


A step-by-step tutorial to deploy machine learning models


Production ML Deployment Architecture
A practical guide to selecting deployment architectures, infrastructure tools, and serving strategies for production ML systems.
Machine learning model deployment is the process of making trained ML models available in real-world applications so they can generate predictions from live data. While building a model is important, deployment is what allows businesses to use AI in production systems such as recommendation engines, fraud detection platforms, chatbots, predictive analytics tools, and automation workflows.
However, deploying machine learning models is often more challenging than training them. Production environments require scalability, low-latency inference, monitoring, security, and continuous updates to ensure models remain accurate over time. In this guide, we will explain how machine learning deployment works, deployment architectures, tools, best practices, challenges, and modern production strategies used in 2026.
Why Deploying ML Models Is More Complex Than Training Them
If you've only ever trained models, deployment will feel like entering a different profession. Here's what actually makes it hard.
The Notebook-to-Production Gap
Model development and production deployment operate under completely different constraints. Everything before deployment, experimentation, tuning, and validation is optimized for exploration and iteration. But once a model moves into production, the focus shifts to reliability, scalability, latency, and real-world performance. Jupyter notebooks are built for experimentation, not for serving 10,000 requests per day.
They have no concept of HTTP endpoints, concurrency, retries, authentication, or graceful failure. Everything that makes notebooks great for experimentation makes them wrong for production.
The Biggest Challenges in Production ML Deployment
1. Dependency hell
Your model was trained on Python 3.9, NumPy 1.23, and scikit-learn 1.1.2. Your production server runs Python 3.11 and the latest everything. Subtle numerical differences, deprecated APIs, and changed default behaviors can silently alter your model's output without throwing a single error.
2. No reproducibility
If you can't deterministically rebuild your training environment, you can't safely retrain, debug, or roll back. Hardcoded file paths, untracked random seeds, and unpinned dependencies all destroy reproducibility.
3. Preprocessing mismatch
This is the most common silent killer. The way your data gets prepared before it reaches the model during training has to be replicated exactly in production, same scaling, same encoding, same imputation, the model runs, and nobody notices the predictions are wrong.StandardScaler().fit_transform(X_train).
Your inference code forgot to apply the scaler, or worse, applies a scaler fitted on the wrong data. The model runs, returns predictions, and nobody notices they're wrong for three weeks.
4. Silent degradation
Models don't always fail with an error. They fail by becoming gradually less accurate as the real world drifts away from the data they trained on. A fraud detection model trained in January may be quietly underperforming by July. Without monitoring, you won't know.
5. Latency vs accuracy tradeoff
A deep ensemble with 200 trees might hit 97% accuracy, but takes 800ms per prediction. If your use case requires sub-100ms response times (real-time recommendations, fraud checks at checkout), a slower, more accurate model is worse than a faster approximate one.
6. No monitoring
A 2025 ACM Queue study found that approximately half of ML practitioners do not monitor their deployed models. That means they have no visibility into drift, degradation, or failure until a user complains or a business metric tanks.
Example: A team deployed a classification model to production. It received null values in one feature column, a scenario that never appeared in training data. The model didn't error. It just returned garbage predictions silently for 23 days before anyone noticed a business metric declining.
Types of Machine Learning Deployment

Different machine learning systems require different deployment approaches depending on business requirements, latency expectations, infrastructure complexity, and data processing needs. Choosing the right deployment type helps improve performance, cost efficiency, and user experience in production environments.
Real-Time (Online) Inference
Real-time inference allows machine learning models to generate predictions instantly whenever new data is received. The model is usually deployed through APIs or inference servers so applications can process requests with very low latency.
This deployment type is commonly used in fraud detection systems, recommendation engines, AI assistants, dynamic pricing platforms, and real-time personalization, where immediate predictions are critical for the user experience.
This deployment approach is best when applications require instant responses and continuous prediction requests. It typically uses tools and technologies such as FastAPI, Flask, TensorFlow Serving, TorchServe, Docker, Kubernetes, and cloud inference services like AWS SageMaker or Vertex AI.
Batch Inference
Batch inference processes large datasets at scheduled intervals instead of generating predictions in real time. It helps organizations run machine learning workloads more cost-effectively by processing predictions in bulk.
This deployment type is widely used for customer churn prediction, sales forecasting, inventory planning, financial reporting, and large-scale analytics systems where immediate predictions are not necessary.
Batch deployment is useful when businesses need predictions periodically rather than continuously. It is commonly implemented using Apache Spark, Airflow, Databricks, Hadoop, AWS Batch, and scheduled cloud pipelines that automate large-scale data processing workflows.
Streaming Inference
Streaming inference continuously processes real-time event data and generates predictions as events occur. Unlike batch systems, streaming deployment allows machine learning models to analyze live data streams without waiting for scheduled processing windows.
This approach is commonly used in cybersecurity monitoring, fraud analytics, IoT systems, operational intelligence platforms, and real-time sensor analytics.
Streaming deployment is ideal when businesses need continuous event processing with low-latency predictions at scale. Common tools used for streaming ML systems include Apache Kafka, Apache Flink, Spark Streaming, Redis Streams, Kubernetes, and event-driven cloud architectures.
Edge Deployment
Edge deployment runs machine learning models directly on local devices instead of cloud servers. Predictions happen on-device, which reduces internet dependency, lowers latency, and improves privacy because sensitive data does not need to leave the device.
This deployment approach is widely used in autonomous vehicles, mobile AI applications, smart cameras, wearable devices, and industrial IoT systems.
Edge deployment is best when applications require offline functionality, ultra-low latency, or limited cloud connectivity. It commonly uses technologies such as TensorFlow Lite, ONNX Runtime, NVIDIA Jetson, Core ML, OpenVINO, and embedded AI accelerators optimized for local inference.
Embedded Deployment
Embedded deployment integrates machine learning models directly into firmware, hardware systems, or embedded software environments. These systems are designed to operate in constrained environments with limited computing power, memory, and storage while still delivering intelligent functionality.
Embedded ML is commonly used in robotics, medical devices, manufacturing equipment, automotive systems, and smart electronics. This deployment approach is used when AI capabilities need to be tightly integrated into hardware systems with minimal external dependencies.
Common technologies include TinyML frameworks, TensorFlow Lite Micro, Edge Impulse, ARM Cortex processors, FPGA-based AI systems, and specialized AI chips designed for embedded environments.
Understanding ML Deployment Strategies
Deploying a machine learning model into production is not just about launching a new version. Teams also need a safe rollout strategy that minimizes downtime, reduces deployment risk, and protects user experience.
Modern ML systems use deployment strategies that allow organizations to test, validate, monitor, and scale new models gradually before full production adoption.
Different deployment strategies are used depending on infrastructure complexity, business risk, traffic volume, and model sensitivity.
1. Blue/Green Deployment
Blue/Green deployment uses two identical production environments. One environment runs the current production model while the second environment hosts the new model version. Once the new deployment is validated, traffic is instantly switched from the old environment to the new one.
This strategy helps reduce downtime and allows fast rollback if issues occur after deployment. It is commonly used in enterprise AI systems, high-availability applications, and critical production environments where service interruptions are unacceptable.
Blue/Green deployment is best when organizations need safe releases with instant rollback capabilities. It is commonly implemented using Kubernetes, Docker, AWS ECS, load balancers, and cloud deployment orchestration tools.
2. Canary Deployment
Canary deployment gradually releases the new model to a small percentage of users before expanding traffic to the full system. Teams usually start by routing 5–10% of requests to the updated model while monitoring latency, prediction quality, error rates, and system stability.
This strategy helps identify problems early without affecting the entire user base. It is widely used in recommendation systems, personalization engines, AI APIs, and customer-facing applications where deployment risk must be controlled carefully.
Canary deployment is ideal when organizations want gradual rollouts with real-world validation before full deployment. Common tools include Kubernetes, Istio, Argo Rollouts, AWS SageMaker, and service mesh infrastructure.
3. Shadow Deployment
Shadow deployment runs the new model silently alongside the production model without impacting actual users. The new system receives live production traffic, but its predictions are only logged and analyzed instead of being shown to users.
This strategy allows teams to compare model behavior under real production conditions before enabling live predictions. It is commonly used in fraud detection systems, financial AI platforms, healthcare applications, and high-risk machine learning environments.
Shadow deployment is best when prediction accuracy and production reliability must be validated extensively before release. Organizations often use Kafka, event streaming systems, Kubernetes, ML observability tools, and logging pipelines to support shadow deployments.
4. A/B Testing
A/B testing splits traffic between two or more machine learning models to compare performance directly in production. Different user groups receive predictions from different models, allowing teams to measure engagement, conversion rates, accuracy, or business outcomes.
This strategy helps organizations optimize models based on real-world user behavior instead of offline evaluation metrics alone. It is widely used in ecommerce platforms, recommendation engines, advertising systems, and AI-driven personalization products.
A/B testing is useful when teams need data-driven comparison between multiple model versions before selecting the best-performing deployment. Common tools include Optimizely, LaunchDarkly, Kubernetes, feature flag systems, and experimentation platforms.
5. Rolling Deployment
Rolling deployment gradually updates production infrastructure instance by instance instead of replacing the entire environment at once. As older instances are replaced, traffic continues flowing without major interruptions.
This strategy helps reduce downtime and distribute deployment risk across infrastructure incrementally. It is commonly used in cloud-native ML systems, microservices environments, and Kubernetes-based production deployments.
Rolling deployment works well for scalable applications that require continuous availability during updates. Kubernetes, Docker Swarm, AWS ECS, and CI/CD pipelines are commonly used to automate rolling deployments.
Step by Step Guide to Deploying ML Models in Production
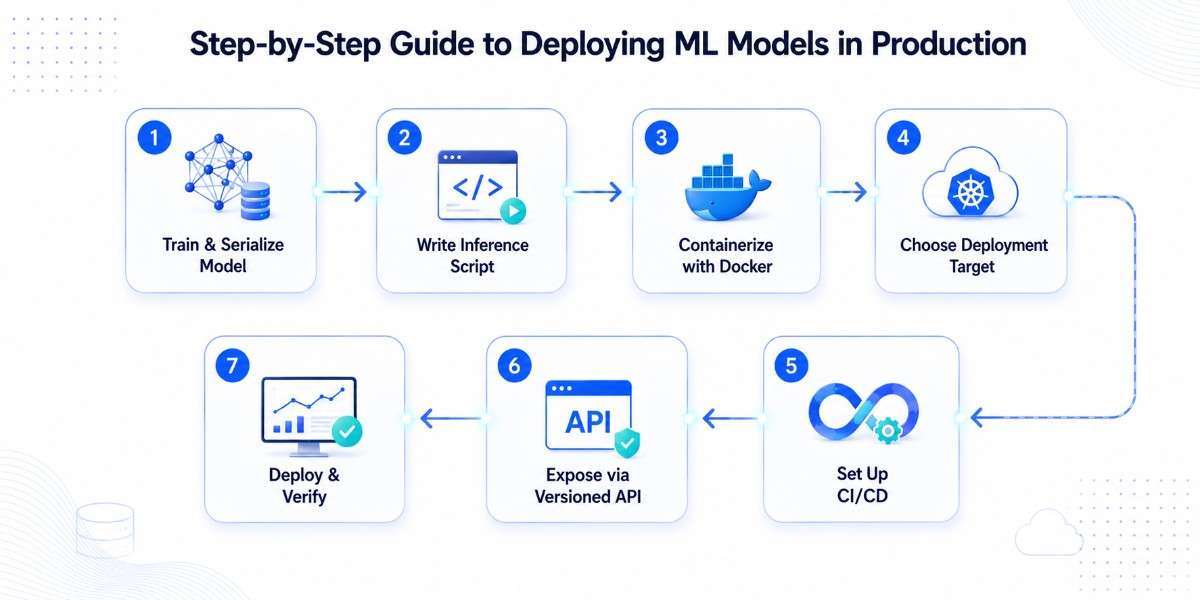
Deploying a machine learning model involves transforming a trained model into a production-ready service that can process live data, generate predictions reliably, and scale efficiently under real-world conditions.
While training focuses on improving model accuracy, deployment focuses on infrastructure, inference performance, scalability, monitoring, and operational reliability. A successful deployment pipeline ensures the model can continuously deliver accurate predictions while handling production workloads securely and efficiently.
Step 1: Train and Serialize Your Model
The deployment process begins after the machine learning model has been trained and validated successfully. Before the model can be used in production, it must be serialized into a portable file format that allows applications and servers to load it without retraining.
Serialization converts the trained model into a reusable artifact that can be transferred across environments, cloud platforms, containers, and deployment pipelines.
Different machine learning frameworks use different serialization formats depending on deployment requirements and infrastructure compatibility. Scikit-learn models are commonly exported using Pickle or Joblib because they are simple to use and work efficiently with NumPy-based objects.
TensorFlow models are usually exported in the SavedModel format because it supports scalable TensorFlow Serving environments and optimized production inference. PyTorch models are typically stored as .pt or .pth files for flexible deep learning deployment workflows.
ONNX has become increasingly popular because it allows models to run across multiple frameworks and hardware environments, making cross-platform inference easier.
Joblib is commonly preferred for Scikit-learn deployments because it handles large numerical arrays efficiently and improves loading performance for production inference systems.
import joblib
from sklearn.ensemble import RandomForestClassifier

model = RandomForestClassifier()
model.fit(X_train, y_train)

joblib.dump(model, "model.joblib")
Choosing the right serialization format is important because it directly affects inference portability, deployment compatibility, infrastructure optimization, and performance.
Step 2: Write Your Inference Script
After the model is exported, the next step is building the inference layer that connects the model to real-world applications. Inference is the process by which the deployed model receives input data, applies preprocessing logic, generates predictions, and returns results to users or systems.
The inference script acts as the operational interface between the machine learning model and production traffic. This layer is responsible for loading the serialized model, validating incoming requests, correctly processing features, generating predictions, and returning responses via APIs or services.
A simple Flask API is often used for lightweight deployments and beginner-friendly applications because it is easy to configure and deploy.
from flask import Flask, request, jsonify
import joblib

app = Flask(__name__)
model = joblib.load("model.joblib")

@app.route("/predict", methods=["POST"])
def predict():
    data = request.json["input"]
    prediction = model.predict([data])
    return jsonify({"prediction": prediction.tolist()})
For larger production systems, FastAPI is increasingly preferred for its asynchronous request handling, faster execution, automatic API documentation, and better scalability under high-traffic conditions.
from fastapi import FastAPI
import joblib

app = FastAPI()
model = joblib.load("model.joblib")

@app.post("/predict")
def predict(data: dict):
    prediction = model.predict([data["input"]])
    return {"prediction": prediction.tolist()}
One of the most critical aspects of inference deployment is ensuring that preprocessing logic exactly matches the training environment.
Any mismatch in feature engineering, normalization, encoding, missing value handling, or data transformation can cause prediction inconsistencies and severe performance degradation in production systems.
Encoding in particular deserves attention; how categorical and other features get encoded during training must carry over exactly into the inference pipeline, including the order of categories and handling of unseen values.
This issue is commonly known as training-serving skew and is one of the most common reasons deployed machine learning models fail after launch.
Step 3: Containerize with Docker
Once the inference layer is ready, the application must be packaged into a consistent runtime environment. Docker helps solve this problem by containerizing the machine learning application along with all required dependencies, libraries, frameworks, and runtime configurations.
Containerization is extremely important in machine learning deployment because development environments often differ from production infrastructure.
A model that works perfectly on a local machine may fail in production due to incompatible package versions, missing libraries, operating system differences, or GPU driver conflicts. Docker eliminates these issues by creating isolated and reproducible environments that behave consistently across systems.
A standard Dockerfile for a Python machine learning application may look like this:
FROM python:3.11

WORKDIR /app

COPY requirements.txt .
RUN pip install -r requirements.txt

COPY . .

CMD ["python", "app.py"]
For deep learning workloads and LLM inference systems, CUDA-enabled Docker containers are commonly used because they provide GPU acceleration for high-performance inference.
GPU containerization has become essential in modern AI infrastructure because transformer models, computer vision systems, and generative AI applications require optimized GPU environments for scalable deployment.
The deployment container can then be built and executed using Docker commands:
docker build -t ml-model-app .
docker run -p 8000:8000 ml-model-app
Docker has become a standard part of modern MLOps pipelines because it improves reproducibility, portability, scalability, and infrastructure consistency across development, staging, and production environments.
Step 4: Choose Your Deployment Target
After containerizing the application, the next step is choosing where the machine learning model will run in production. The deployment environment affects scalability, infrastructure cost, latency, monitoring, and operational complexity. The right choice depends on traffic volume, GPU requirements, engineering resources, and business scale.
Managed Cloud ML Platforms
Platforms such as AWS SageMaker, Google Vertex AI, and Azure Machine Learning provide built-in infrastructure for model serving, autoscaling, monitoring, and GPU-based inference. These platforms simplify deployment and are commonly used for enterprise AI systems, large-scale prediction workloads, and production MLOps pipelines.
Platform-as-a-Service (PaaS) Deployment
Platforms like Heroku, Railway, Render, and Hugging Face Spaces make it easy to deploy machine learning APIs without managing infrastructure directly. They are best suited for prototypes, internal tools, MVPs, and lightweight ML applications that require fast deployment with minimal DevOps overhead.
Self-Hosted Deployment
Self-hosted deployments use VPS infrastructure, Docker containers, Nginx, and cloud virtual machines to run ML systems with full infrastructure control. This approach is useful for organizations that require custom networking, compliance, security configurations, or cost optimization, but it also requires stronger DevOps management.
Kubernetes-Based Deployment
Kubernetes is widely used for scalable machine learning infrastructure because it supports autoscaling, rolling deployments, GPU scheduling, high availability, and multi-model serving. It is ideal for high-traffic AI systems and enterprise-grade deployment pipelines running multiple ML services.
Serverless Deployment
Serverless platforms such as AWS Lambda allow lightweight models to run only when requests are triggered, reducing infrastructure costs for low-traffic workloads. This approach works well for smaller prediction APIs and automation tasks, but is less suitable for large deep learning models or GPU-intensive inference systems due to runtime and memory limitations.
Decision Guide:
Step 5: Set Up CI/CD for Your Model
Once the model is ready for production, the deployment process should be automated using CI/CD pipelines. In machine learning systems, manual deployments often lead to version mismatches, broken dependencies, configuration errors, and unreliable releases.
Automating the deployment workflow helps ensure consistency, faster releases, and safer production updates.
CI/CD pipelines automatically trigger testing, validation, and deployment whenever new code, updated models, or infrastructure changes are pushed to the repository. This allows teams to continuously improve models while reducing deployment downtime and operational errors.
GitHub Actions is commonly used to automate ML deployment workflows:
# .github/workflows/deploy.yml
name: Deploy ML Model

on:
  push:
    branches: [main]

jobs:
  deploy:
    runs-on: ubuntu-latest
    steps:
      - uses: actions/checkout@v3

      - name: Run inference smoke test
        run: |
          pip install -r requirements.txt
          python tests/smoke_test.py

      - name: Build Docker image
        run: docker build -t mymodel:${{ github.sha }} .

      - name: Push to registry
        run: |
          echo ${{ secrets.REGISTRY_PASSWORD }} | docker login -u ${{ secrets.REGISTRY_USER }} --password-stdin
          docker push myregistry/mymodel:${{ github.sha }}

      - name: Deploy to production
        run: |
          # Replace with your cloud CLI command
          # e.g.: gcloud run deploy mymodel --image myregistry/mymodel:${{ github.sha }}
In production ML systems, model versioning is equally important because teams need to track datasets, experiments, feature pipelines, and deployed model versions. Tools such as MLflow and DVC help maintain reproducibility and make it easier to compare model performance or roll back failed deployments.
Before deployment, the CI/CD pipeline should also run validation checks to ensure the model is production-ready. These checks typically verify schema compatibility, feature consistency, inference quality, API functionality, and infrastructure stability. Automated testing helps prevent broken models from reaching production and improves deployment reliability.
Step 6: Expose via Versioned API
Your model isn't just for you. Other services, apps, and teams will consume it. Design your API accordingly.
API design principles:
- Always version your endpoints:
/v1/predictnot/predict. When v2 ships, v1 stays alive, so existing consumers don't break. - Return consistent, structured responses every time, including the model version, a request ID for tracing, and latency.
- Reject bad inputs with a clear 400 error before the input ever touches the model.
- Add a
/healthendpoint - load balancers, Kubernetes probes, and monitoring all depend on it.
Response format to standardize on:
{
  "prediction": 1,
  "confidence": 0.9234,
  "model_version": "v1.3.2",
  "request_id": "f47ac10b-58cc-4372-a567-0e02b2c3d479",
  "latency_ms": 23.4
}
Authentication, for any model exposed externally:
from fastapi import Header, HTTPException
import os

API_KEY = os.environ['API_KEY']  # Never hardcode

def verify_api_key(x_api_key: str = Header(...)):
    if x_api_key != API_KEY:
        raise HTTPException(status_code=401, detail="Invalid API key")
Step 7: Deploy and Verify
Once the machine learning model is deployed, the next step is validating that the service works correctly in the production environment. This stage focuses on checking API availability, inference reliability, latency, and deployment stability before routing full production traffic to the model.
The first step is creating a health check endpoint that allows monitoring systems and load balancers to verify whether the application is running properly.
from fastapi import FastAPI

app = FastAPI()

@app.get("/health")
def health():
    return {"status": "healthy"}
After deployment, teams should run smoke tests using predefined sample inputs to confirm that the model loads correctly and returns expected predictions. This helps detect issues such as failed dependencies, incorrect pre-processing pipelines, broken API responses, or serialization mismatches.
import requests

sample_input = {
    "input": [25, 50000, 3]
}

response = requests.post(
    "http://localhost:8000/predict",
    json=sample_input
)

print(response.json())
Once the deployment is verified, the system should be monitored continuously for inference latency, API failures, memory usage, GPU utilization, and abnormal prediction behavior. Monitoring is critical because production data changes over time, which can reduce model accuracy even if the infrastructure remains stable.
Modern ML systems also configure rollback triggers that automatically revert deployments if critical metrics degrade after release. Common rollback indicators include increasing API error rates, failed health checks, high latency spikes, infrastructure instability, or abnormal prediction outputs.
In production environments, deployment verification is not a one-time task. Machine learning systems require continuous validation, monitoring, and performance tracking to ensure long-term reliability and prediction quality.
Popular Tools for Machine Learning Deployment
Modern machine learning deployment involves multiple layers, including model serving, infrastructure orchestration, monitoring, feature management, and deployment automation. Different tools solve different parts of the ML deployment lifecycle, and choosing the right stack depends on the scale of the application, infrastructure complexity, and production requirements.
Model Serving Tools
TensorFlow Serving
TensorFlow Serving is widely used for deploying TensorFlow models in production environments. It supports high-throughput inference, model versioning, and scalable API serving, making it suitable for enterprise AI systems, recommendation engines, and large-scale prediction workloads built on TensorFlow.
TorchServe
TorchServe is designed specifically for serving PyTorch models and is commonly used in deep learning applications, computer vision systems, and NLP inference pipelines. It supports GPU acceleration, multi-model serving, and REST APIs, which makes it useful for production deep learning deployments.
BentoML
BentoML helps package machine learning models into production-ready APIs with built-in support for Docker and Kubernetes. It works with multiple ML frameworks and is commonly used for deploying lightweight ML APIs, startup applications, and scalable inference services without managing complex infrastructure manually.
MLflow
MLflow fits into deployment workflows through experiment tracking, model versioning, and deployment management. Teams commonly use MLflow to track training runs, manage model artifacts, and maintain reproducible deployment pipelines across production environments.
Container & Orchestration Tools
Docker
Docker is one of the most important tools in machine learning deployment because it packages the model, dependencies, libraries, and runtime environment into portable containers. This helps ensure the application runs consistently across local, staging, and production environments.
Kubernetes
Kubernetes is used for orchestrating and scaling containerized ML workloads. It supports autoscaling, rolling deployments, GPU scheduling, high availability, and multi-model serving, making it the standard choice for large-scale AI infrastructure and enterprise MLOps systems.
Cloud ML Platforms
AWS SageMaker
AWS SageMaker provides managed infrastructure for model training, deployment, monitoring, and GPU inference. It is commonly used for enterprise-grade machine learning systems that require scalable production deployment and integrated MLOps workflows.
Google Vertex AI
Google Vertex AI combines model deployment, pipeline orchestration, experiment tracking, and generative AI infrastructure into a unified platform. It is widely used for LLM applications, modern AI pipelines, and scalable cloud-native ML systems.
Azure Machine Learning
Azure Machine Learning integrates closely with the Microsoft ecosystem and provides tools for model serving, deployment automation, monitoring, and enterprise security management. It is commonly used in business applications and enterprise AI environments already built on Azure infrastructure.
Monitoring Tools
Evidently AI
Evidently AI is used for monitoring machine learning model performance, detecting data drift, and validating prediction quality in production systems. It helps teams identify when deployed models begin degrading due to changes in real-world data patterns.
WhyLabs
WhyLabs focuses on ML observability and production monitoring. It helps monitor feature distributions, prediction anomalies, data quality issues, and model drift across large-scale machine learning systems.
Prometheus
Prometheus is commonly used for infrastructure and application monitoring in ML deployments. It tracks metrics such as API latency, CPU usage, memory consumption, GPU utilization, and service uptime, especially in Kubernetes-based environments.
Feature Stores
Feast
Feast is one of the most widely used feature stores for machine learning systems. It helps maintain consistency between training and production data by managing reusable features centrally. Feast is commonly used in recommendation systems, fraud detection platforms, and real-time ML pipelines where feature consistency is critical.
CI/CD & MLOps Automation Tools
GitHub Actions
GitHub Actions is commonly used to automate CI/CD workflows for machine learning deployments. It helps trigger testing, validation, container builds, and deployment pipelines whenever code or models are updated.
ArgoCD
ArgoCD is a Kubernetes-native continuous delivery tool used for automated deployment management in cloud-native ML infrastructure. It is commonly used in GitOps-based deployment workflows and enterprise Kubernetes environments.
Kubeflow
Kubeflow supports end-to-end ML pipeline orchestration, including training, deployment, workflow automation, and scalable infrastructure management. It is best suited for organizations managing complex machine learning workflows across Kubernetes clusters.
How LLM and Generative AI Deployment Work
Deploying large language models and generative AI systems is very different from deploying traditional machine learning models.
Classical ML models usually process structured inputs and generate lightweight predictions, while LLM deployments handle massive transformer models, GPU-intensive inference workloads, token generation pipelines, and high-concurrency user traffic.
Modern AI applications also require retrieval systems, vector databases, streaming responses, and inference optimization layers to maintain low latency and scalable performance in production environments.
GPU Inference Infrastructure
Large language models require GPU-based inference because models with billions of parameters cannot run efficiently on standard CPU infrastructure.
Production AI systems commonly use NVIDIA GPUs such as A100, H100, and L40S for high-throughput inference and optimized transformer execution. GPU inference servers are responsible for loading models into memory, managing concurrent requests, and generating tokens in real time.
Modern deployment environments also use orchestration systems such as Kubernetes to manage autoscaling, GPU scheduling, and distributed inference workloads. Frameworks such as vLLM and Hugging Face Text Generation Inference (TGI) are widely used because they optimize token throughput, batching efficiency, and GPU memory utilization for production LLM serving.
Vector Databases and Retrieval Systems
Most production GenAI systems now use vector databases to retrieve contextual information dynamically during inference. Instead of relying only on pretrained model knowledge, AI systems convert text into embeddings and store them in vector databases for semantic search and retrieval.
Platforms such as Pinecone, Weaviate, Milvus, and pgvector are commonly used in enterprise AI systems, recommendation engines, document retrieval pipelines, and AI search applications. These databases allow the model to retrieve contextually relevant information during inference, which improves response accuracy and reduces hallucinations.
RAG Pipelines
Retrieval-Augmented Generation (RAG) has become one of the most widely used AI architectures for deploying enterprise AI systems in 2026. In a RAG pipeline, the user query is converted into embeddings, relevant documents are retrieved from a vector database, and the retrieved context is injected into the LLM before response generation.
This architecture helps AI systems access real-time business data, internal documentation, and external knowledge sources without retraining the model continuously. RAG pipelines are now commonly used in enterprise chatbots, AI assistants, customer support systems, and knowledge retrieval platforms because they improve factual accuracy and response relevance.
Token Streaming and Real-Time Inference
Modern LLM deployments use token streaming to improve response speed and user experience. Instead of waiting for the full response to complete, the model streams tokens incrementally as they are generated. This creates a faster and more interactive experience for users, especially in conversational AI systems and coding assistants.
Streaming inference has become a standard requirement in chatbots, copilots, AI search systems, and real-time generative AI applications where perceived latency directly affects usability and engagement.
Model Quantization
LLM deployment is extremely expensive because large models consume high GPU memory and computational resources continuously. LLMs push GPU memory limits in both directions. During training, techniques like gradient accumulation allow larger effective batch sizes without exceeding VRAM; during inference, quantization solves the same constraint from the deployment side.
Quantization helps reduce infrastructure cost by compressing model weights into lower precision formats such as INT8 and INT4 while maintaining acceptable inference quality.
Quantized models require less VRAM, reduce inference cost, and improve deployment efficiency for edge devices, local AI systems, and production GPU environments. Frameworks such as TensorRT-LLM, llama.cpp, and AWQ are commonly used for optimized quantized inference in modern generative AI systems.
Inference Optimization
Inference optimization has become a critical part of production LLM deployment because GPU inefficiencies directly increase latency and infrastructure cost. Modern inference systems use techniques such as dynamic batching, KV-cache optimization, tensor parallelism, and speculative decoding to improve throughput and reduce response time.
vLLM has become one of the most widely adopted inference engines because it improves token generation performance through optimized attention caching and request scheduling. Hugging Face TGI is also commonly used for scalable transformer inference with built-in support for batching and streaming.
These optimization techniques help organizations serve larger models more efficiently while reducing GPU overhead and operational cost.
AI Gateways and Model Routing
Enterprise AI systems increasingly use AI gateways to manage authentication, request routing, rate limiting, logging, and model orchestration. Instead of exposing inference endpoints directly, AI gateways act as a centralized control layer between applications and deployed models.
Understanding which components belong at which layer, the model, the gateway, the retrieval system, and the caching layer, is really a question of how the overall generative AI stack fits together, and getting that picture right before optimizing individual pieces saves a lot of re-architecture later.
This architecture helps organizations manage multiple LLMs, embedding models, and inference pipelines from a single layer while improving observability, security, and traffic management across production AI systems.
Caching and Cost Optimization
Caching has become essential in large-scale LLM deployment because repeated inference requests significantly increase GPU utilization and infrastructure cost. Modern AI systems use semantic caching, prompt caching, and response caching to reduce redundant inference operations and improve response speed.
Caching layers are especially useful in AI copilots, enterprise search systems, and customer support applications where similar prompts are processed repeatedly. Effective caching strategies help reduce latency, improve throughput, and lower operational cost in production generative AI environments.
The Most Common ML Deployment Errors and How to Avoid Them
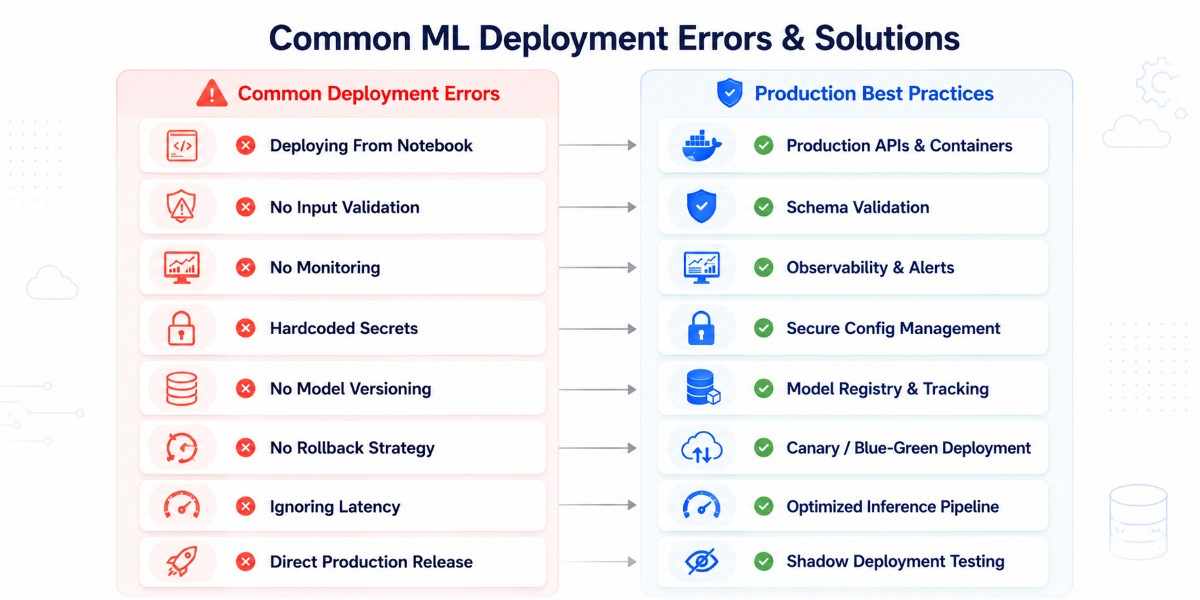
Many machine learning projects fail not because the model is inaccurate, but because the deployment process is poorly designed. Production ML systems require reliability, reproducibility, monitoring, scalability, and infrastructure planning. Even highly accurate models can fail in real-world environments if deployment best practices are ignored.
Deploying Directly From a Jupyter Notebook
One of the most common mistakes is deploying models directly from notebooks without converting them into reproducible production pipelines. Jupyter notebooks are useful for experimentation, but they are not designed for scalable deployment, dependency management, or infrastructure automation.
This often leads to inconsistent environments, broken dependencies, and deployment failures when the model moves from local development to production infrastructure.
The better approach is to separate training, preprocessing, inference, and deployment logic into modular production-ready services using APIs, Docker containers, and version-controlled deployment pipelines.
Skipping Input Validation
Many production ML systems fail because incoming data does not match the format used during training. Invalid schema structures, missing values, incorrect feature types, or unexpected user inputs can break inference pipelines or generate inaccurate predictions.
Production deployments should validate incoming requests before inference by checking feature types, schema consistency, value ranges, and missing fields.
Proper input validation improves prediction reliability, prevents inference failures, and protects the deployment pipeline from unstable production data.
Deploying Without Monitoring
A deployed model can silently degrade over time due to changing user behavior, data drift, or infrastructure instability. Without monitoring, teams often have no visibility into latency spikes, prediction failures, declining accuracy, or abnormal inference behavior.
Production systems should continuously monitor latency, API failures, prediction quality, infrastructure usage, and data drift using tools such as Prometheus, Grafana, Evidently AI, and WhyLabs. Continuous monitoring helps detect deployment issues early and improves long-term production reliability.
Hardcoding Secrets and File Paths
Hardcoding API keys, database credentials, or local file paths directly into deployment code creates major security and portability issues. It matters even more when the deployed model operates in a security-critical environment, such as systems that are built for threat detection, anomaly monitoring, etc., because a poorly configured deployment can expose far more than just the model endpoint.
These configurations often fail when applications move between local, staging, and production environments, and they increase the risk of credential exposure.
Production deployments should use environment variables, secret managers, and centralized configuration systems instead of hardcoded values. This improves deployment security, infrastructure flexibility, and environment portability across production workflows.
Not Versioning Model Artifacts
Overwriting deployed models without maintaining proper version history makes it difficult to compare experiments, debug failures, or roll back unstable deployments.
Without model versioning, teams lose visibility into which datasets, training runs, or preprocessing pipelines produced the active model.
Using tools such as MLflow, DVC, and model registries helps maintain reproducible deployment pipelines with proper version tracking for datasets, models, and configurations. This improves traceability, rollback management, and deployment reliability.
Deploying Without a Rollback Plan
Production deployments can fail due to infrastructure issues, unstable predictions, latency spikes, or unexpected traffic patterns. Without rollback mechanisms, failed deployments can remain active and negatively impact users and business operations for extended periods.
Modern deployment pipelines should include automated rollback triggers based on failed health checks, rising error rates, prediction anomalies, or latency degradation. Strategies such as canary deployment and blue/green deployment help reduce deployment risk and improve recovery speed.
Ignoring Latency Budgets
A highly accurate model is not useful if inference is too slow for production use. Many teams optimize only for accuracy during training while ignoring real-world latency requirements.
Real time systems such as fraud detection, recommendation engines, AI assistants, and search applications require low-latency inference to maintain usability and user experience.
Latency optimization techniques such as batching, caching, quantization, GPU acceleration, and optimized inference frameworks help reduce response time while maintaining scalability.
Skipping Shadow Deployment
Deploying a new model directly into production without testing it against real traffic is a major deployment risk. Even if offline evaluation metrics look strong, production behavior may differ significantly due to live data patterns and infrastructure conditions.
Shadow deployment allows teams to run the new model alongside the existing production system without affecting users. This helps validate prediction quality, latency, infrastructure stability, and inference behavior before routing live traffic to the new deployment.
Shadow deployments are widely used in enterprise AI systems because they reduce deployment risk and improve production reliability.
Best Practices for Managing ML Models
Successful machine learning deployment requires more than just serving predictions through an API. Production ML systems must be reliable, scalable, reproducible, and easy to maintain over time. Following deployment best practices helps reduce infrastructure failures, improve prediction stability, and simplify long-term model management in production environments.
Use CI/CD Pipelines for Automated Deployment
Manual deployment workflows increase the risk of broken dependencies, configuration mismatches, and unstable releases. CI/CD pipelines help automate testing, validation, container builds, and deployment workflows whenever code, infrastructure, or models are updated.
Automated deployment pipelines improve consistency and reduce operational errors while enabling faster and safer production releases. Tools such as GitHub Actions, GitLab CI/CD, Jenkins, and ArgoCD are commonly used in modern ML deployment environments.
Implement Rollback Systems
Production deployments can fail due to latency spikes, infrastructure instability, inaccurate predictions, or failed configurations. Without rollback mechanisms, unstable models can remain active and impact users or business operations.
Rollback systems allow teams to revert quickly to a previous stable deployment when critical metrics degrade. Modern ML infrastructure often uses automated rollback triggers based on failed health checks, increasing API errors, or abnormal prediction behavior.
Use Canary Deployment for Safer Releases
Canary deployment helps reduce deployment risk by routing a small percentage of production traffic to the new model before a full rollout. This allows teams to monitor latency, prediction quality, and infrastructure behavior under real-world conditions without affecting the entire user base.
Canary deployments are commonly used in customer-facing AI systems where deployment stability and gradual validation are important.
Validate Models with Shadow Deployment
Shadow deployment allows the new model to run alongside the production system without exposing predictions to users directly. The deployment receives real production traffic while teams compare prediction quality, inference performance, and infrastructure behavior in the background.
This approach helps identify production issues early and reduces the risk of deploying unstable models directly into live environments.
Use A/B Testing for Model Comparison
A/B testing helps compare multiple model versions in production by splitting traffic across different deployments. This allows organizations to evaluate models using real-world user behavior instead of relying only on offline evaluation metrics.
A/B testing is widely used in recommendation systems, personalization engines, search ranking systems, and AI-driven customer experiences where business impact must be measured continuously.
Maintain Proper Model Versioning
Production ML systems should version models, datasets, feature pipelines, and deployment configurations consistently. Without versioning, teams cannot reproduce experiments, debug failures, or roll back unstable deployments effectively.
Tools such as MLflow, DVC, and model registries help maintain deployment traceability and improve reproducibility across production workflows.
Ensure Feature Engineering Consistency
One of the most common deployment failures occurs when preprocessing logic differs between training and production environments. Even small inconsistencies in feature encoding, normalization, or missing value handling can significantly reduce prediction accuracy.
Production systems should use centralized preprocessing pipelines and feature stores to maintain consistency between training data and live inference environments.
Use a Centralized Model Registry
A model registry provides centralized management for trained models, deployment stages, metadata, and version history. It helps teams track which models are in staging, production, or archived environments while simplifying deployment approvals and rollback management.
Model registries improve collaboration across ML engineering, DevOps, and data science teams while making deployment workflows easier to manage at scale.
Prioritize Reproducibility
Reproducibility is critical for debugging, auditing, retraining, and maintaining production ML systems. Teams should be able to recreate training runs, deployment environments, preprocessing pipelines, and inference behavior consistently across environments.
Containerization, version-controlled pipelines, experiment tracking, and infrastructure automation help maintain reproducible deployment workflows and reduce operational inconsistencies.
Establish Governance and Compliance Controls
Enterprise AI systems require governance frameworks to manage security, compliance, auditability, and responsible AI practices. Production deployments should include access control, logging, model approval workflows, and monitoring policies to ensure deployment transparency and regulatory compliance.
Governance becomes especially important in industries such as healthcare, finance, insurance, and enterprise SaaS where AI systems process sensitive business or customer data.
Conclusion
Machine learning deployment is no longer just about putting a trained model behind an API. Modern production systems require scalable infrastructure, reliable inference pipelines, monitoring, versioning, deployment automation, and continuous optimization to ensure models perform effectively in real-world environments. From traditional ML systems to large language models and generative AI applications, successful deployment depends on choosing the right architecture, tools, deployment strategies, and monitoring workflows based on business and technical requirements. Organizations that invest in production-ready ML infrastructure, observability, and deployment best practices are better positioned to build scalable, reliable, and cost-efficient AI systems that deliver long-term business value.
 WhatsApp
 Call Us
 Mail Us