


How to Develop a Mobile App with Flutter From Scratch


What is Flutter?
Flutter is Google's powerful toolkit that lets developers create beautiful mobile apps for both iPhone and Android using a single set of code. Initially launched in May 2017, with its first stable version 1.0 released in December 2018, Flutter has grown to become one of the most popular frameworks for mobile development.
Instead of building separate apps for each platform, Flutter lets you write once and run everywhere, making collaboration easier for distributed mobile app teams working on a shared codebase. What makes Flutter special is its rich collection of pre-built components (called widgets) that make your app look stunning right from the start. Plus, it uses Dart, a friendly programming language that's easier to learn than many alternatives. Companies like Google Pay, BMW, and eBay trust Flutter for their apps because it's fast, reliable, and helps get apps to market quickly.
Advantages of Flutter
Flutter Setup
Before installing Flutter, let's look at the system requirements for different operating systems.
System Requirements
Windows
.png)
Linux
-1.png)
mac OS
.png)
📝 Note: Check out Flutter's official website for the most up-to-date system requirements. Requirements might change as Flutter evolves, so it's always good to verify there!
Install Flutter
I've added links to Flutter's official installation guide for each operating system below. The steps are clearly explained there.
After installation is complete, let's run `flutter doctor` once. Following is the output for the command we just ran.
[✓] Flutter (Channel stable, 3.3.0, on Ubuntu 20.04.5 LTS 5.15.0-46-generic, locale en_US.UTF-8)
    • Flutter version 3.3.0 at /home/user/flutter
    • Upstream repository https://github.com/flutter/flutter.git
    • Framework revision 1234567890 (2 weeks ago), 2023-10-01 12:00:00 -0700
    • Engine revision 1234567890
    • Dart version 2.18.0

[✓] Android toolchain - develop for Android devices
    • Android SDK at /home/user/Android/Sdk
    • Platform android-31, build-tools 31.0.0
    • ANDROID_HOME = /home/user/Android/Sdk
    • Java binary at: /usr/bin/java
    • Java version: OpenJDK Runtime Environment (build 11.0.11+9-Ubuntu-0ubuntu2)

[✓] Chrome - develop for the web
    • Chrome at /usr/bin/google-chrome

[✓] Linux toolchain - develop for Linux desktop
    • clang version 12.0.0
    • cmake version 3.16.3
    • ninja version 1.10.0

[✓] Android Studio (version 2021.2)
    • Android Studio at /home/user/AndroidStudio
    • Flutter plugin can be installed from:
      https://plugins.jetbrains.com/plugin/9215-flutter
    • Dart plugin can be installed from:
      https://plugins.jetbrains.com/plugin/6351-dart

[✓] VS Code (version 1.60.0)
    • VS Code at /usr/share/code
    • Flutter extension version 3.30.0

[✓] Connected device (2 available)
    • Chrome • chrome • web-javascript • Google Chrome 94.0.4606.61
    • Linux • linux • linux-x64 • Linux

• No issues found!
Creating our Flutter App
To start creating our app, open the command-line interface of your choice and run this command.
flutter create hello_worldWhile the command is running, let’s take a moment to go through each part and understand what it does.
- flutter: This is the Flutter CLI (command-line interface) command. Flutter is a UI toolkit that enables developers to build natively compiled mobile, web, and desktop applications from a single codebase.
- create: This command instructs the Flutter CLI to create a new project and sets up all the necessary files and folders for a new Flutter app.
- hello_world: This is the name of the new project folder. Flutter will create a folder called "hello_world" containing the files for the new Flutter project. You can replace this with any name you want for your project.
📝 Note: In Flutter, there are specific naming conventions for project names to ensure compatibility and consistency. Here are the main guidelines:
Lowercase Letters Only: Use only lowercase letters in the project name.
Underscores for Word Separation: Use underscores (
_) instead of spaces or hyphens to separate words. For example,my_flutter_app.No Special Characters: Avoid any special characters (like
!,@,#,-, etc.) or spaces in the project name. Stick to letters and underscores.Start with a Letter: The project name should start with a letter (not a number or underscore).
Avoid Reserved Words: Do not use Dart or Flutter reserved words like
class,void, orimportas project names.
Now, let's open our Flutter project. If you're using VS Code, you can use the following command to open it.
code hello_world/.png)
Let's take a quick overview of the main files and folders you’ll find in a new Flutter project:
Project Root
- android/: Contains Android-specific files, such as
build.gradle, for building and customizing the Android app. - ios/: Contains iOS-specific files, including configuration for building and customizing the iOS app.
- lib/: The main folder for your Dart code. By default, it includes:
- test/: Holds the testing files for your Flutter app. Includes a sample test file (
widget_test.dart) to help you start with unit testing.
Configuration Files
- pubspec.yaml: The configuration file for managing dependencies, assets, and metadata for your Flutter app.
- analysis_options.yaml (optional): Used to define custom linting rules and coding standards for the project.
- README.md: A Markdown file where you can describe your project and document instructions or information about the project.
Build and Metadata
- .gitignore: Specifies which files and directories Git should ignore (often includes build files, caches, etc.).
- .metadata: Stores metadata for Flutter tools (not usually modified manually).
- .packages: Used by Dart to map package names to their locations in the
.pub-cache. - .idea/ or vscode/ (optional): Configuration files for development environments like Android Studio (IntelliJ) or VS Code.
- build/: Automatically generated folder where Flutter compiles the app code (created when you build the project).
Platform-Specific Files
- web/: Contains files required to run the app on the web (if web support is enabled).
- windows/, linux/, macos/: Folders for building the app on desktop platforms (if desktop support is enabled).
Writing Your First Flutter App
Open the lib/main.dart file and replace its content with the following code to set up a basic Flutter application:
import 'package:flutter/material.dart';

void main() {
  runApp(MyApp());
}

class MyApp extends StatelessWidget {
  @override
  Widget build(BuildContext context) {
    return MaterialApp(
      title: 'Hello World',
      theme: ThemeData(
        primarySwatch: Colors.blue,
      ),
      home: MyHomePage(),
    );
  }
}

class MyHomePage extends StatelessWidget {
  @override
  Widget build(BuildContext context) {
    return Scaffold(
      appBar: AppBar(
        title: Text('Home Page'),
      ),
      body: Center(
        child: Text(
          'Hello, Flutter!',
          style: TextStyle(fontSize: 24),
        ),
      ),
    );
  }
}
Running the App
To run the app on an emulator or a physical device, use the following command:
flutter runThe following will be the output of the code :

Visual explanation of the code execution :
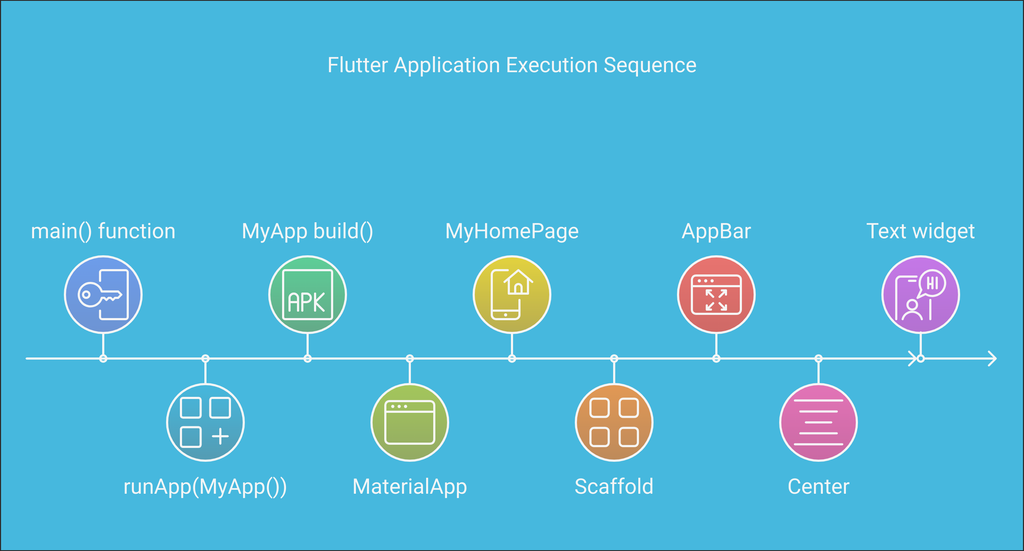
main() function
- The execution of every Flutter app begins with the
main()function. - This is the entry point of the Flutter application.
- The execution of every Flutter app begins with the
runApp(MyApp())
- The
runAppfunction takes the root widget (MyApp) and attaches it to the screen. - This initializes the Flutter framework and starts the rendering pipeline.
- The
MyApp build()
- The
build()method of the root widget (MyApp) is called. - This method defines the initial structure of the app.
- The
MaterialApp
- A
MaterialAppwidget is created. - It provides essential functionalities like theme, routing, and navigation.
- A
MyHomePage
MyHomePageis a widget defined to act as the app's home screen.- It serves as the primary page displayed when the app starts.
Scaffold
- The
Scaffoldwidget is used to provide a structure to the visual interface. - It includes app bars, drawers, and floating action buttons.
- The
AppBar
- The
AppBarwidget is added to the Scaffold to provide a top app bar interface. - It typically contains the app title and action buttons.
- The
Center
- The
Centerwidget centers its child widget within its parent.
- The
Text Widget
- The
Textwidget is displayed within theCenterwidget. - It shows static text on the screen.
- The
Let's make our app more interactive, let's add a button that increments a counter each time it is pressed. Update the MyHomePage class as follows:
class MyHomePage extends StatefulWidget {
  @override
  _MyHomePageState createState() => _MyHomePageState();
}

class _MyHomePageState extends State<MyHomePage> {
  int _counter = 0;

  void _incrementCounter() {
    setState(() {
      _counter++;
    });
  }

  @override
  Widget build(BuildContext context) {
    return Scaffold(
      appBar: AppBar(
        title: Text('Home Page'),
      ),
      body: Center(
        child: Column(
          mainAxisAlignment: MainAxisAlignment.center,
          children: <Widget>[
            Text(
              'You have pushed the button this many times:',
            ),
            Text(
              '$_counter',
              style: Theme.of(context).textTheme.headline4,
            ),
          ],
        ),
      ),
      floatingActionButton: FloatingActionButton(
        onPressed: _incrementCounter,
        tooltip: 'Increment',
        child: Icon(Icons.add),
      ),
    );
  }
}
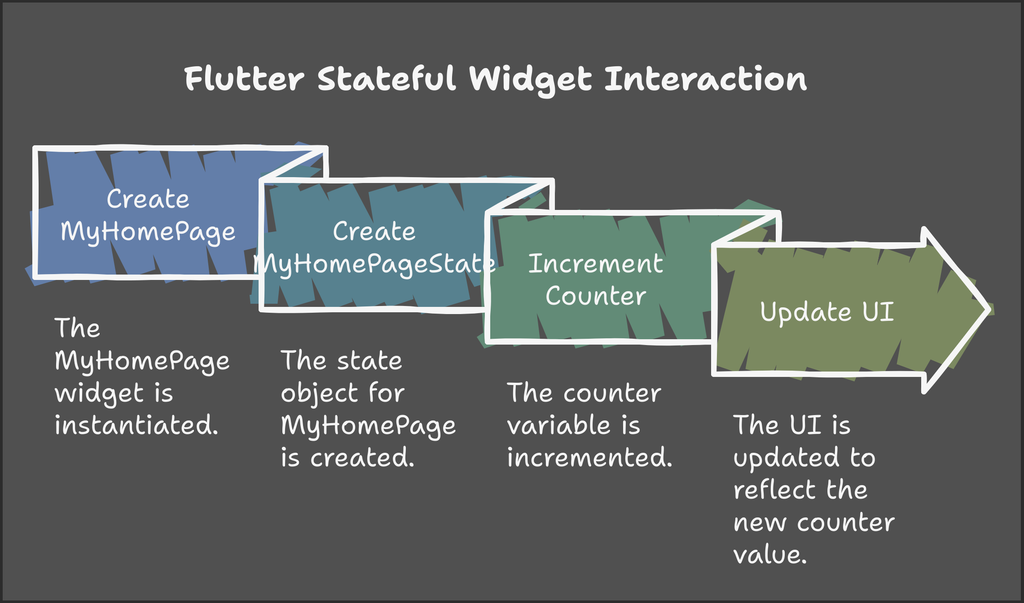
Code Explaination 1. Class Definition
MyHomePage (StatefulWidget)
- Purpose:
MyHomePageis a stateful widget, meaning it can maintain and update its internal state over time. - State Management: The widget creates an associated
_MyHomePageStateobject using thecreateStatemethod.
StatefulWidget is used when the UI needs to change dynamically based on user interaction or other factors.
2. State Class (_MyHomePageState)
State Variables:
_counter: A private integer variable that keeps track of how many times the button has been pressed.
State Update Method:
_incrementCounter: This method updates the_countervariable.setState: This method tells Flutter to rebuild the UI with the updated state._counter++: Increases the counter by 1 every time the button is pressed.
3. UI Structure (build method)
The build method describes the UI using Flutter's widget tree.
Scaffold Widget:
- Provides the basic visual layout structure for the screen.
Key Widgets Explanation:
AppBar:
- Displays the title "Home Page" at the top of the screen.
Body (Center & Column):
- Center: Centers its child widgets in the middle of the screen.
- Column: Arranges widgets vertically.
FloatingActionButton:
- A button at the bottom-right corner.
onPressed: Calls_incrementCounterto increase_counter.- The button contains an
Iconshowing a plus (+) sign. - A
tooltipprovides a helpful message ("Increment") when the button is long-pressed.
4. How It Works:
- The app starts with
_counterset to 0. - Every time the floating action button is pressed:
Before viewing the output, let us see the life cycle of the state component using a diagram:
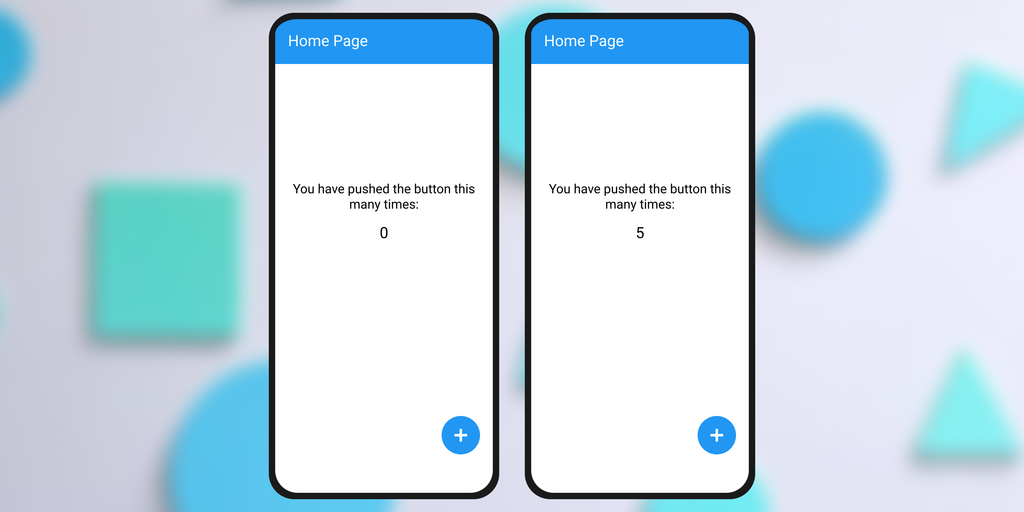
Now let's view the output. I have 2 outputs: one when there is no click, which is the initial state, and one after the click.
What We Have Learned
Setting Up Flutter: We've covered how to set up the Flutter SDK, configure your IDE, and create a new Flutter project.
Project Structure: We explored the structure of a Flutter project, including key directories and files.
Building a Basic App: We wrote our first Flutter app, which displayed a simple home page with text.
Adding Interactivity: We enhanced our app by adding a button that incremented a counter and updated the UI.
Conclusion
In this guide, we have walked through the essentials of developing a mobile app with Flutter from scratch. By following these steps, you now have a solid foundation for building your own Flutter applications. Flutter’s robust framework, coupled with Dart’s powerful language features, allows you to create visually stunning and high-performance apps with ease. Keep exploring Flutter’s rich set of widgets and packages to further enhance your app development skills.
Happy coding! 🚀
 WhatsApp
 Call Us
 Mail Us