Understanding Spring Boot: An Integration Guide with CRUD Operations Using MongoDB

In modern software development, frameworks that simplify application development while providing robust features are invaluable.
Spring Boot, developed by Pivotal Software and released in 2014, is one such framework that has gained immense popularity among Java developers.
Built on top of the Spring Framework, Spring Boot allows developers to create stand-alone, production-grade applications easily. With Spring Boot, you can get started with minimal configuration, enabling a quicker development process.
In this blog, we will explore what Spring Boot is, why you should consider using it, the problems it solves, and how to perform simple CRUD operations with MongoDB.
What is Spring Boot?
Spring Boot is an open-source Java-based framework that is built on top of the Spring Framework. It allows developers to create stand-alone, production-grade applications easily. With Spring Boot, you can get started with minimal configuration, enabling a quicker development process. Spring Boot is a popular framework that helps developers create applications faster and easier. Here are some key reasons why you should consider using it:
The key feature of Spring Boot

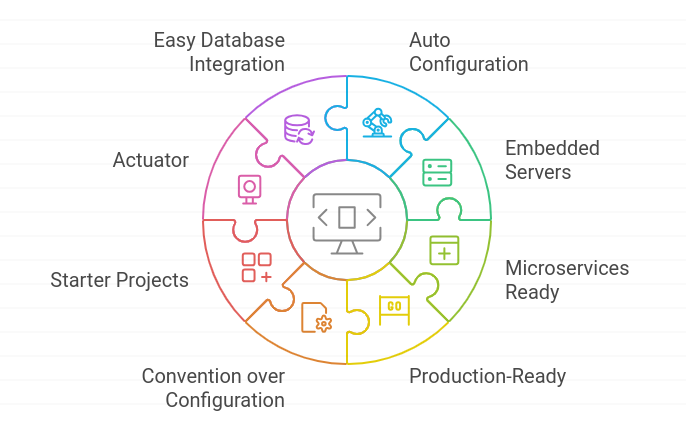
Auto Configuration: Spring Boot automatically sets up your application based on the libraries you choose, so you don’t have to write a lot of setup code.
Embedded Servers: It comes with built-in servers like Tomcat and Jetty, allowing you to run your application without needing a separate server.
Microservices Ready: Spring Boot is great for building microservices, which are small, independent applications that work together.
Production-Ready: It has built-in features to check the health of your application and monitor its performance, making it ready for real-world use.
Convention over Configuration: Spring Boot follows the idea of convention over configuration, which means it has smart defaults. This helps you spend less time setting things up.
Starter Projects: It offers starter projects that make it easy to add new features to your application quickly.
Actuator: This feature helps you monitor and manage your application, giving you insights into how it’s running.
Easy Database Integration: Spring Boot works well with different databases like MongoDB, so you can easily connect and use them without extra setup.
Development Tools: It includes tools that help improve your coding experience, like automatic restarts and live reloads, making it easier to test changes.
Simple Testing: Spring Boot makes testing your application easier with helpful tools and features.
Built-in Security: It has security features that help you protect your application with minimal effort.
Fast Development: You can build applications quickly, which is important in today’s fast-paced tech world.
Strong Ecosystem: Spring Boot is part of a larger family of Spring tools that provide a lot of resources for building web applications and more.
Community Support: There is a large community of Spring Boot users, offering lots of guides, tutorials, and help online.
These features make Spring Boot a great choice for developers who want to build powerful applications quickly and easily.
Integration of Spring Boot
Now, let’s see how easily we can use Spring Boot to perform a straightforward CRUD (Create, Read, Update, Delete) operation with MongoDB as our database. This integration simplifies our development process and shows how well these two technologies work together to manage data efficiently!You can choose any IDE for your development, but Eclipse is a popular choice that we will use for this project.MediaEdit RelationshipEdit RelationshipSwap UploadSwap UploadRemove UploadRemove Upload

Step 1: Install Required Tools
- Before starting, make sure you have the following installed:
- Java Development Kit (JDK) (preferably JDK 11 or later)
- Maven (if not bundled with your IDE)
- Eclipse IDE (you can download the latest version from the Eclipse website)
- MongoDB (installed and running on your local machine)
Step 2: Create a New Spring Boot Project
- Open Eclipse: Launch Eclipse IDE.
- Create a New Maven Project:
- Go to File > New > Other... In the wizard, expand Maven and select Maven Project, then click Next.
- Configure Project Settings: Choose a workspace location if prompted, then click Next.
- In the Archetype Selection step,
- check Create a simple project (skip archetype selection) and click Next.
- Enter Project Metadata:
- Group Id: com.example
- Artifact Id: crud
- Version: 0.0.1
-SNAPSHOT- Name: crud
- Description: A simple CRUD application with MongoDB
- Click Finish.
Step 3: Set Up Project Structure
- Create Packages:
- Right-click on the src/main/java/com/example/crud folder.
- Select New > Package.
- Create the following packages:
- controller
- model
- repository
- service
- Create Resources Folder:
- Right-click on the src/main/resources folder.
- Create a new file named application.properties.
Step 4: Add Dependencies to pom.xml
Open the pom.xml file and add the following dependencies within the <dependencies> tag:<dependency>
<dependency>
	<dependency>
			<groupId>org.springframework.boot</groupId>
			<artifactId>spring-boot-starter-web</artifactId>
	</dependency>
	<dependency>
			<groupId>org.springframework.boot</groupId><artifactId>spring-boot-starter-data-mongodb</artifactId>
	</dependency>
	<dependency>
			<groupId>org.springframework.boot</groupId><artifactId>spring-boot-devtools</artifactId><scope>runtime</scope>
			<optional>true</optional>
	</dependency>
</dependencies>
Step 5: Configure MongoDB Connection
- Open src/main/resources/application.properties.
- Add the following line to configure your MongoDB connection
spring.data.mongodb.uri=mongodb://localhost:27017/cruddbStep 6: Create the User Model
- Right-click on the model package and select New > Class.
- Name the class User.
- Add the following code:
package com.example.crud.model;
import org.springframework.data.annotation.Id;import
import org.springframework.data.annotation.Id;
import org.springframework.data.mongodb.core.mapping.Document;

@Document(collection = "users")
public class User {

    @Id
    private String id;
    private String name;
    private String email;

    // Constructors
    public User() {}

    public User(String name, String email) {
        this.name = name;
        this.email = email;
    }

    // Getters and Setters
    public String getId() {
        return id;
    }

    public void setId(String id) {
        this.id = id;
    }

    public String getName() {
        return name;
    }

    public void setName(String name) {
        this.name = name;
    }

    public String getEmail() {
        return email;
    }

    public void setEmail(String email) {
        this.email = email;
    }
}
Step 7: Create the User Repository
- Right-click on the repository package and select New > Interface.
- Name it UserRepository.
- Add the following code:
package com.example.crud.repository;

import com.example.crud.model.User;
import org.springframework.data.mongodb.repository.MongoRepository;
import org.springframework.stereotype.Repository;

@Repository
public interface UserRepository extends MongoRepository<User, String> {
}
Step 8: Create the User Service
- Right-click on the service package and select New > Class.
- Name it UserService.
- Add the following code:
package com.example.crud.service;
import com.example.crud.model.User;
import com.example.crud.repository.UserRepository;
import org.springframework.beans.factory.annotation.Autowired;
import org.springframework.stereotype.Service;
import java.util.List;
import java.util.Optional;
@Service
public class UserService {
    @Autowired
    private UserRepository userRepository;
    public List<User> getAllUsers() {
        return userRepository.findAll();
    }
    public Optional<User> getUserById(String id) {
        return userRepository.findById(id);
    }
    public User createUser(User user) {
        return userRepository.save(user);
    }
    public User updateUser(String id, User userDetails) {
        User user = userRepository.findById(id).orElseThrow(() -> new RuntimeException("User not found"));
        user.setName(userDetails.getName());
        user.setEmail(userDetails.getEmail());
        return userRepository.save(user);
    }
    public void deleteUser(String id) {
        userRepository.deleteById(id);
    }

}
Step 9: Create the User Controller
- Right-click on the controller package and select New > Class.
- Name it UserController.
- Add the following code:
package com.example.crud.controller;

import com.example.crud.model.User;
import com.example.crud.service.UserService;
import org.springframework.beans.factory.annotation.Autowired;
import org.springframework.http.ResponseEntity;
import org.springframework.web.bind.annotation.*;

import java.util.List;

@RestController
@RequestMapping("/api/users")
public class UserController {

    @Autowired
    private UserService userService;

    @GetMapping
    public List<User> getAllUsers() {
        return userService.getAllUsers();
    }

    @GetMapping("/{id}")
    public ResponseEntity<User> getUserById(@PathVariable String id) {
        return userService.getUserById(id)
                .map(ResponseEntity::ok)
                .orElse(ResponseEntity.notFound().build());
    }

    @PostMapping
    public User createUser(@RequestBody User user) {
        return userService.createUser(user);
    }

    @PutMapping("/{id}")
    public ResponseEntity<User> updateUser(@PathVariable String id, @RequestBody User userDetails) {
        User updatedUser = userService.updateUser(id, userDetails);
        return ResponseEntity.ok(updatedUser);
    }

    @DeleteMapping("/{id}")
    public ResponseEntity<Void> deleteUser(@PathVariable String id) {
        userService.deleteUser(id);
        return ResponseEntity.noContent().build();
    }
}
Step 10: Run the Application
- Open the main application file CrudApplication.java (located in src/main/java/com/example/crud).
- Add the following code if it’s not already present:
package com.example.crud;

import org.springframework.boot.SpringApplication;
import org.springframework.boot.autoconfigure.SpringBootApplication;

@SpringBootApplication
public class CrudApplication {

    public static void main(String[] args) {
        SpringApplication.run(CrudApplication.class, args);
    }
}
To run the application:
Right-click on CrudApplication.java > Run As > Java Application.
Testing the CRUD Operations
You can use tools like Postman or Curl to test your CRUD operations:
Create a User
Method: POST
URL: http://localhost:8080/api/users
Body (JSON):
{
"name": "John Doe",
"email": "john@example.com"
}
Get All Users
Method: GET
URL: http://localhost:8080/api/users
Get a User by ID
Method: GET
URL: http://localhost:8080/api/users/{id}
Update a User
Method: PUT
URL: http://localhost:8080/api/users/{id}
Body (JSON):
{
"name": "Jane Doe",
"email": "jane@example.com"
}
Delete a User
Method: DELETE
URL: http://localhost:8080/api/users/{id}
Further Enhancements
As this project is a straightforward Spring Boot integration, we’ve kept the setup simple. However, to elevate it toward production-quality, consider implementing the following features for added robustness:
.png)
- Spring Security: Add authentication and authorization to secure API endpoints.
- Pagination and Sorting: Improve handling of large datasets by enabling paginated responses and sorted data.
- DTOs and Mappers: Introduce Data Transfer Objects (DTOs) and use mappers like MapStruct for organized and efficient code.
- Validation: Use Bean Validation (JSR 380) to maintain data integrity and streamline error handling.
- Spring Boot Actuator: Enable monitoring and health endpoints to support diagnostics and performance insights.
- Containerization: Dockerize the application for simplified deployment and scaling.
- Asynchronous Processing: Use @Async for non-blocking operations, enhancing responsiveness.
- Messaging Integration: Add messaging with RabbitMQ or Apache Kafka to enable event-driven communication.
- These enhancements allow you to dive deeper into Spring Boot's capabilities, transforming a simple integration into a scalable, secure, and production-ready application.
Conclusion
Spring Boot simplifies the development process by providing a robust framework that addresses many challenges faced by developers. Its auto-configuration and rapid application development features make it an ideal choice for building modern applications. In this guide, we explored how to set up a simple CRUD application using Spring Boot with MongoDB, demonstrating the flexibility and ease of use that Spring Boot offers.
While we used MongoDB in this example, Spring Boot seamlessly integrates with various other databases, both relational (like MySQL, PostgreSQL) and NoSQL (like Cassandra, Couchbase). This versatility allows you to choose the right database for your application's needs while leveraging the powerful features of Spring Boot. Whether you're building a small application or a large enterprise system, Spring Boot can help you get the job done efficiently, regardless of your data storage solution.
