


How to Build Your First Microservices Using Scala: Full Tutorial


Why Scala For Microservices?
Scala offers a compelling mix of strong typing, immutability, and functional + object-oriented styles. On the JVM, it integrates easily with existing infrastructure, libraries, and services. For microservices, it brings:
- concise, expressive code and domain modelling
- compatibility with the Java ecosystem (JDK, libraries, frameworks)
- great concurrency support through libraries like Akka
- ability to choose high-productivity (Scala 3) or compatibility with legacy (Scala 2.13)
Setting the Stage on Linux
Welcome to the Linux edition of "Setting the Stage," where we'll meticulously guide you through the process of setting up your Linux environment for Scala microservices development. Follow these detailed steps to ensure a smooth initiation into the world of Scala.
1. Installing the Java Development Kit (JDK):
a. Open a Terminal:
- On most Linux distributions, press
Ctrl + Alt + Tto open a terminal.
b. Update Package List:
Run the following commands to update the package list and install essential tools:
sudo apt update
sudo apt install -y software-properties-common
c. Install OpenJDK:
Install OpenJDK, the open-source implementation of the Java Platform:
sudo apt install -y openjdk-11-jdkd. Verify Installation:
Ensure that Java is installed by checking the version:
java -versionYou should see information about the installed Java version.
2. Configuring the Scala Build Tool (sbt):
a. Download and Install sbt:
Download the latest version of sbt or use the following commands:
echo "deb https://repo.scala-sbt.org/scalasbt/debian all main" | sudo tee /etc/apt/sources.list.d/sbt.listecho "deb https://repo.scala-sbt.org/scalasbt/debian /" | sudo tee /etc/apt/sources.list.d/sbt_old.listcurl -sL "https://keyserver.ubuntu.com/pks/lookup?op=get&search=0x2EE0EA64E40A89B84B2DF73499E82A75642AC823" | sudo apt-key add
sudo apt-get update
sudo apt-get install sbt
b. Create Your First sbt Project:
Navigate to the directory where you want to create your project and run:
sbt new scala/scala-seed.g8Follow the prompts to initialize your project.
c. Dependency Management:
In your
build.sbtfile, declare dependencies. For example:
libraryDependencies += "org.scalatestplus.play" %% "scalatestplus-play" % "5.0.0" % Test3. Version Control Setup (Optional):
a. Install Git:
If Git is not already installed, use the package manager to install it:
sudo apt install -y gitb. Initialize a Git Repository:
Navigate to your project directory and run:
git initc. Connect to a Remote Repository (Optional):
If you have a remote repository (e.g., on GitHub), follow these optional steps:
# Add a remote repository
git remote add origin <repository_url>
# Push your initial code to the remote repository
git push -u origin master
Congratulations! Your Linux environment is now set up for Scala microservices development. You've installed the JDK, configured sbt, and optionally set up version control. In the upcoming chapters, we'll delve into Scala's features and guide you through crafting your first microservice. Get ready for an engaging and hands-on journey into Scala microservices development!
Writing Your First Microservice In Scala
Now that your development environment is set up, let's jump into creating your first Scala microservice using Akka HTTP.
1. Introduction to Akka HTTP for Web Services:
a. Understanding Akka HTTP:
Akka HTTP is a powerful tool for making web services in Scala. It makes handling HTTP requests and responses easy and efficient.
b. The Power of Routes:
Think of routes as a map for incoming requests. They help direct requests to the right handlers, ensuring your microservices architecture is organized and scalable.
2. Code Walkthrough: Building the Scala Tapestry:
a. Decoding Routing Logic:
Let's explore the code and understand how routing logic works. Routes are like signposts, guiding incoming requests to the right parts of your code.
b. Handling Concurrent Requests with Akka's Actor Model:
We'll delve into Akka's actor model, a way to manage multiple requests at once. Think of actors as efficient workers handling different tasks simultaneously, making your microservice responsive.
3. Putting It All Together: Your First Microservice
a. Project Structure:
Create a new project folder and organize it like this:
my-scala-microservice
|-- src
|   |-- main
|       |-- scala
|           |-- com
|               |-- mycompany
|                   |-- Main.scala
b. Dependencies:
In your project settings, include the necessary tools for Akka HTTP:
name := "my-scala-microservice"

version := "1.0"

scalaVersion := "2.13.6"

libraryDependencies ++= Seq(
  "com.typesafe.akka" %% "akka-http" % "10.2.6",
  "com.typesafe.akka" %% "akka-http-spray-json" % "10.2.6"
)
Run sbt compile to get these tools.
c. Main.scala (Main Application):
Create a file called Main.scala with the following code:
package com.mycompany
import akka.actor.ActorSystem
import akka.http.scaladsl.Http
import akka.http.scaladsl.server.Directives._
import akka.stream.ActorMaterializer
import scala.concurrent.ExecutionContextExecutor


object Main extends App {
	implicit val system: ActorSystem = ActorSystem("my-scala-microservice")
	implicit val materializer: ActorMaterializer = ActorMaterializer()
	implicit val executionContext: ExecutionContextExecutor = system.dispatcher

	// Controller

	val simpleController = new SimpleController

	// Route

	val route =
		path("hello") {
		  get {
		  	complete(simpleController.sayHello())
		    }
		      }

	// Start the server

	Http().bindAndHandle(route, "localhost", 8080)
	println(s"Server online at http://localhost:8080/") }
d. SimpleController.scala (Controller):
Create another file called SimpleController.scala with:
package com.mycompany

class SimpleController {
		def sayHello(): String = "Hello, this is your first microservice with Akka HTTP!"
}
e. Running the Microservice:
Run your microservice using sbt run. The server will start at http://localhost:8080/.
f. Testing the Route:
Open your browser or use a tool like curl to test the route:
curl http://localhost:8080/hello You should see:
Hello, this is your first microservice with Akka HTTP!You've built your first Scala microservice. In the next chapters, we'll explore advanced features, testing, and deployment strategies to help you become a master in Scala microservices development.
Local Execution to Deployment
In this chapter, we'll guide you through the process of executing your Scala microservice locally using defined commands and discuss considerations for deploying it in various environments. Let's dive in!
1. Executing Microservice Locally:
Before deploying your microservice, let's make sure it runs smoothly on your local machine. Here are the steps for Linux:
a. Navigate to Your Project:
Open a terminal and navigate to your microservice project directory:
cd path/to/your/my-scala-microserviceb. Run the Microservice:
Execute the following command to run your microservice locally:
sbt runThis will start your microservice, and you should see output indicating that the server is online at http://localhost:8080/.
c. Test the Local Endpoint:
Open your browser or use a tool like curl to test the hello endpoint locally:
curl http://localhost:8080/helloYou should receive the response:
Hello, this is your first microservice with Akka HTTP!Your microservice is now successfully running on your local machine.
2. Considerations for Deployment:
Now, let's discuss considerations for deploying your Scala microservice in various environments.
a. Packaging Your Application:
Before deploying, you need to package your application. In the root of your project, run the following command:
sbt universal:packageZipTarballThis command creates a distribution package that you can deploy to different environments.
b. Environment-Specific Configurations:
Consider any environment-specific configurations your microservice may need. Configuration files often differ between development, testing, and production environments. Ensure your microservice is configured appropriately for the target environment.
c. Choosing a Deployment Environment:
Select the environment where you want to deploy your microservice. Common choices include:
- Local Server: For testing and development.
- Cloud Platforms (AWS, GCP, Azure): Scalable solutions for production.
- Container Orchestration (Docker, Kubernetes): Efficient deployment and scaling.
d. Deploying to a Local Server:
If deploying to a local server, copy the packaged distribution to your server and extract it:
cp target/universal/my-scala-microservice-1.0.tgz /path/to/your/server tar -xvzf my-scala-microservice-1.0.tgzNavigate to the extracted directory and run your microservice:
./my-scala-microservice-1.0/bin/my-scala-microservicee. Deploying to a Cloud Platform:
For cloud deployment, you may need to upload your packaged distribution to a storage service (like Amazon S3) and deploy it on a virtual machine or containerized environment.
f. Deploying with Docker:
If using Docker, create a Dockerfile in your project root:
FROM openjdk:11-jre-slim
WORKDIR /app
COPY target/universal/my-scala-microservice-1.0.tgz .
RUN tar -xvzf my-scala-microservice-1.0.tgz
CMD ["./my-scala-microservice-1.0/bin/my-scala-microservice"]
Build and run the Docker image:
docker build -t my-scala-microservice .
docker run -p 8080:8080 my-scala-microservice
You've successfully executed your Scala microservice locally and explored considerations for deploying it in different environments. Whether on a local server, a cloud platform, or within a Docker container, understanding the deployment process is crucial for bringing your microservice to a wider audience.
The Cost & Effort of Adopting Microservices
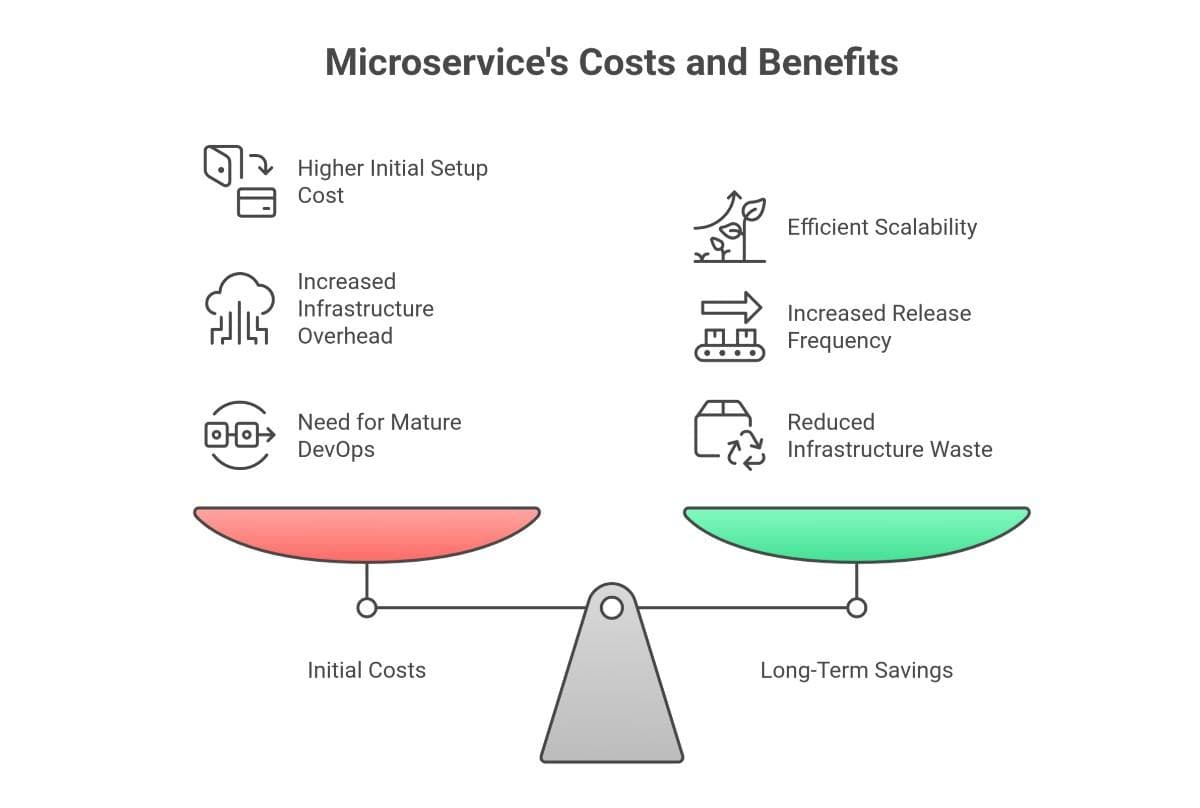
1. Higher Initial Setup Cost
- Requires upfront investment in CI/CD, container infrastructure, monitoring, and security, before real development velocity is achieved.
- Increases early engineering hours as teams build foundations that a monolith would not need.
2. Increased Infrastructure Overhead
- Running multiple services means more compute, more environments, and more network traffic, all contributing to higher cloud bills.
- Each service needs its own health checks, configs, scaling rules, and deployment pipeline, multiplying operational effort.
3. Need for Mature DevOps Practices
- Automated deployments, versioning, rollbacks, and secrets management become mandatory rather than “nice to have.”
- Organizations lacking DevOps maturity face delays, production issues, and rising complexity.
4. Team Structure & Organizational Changes
- Microservices work best with small, cross-functional squads that own a service end-to-end.
- Requires cultural change: clearer ownership, more coordination, and stronger documentation practices.
5. Higher Operational Complexity
- Debugging shifts from single-app troubleshooting to distributed tracing across multiple services and networks.
- More moving parts mean more potential failure points, requiring stronger observability and alerting.
6. Long-Term Savings Through Scalability
- Once in place, microservices let teams ship features independently, reducing bottlenecks and increasing release frequency.
- Scalability becomes more efficient: you scale only the services that need it, reducing long-term infrastructure waste.
Conclusion
Microservices in Scala offer a powerful path for building scalable, resilient, and future-proof systems. With its strong type safety, high performance on the JVM, and mature tooling like Akka and sbt, Scala enables teams to move fast while maintaining reliability. Whether you’re handling live data, high traffic, or complex business workflows, a microservice architecture built in Scala gives you the flexibility to grow without sacrificing quality. By understanding the benefits, costs, and actual applications, you’re now better equipped to decide whether this approach aligns with your product’s needs and long-term goals.
 WhatsApp
 Call Us
 Mail Us