


Node.js REST API Tutorial: How to Build a Secure API with Express


How to Build a REST API in Node.js
A Node.js REST API can be built using Express by following a structured approach. First, initialize a Node.js project and install Express. Then create API routes using HTTP methods such as GET and POST. After that, implement CRUD operations to handle data, add authentication using JWT, and apply security measures such as validation, rate limiting, and HTTPS.
What Is a REST API in Node.js?
A REST API in Node.js is a structured way for applications to communicate over the web. Instead of directly interacting with a database or internal system, applications send requests to defined endpoints that return data in a standard format such as JSON.
Each endpoint represents a specific resource. For example, a users endpoint is used to manage user data, while an orders endpoint handles operations related to orders. These endpoints respond to different HTTP methods, which define how the data is created, retrieved, updated, or removed.
REST APIs follow a stateless architecture. This means each request contains all the information required to process it, without relying on previous interactions. This approach keeps systems predictable and easier to maintain.
Understanding REST Architecture
REST, or Representational State Transfer, defines a set of rules for designing web services. It focuses on clear communication between client and server, consistent endpoint structures, and predictable request handling.
In a RESTful API built with Node.js, the client sends a request to a specific endpoint, and the server returns a response based on that request. The server does not store session data between requests, which simplifies communication and reduces dependencies between systems.
This model is widely used in modern applications because it allows different services to interact without tightly coupling their internal logic.
HTTP Methods Used in REST APIs
REST APIs rely on standard HTTP methods to perform operations on resources. Each method corresponds to a specific type of action.
GET is used to retrieve data from the server. POST is used to create new data. PUT replaces an existing resource, while PATCH updates specific fields within a resource. DELETE is used to remove a resource.
These methods create a predictable structure that developers can follow when building and consuming APIs.
Example of REST API Endpoints
A typical Node.js REST API includes endpoints such as the following:
GET /users
POST /users
GET /users/:id
PATCH /users/:id
DELETE /users/:id
Each endpoint performs a specific action on a resource. For example, retrieving a list of users or updating a specific record.
Why Use Node.js for REST API Development
Node.js is commonly used for building REST APIs because it allows developers to handle multiple requests efficiently while using JavaScript on the backend.
Teams building performance-intensive applications evaluate Node.js and Golang based on factors such as concurrency, response times, and long-term maintainability.
When working with APIs, the ability to process many requests without delay is important. Node.js handles this using an event-driven architecture that avoids blocking operations.
Event-Driven Architecture in Node.js
Node.js processes requests using a non-blocking model. Instead of waiting for one operation to complete before starting another, it continues executing other tasks in parallel.
This makes it suitable for applications that deal with frequent API requests, such as web platforms or mobile backends. Tasks like database queries or external API calls are handled without interrupting the overall execution flow.
As a result, applications can respond to users faster and manage higher request volumes more efficiently.
Using Express for API Development
Node.js provides the runtime environment, but most developers use Express to simplify API development. Express helps manage routing, handle middleware, and organize request logic in a clean way.
Instead of writing low-level server code, you can define routes and responses in a structured format.
Here is a simple example of creating a route using Express:
const express = require('express');
const app = express();

app.get('/users', (req, res) => {
  res.json({ message: 'List of users' });
});
This example shows how an endpoint can return a response when a request is made. Express also allows you to extend functionality using middleware for tasks such as authentication, validation, and logging.
Common Use Cases for Node.js APIs
Node.js REST APIs are widely used in applications where consistent data exchange between systems is essential.
In food delivery apps, APIs handle real-time order updates. For instance, when a user places an order, the API connects the app with restaurant systems, payment gateways, and delivery tracking and ensures status updates like “preparing,” “out for delivery,” and “delivered” to be reflected instantly.
This early-stage planning defines how API interactions, data flow, and acceptance criteria come together before development of your delivery app begins.
For trading or fintech platforms, APIs manage high-frequency data like stock prices, user portfolios, and transactions. They enable live price updates, execute trades, and sync user balances across devices without delays.
In SaaS platforms, APIs power core product functionality. For example, a project management tool uses APIs to manage user authentication, assign tasks, send notifications, and integrate with any internal or external tool that's currently being used to manage updates.
Its non-blocking architecture and strong ecosystem, makes it all the more suitable for APIs that need to handle multiple requests efficiently while remaining easy to extend as the product grows.
Prerequisites for Building a Node.js REST API
Before building a REST API in Node.js, it is important to set up the required tools and understand the basics of how APIs work.
Required Tools
You need Node.js installed on your system along with npm to manage dependencies. A code editor such as VS Code helps in writing and organizing code efficiently.
An API testing tool like Postman or Insomnia is useful for sending requests and checking responses while developing the API.
Basic Knowledge Needed
A basic understanding of JavaScript is required since Node.js uses JavaScript for backend development. You should also be familiar with how HTTP requests work and how data is structured in JSON format.
With these fundamentals in place, you are ready to start building your REST API in Node.js.
How to Create a REST API in Node.js
Creating a REST API in Node.js starts with setting up a project, configuring a server, and defining endpoints that respond to client requests. Instead of building everything at once, it is more effective to start with a simple API and gradually expand it with structured logic.
This approach allows you to test each part of the application while keeping the code organized and easy to understand.
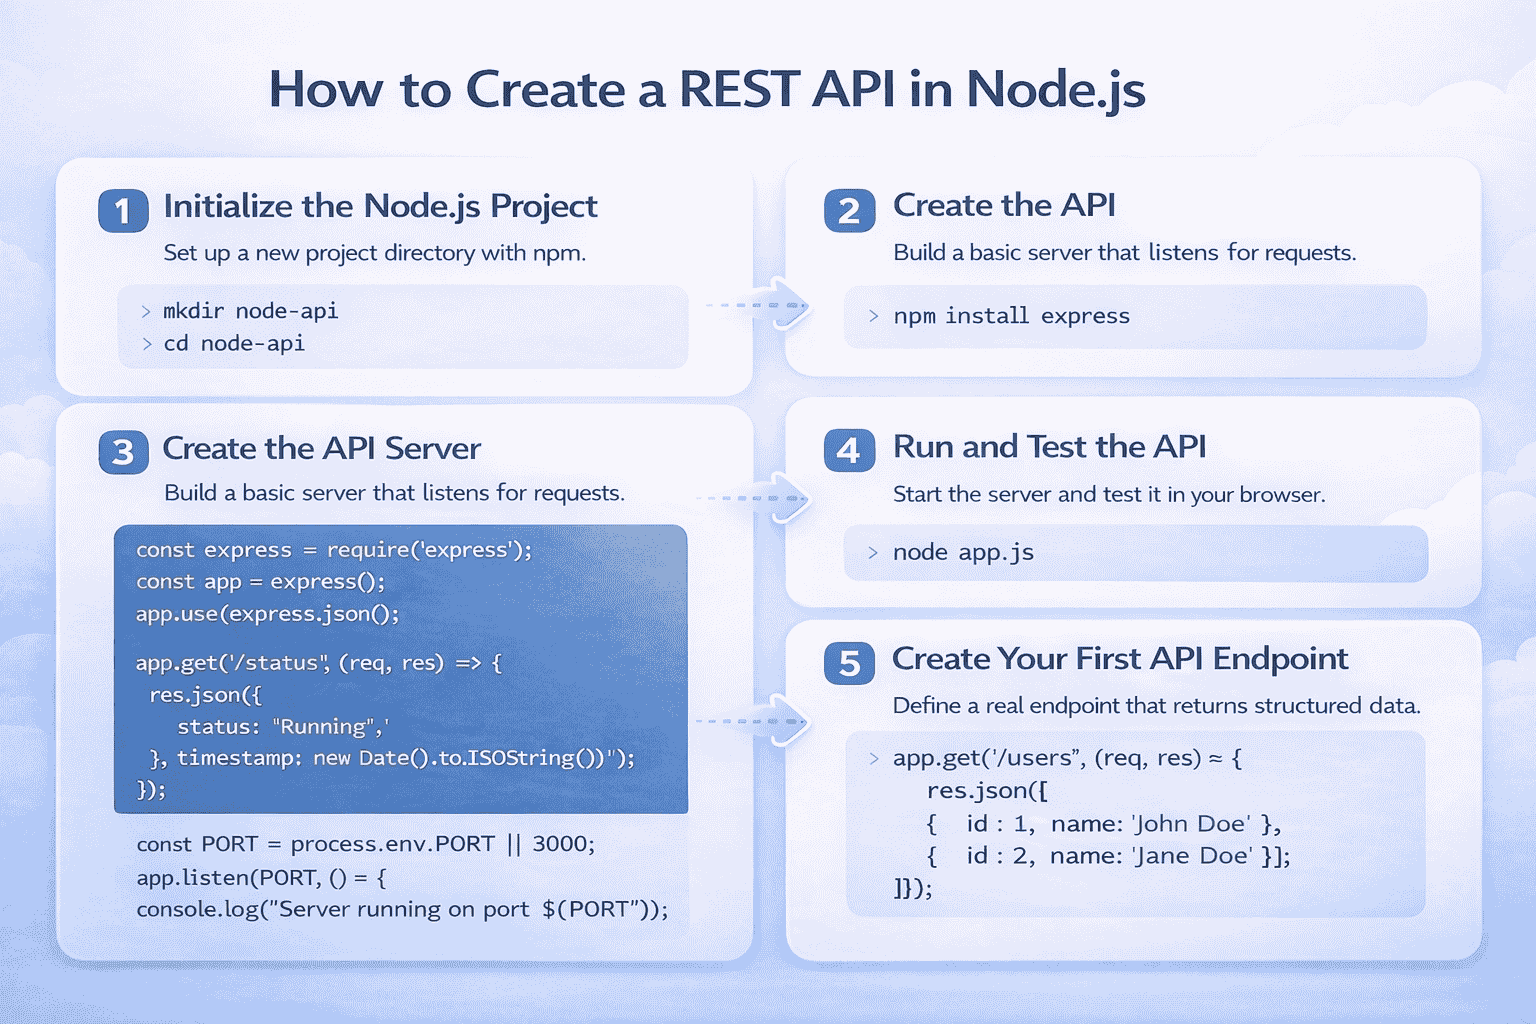
1. Initialize Node.js Project
The first step is to create a new project directory and initialize it using npm. This sets up the configuration needed to manage dependencies and scripts.
mkdir node-api
cd node-api
npm init -y
This creates a package.json file, which keeps track of installed libraries and project settings. It acts as the foundation of your Node.js application.
2. Install Express
Once the project is initialized, install Express to simplify API development.
npm install expressExpress provides a structured way to define routes, handle requests, and send responses. It removes the need to write low-level server logic, allowing you to focus on building the API.
3. Create the API server
After installing Express, create a basic server that listens for incoming requests. This confirms that your setup is working correctly.
const express = require('express');
const app = express();

app.use(express.json());

app.get('/status', (req, res) => {
  res.json({
    status: 'Running',
    timestamp: new Date().toISOString()
  });
});

const PORT = process.env.PORT || 3000;

app.listen(PORT, () => {
  console.log(`Server running on port ${PORT}`);
});
This server responds with a JSON object when accessed. The JSON middleware allows the API to process incoming request data, which becomes important when handling user input.
4. Run and Test the API
Once the server is ready, start the application using Node.js.
node app.jsAfter running the command, the API will be available locally. You can open it in a browser or test it using an API tool such as Postman.
When you send a request to the status endpoint, you should receive a response confirming that the API is running. This step ensures that your environment is set up correctly before adding more functionality.
5. Create Your First API Endpoint
With the server running, the next step is to define a real endpoint that returns data. This is where the API starts behaving like a backend service.
app.get('/users', (req, res) => {
  res.json([
    { id: 1, name: 'John Doe' },
    { id: 2, name: 'Jane Doe' }
  ]);
});
This endpoint returns a list of users when a request is made. It demonstrates how APIs send structured data in response to client requests.
6. Organize Your API Structure
As the application grows, placing all logic in a single file becomes difficult to manage. A better approach is to separate the project into layers based on responsibility.
project/
  ├── routes/
  ├── controllers/
  ├── models/
  ├── middleware/
  └── app.js
Routes define the endpoints, controllers contain business logic, models handle data, and middleware processes requests before they reach the main logic.
This structure improves maintainability and makes it easier to extend the API as new features are added in backend systems.
Implementing CRUD Operations in a Node.js REST API
Once the basic server is set up, the next step is to handle real data operations. Most REST APIs are built around CRUD functionality, which includes creating, retrieving, updating, and deleting data.
These operations form the core of any backend system and allow applications to interact with resources in a structured way.
In this section, we will extend the API to support CRUD operations using simple in-memory data. This keeps the logic easy to understand before introducing databases in more advanced setups.
1. Creating Data with POST
Creating data is the first step in building a functional API. This is done using a POST request, where the client sends data to the server.
To handle incoming data, the API reads the request body and stores it.
let users = [];

app.post('/users', (req, res) => {
  const newUser = {
    id: users.length + 1,
    name: req.body.name
  };

  users.push(newUser);

  res.status(201).json(newUser);
});
This example creates a new user and stores it in an array. While this is a simple approach, it demonstrates how APIs process and return data.
2. Retrieving Data with GET
Retrieving data allows clients to access stored information. This is done using GET requests.
app.get('/users', (req, res) => {
  res.json(users);
});
This endpoint returns all users stored in the system. It is commonly used to display lists of data in applications.
You can also retrieve a specific resource by passing an identifier.
app.get('/users/:id', (req, res) => {
  const user = users.find(u => u.id == req.params.id);

  if (!user) {
    return res.status(404).json({ message: 'User not found' });
  }

  res.json(user);
});
This allows clients to fetch a single record based on its ID.
3. Updating Data with PUT or PATCH
Updating data allows clients to modify existing resources. This is done using PUT or PATCH requests.
app.patch('/users/:id', (req, res) => {
  const user = users.find(u => u.id == req.params.id);

  if (!user) {
    return res.status(404).json({ message: 'User not found' });
  }

  user.name = req.body.name || user.name;

  res.json(user);
});
PATCH is commonly used when only part of the data needs to be updated, while PUT is used when replacing the entire resource.
4. Deleting Data with DELETE
Deleting data removes a resource from the system. This is done using a DELETE request.
app.delete('/users/:id', (req, res) => {
  users = users.filter(u => u.id != req.params.id);

  res.json({ message: 'User deleted' });
});
This endpoint removes a user based on the provided ID.
5. Testing CRUD Operations
Once the CRUD operations have been implemented, it is important to test the operations. This is with the intention of ensuring that the API will function as intended. API testing is critical in assuring that data is generated, accessed and updated in the right manner.
To test your API, you can use a tool called Postman which allows you to simulate different types of requests and inspect responses.
Start by sending a POST request to create a new resource. Once the request is processed, check whether the response includes the newly created data and returns the expected status code.
Next, send a GET request to retrieve that resource. This helps verify that the data was stored correctly and can be accessed as expected.
A PATCH request can then be sent with the intention of updating a resource. After that, you may check whether the update has been completed correctly.
Lastly, one can make a DELETE request, and the goal of this is to delete a resource. Then you are able to make a GET request with the intention of retrieving a resource. This will assist you in checking whether the resource is deleted or not.
Adding Authentication to a Node.js REST API
Once your API can handle CRUD operations, the next step is to control who can access certain endpoints. Without authentication, any user can send requests and modify data, which is not suitable for real applications.
Authentication ensures that users are verified before accessing protected resources. One of the most commonly used methods for API authentication in Node.js is JSON Web Tokens, also known as JWT.
JWT-based authentication allows the server to issue a token after a successful login, which the client then includes in future requests to access protected routes.
How JWT Authentication Works
JWT authentication is based on a simple flow where the server generates a token after verifying user credentials. This token is then used to identify the user in subsequent requests.
When a user logs in, the server validates their credentials and creates a token that contains user information. This token is sent back to the client and stored on the client side.
For every protected request, the client includes the token in the authorization header. The server verifies the token and allows access only if it is valid.
This approach avoids storing session data on the server and keeps authentication stateless, which is ideal for REST APIs.
1. Install Required Dependencies
To implement JWT authentication, you need to install the required packages.
npm install jsonwebtoken bcryptThe jsonwebtoken package is used to generate and verify tokens, while bcrypt is used to securely hash passwords.
2. Creating a Login Endpoint
The login endpoint verifies user credentials and generates a token if the credentials are valid.
const jwt = require('jsonwebtoken');
const bcrypt = require('bcrypt');

const SECRET_KEY = 'your-secret-key';

app.post('/login', async (req, res) => {
  const { username, password } = req.body;

  const user = users.find(u => u.name === username);

  if (!user) {
    return res.status(401).json({ message: 'User not found' });
  }

  const isMatch = await bcrypt.compare(password, user.password || '');

  if (!isMatch) {
    return res.status(401).json({ message: 'Invalid credentials' });
  }

  const token = jwt.sign({ id: user.id, name: user.name }, SECRET_KEY, {
    expiresIn: '1h'
  });

  res.json({ token });
});
This endpoint checks if the user exists and verifies the password. If the credentials are correct, it generates a token that the client can use for future requests.
3. Protecting Routes with Middleware
Once the token is generated, you need to protect specific routes so that only authenticated users can access them.
function authenticateToken(req, res, next) {
  const authHeader = req.headers['authorization'];
  const token = authHeader && authHeader.split(' ')[1];

  if (!token) {
    return res.status(401).json({ message: 'Access denied' });
  }

  jwt.verify(token, SECRET_KEY, (err, user) => {
    if (err) {
      return res.status(403).json({ message: 'Invalid token' });
    }

    req.user = user;
    next();
  });
}
This middleware checks whether a token is present and verifies it. If the token is valid, the request is allowed to proceed.
4. Securing API Endpoints
You can now apply the authentication middleware to protect routes.
app.get('/protected', authenticateToken, (req, res) => {
  res.json({ message: 'This is a protected route' });
});
Only requests with a valid token will be able to access this endpoint. This ensures that sensitive operations are restricted to authenticated users.
Securing a REST API in Node.js
After adding authentication, the next step is to secure the API against common vulnerabilities. Authentication verifies users, but it does not protect the system from malicious input, excessive requests, or insecure configurations.
A secure Node.js REST API ensures that data is protected, requests are validated, and access is controlled properly. This reduces the risk of attacks and keeps the API reliable in real-world environments.
1. Securing a REST API in Node.js
After adding authentication, the next step is to secure the API against common vulnerabilities. Authentication verifies users, but it does not protect the system from malicious input, excessive requests, or insecure configurations.
A secure Node.js REST API ensures that data is protected, requests are validated, and access is controlled properly. This reduces the risk of attacks and keeps the API reliable in real-world environments.
const https = require('https');
const fs = require('fs');
const express = require('express');

const app = express();

const options = {
  key: fs.readFileSync('key.pem'),
  cert: fs.readFileSync('cert.pem')
};

https.createServer(options, app).listen(3000, () => {
  console.log('Secure server running');
});
This setup ensures that all communication between the client and server is encrypted.
2. Validating and Sanitizing Input
APIs often receive user input, which must be validated before being processed in systems handling transactions or external integrations, where even minor errors can lead to serious issues.
Using validation libraries helps ensure that incoming data meets expected formats.
const { body, validationResult } = require('express-validator');

app.post('/register', [
  body('email').isEmail(),
  body('password').isLength({ min: 6 })
], (req, res) => {
  const errors = validationResult(req);

  if (!errors.isEmpty()) {
    return res.status(400).json({ errors: errors.array() });
  }

  res.json({ message: 'Valid input' });
});
This ensures that only properly formatted data is accepted by the API.
3. Preventing Common API Vulnerabilities
Several middleware packages can be used to protect your API from common threats.
npm install helmet express-mongo-sanitize xss-clean corsHelmet helps set secure HTTP headers, while sanitization libraries prevent injection attacks and malicious scripts.
const helmet = require('helmet');
const mongoSanitize = require('express-mongo-sanitize');
const xss = require('xss-clean');
const cors = require('cors');

app.use(helmet());
app.use(mongoSanitize());
app.use(xss());
app.use(cors());
These tools reduce the risk of attacks such as cross-site scripting and injection vulnerabilities, helping maintain security across backend environments.
4. Limiting API Requests
APIs should limit the number of requests a client can make within a certain time frame. This helps prevent abuse and reduces the risk of denial-of-service attacks.
const rateLimit = require('express-rate-limit');

const limiter = rateLimit({
  windowMs: 15 * 60 * 1000,
  max: 100
});

app.use(limiter);
Rate limiting ensures that the API remains stable even under high traffic or misuse.
5. Hashing Passwords Securely
Storing plain text passwords is a major security risk. Passwords should always be hashed before storing them.
const bcrypt = require('bcrypt');

app.post('/register', async (req, res) => {
  const hashedPassword = await bcrypt.hash(req.body.password, 10);

  res.json({ password: hashedPassword });
});
Hashing ensures that even if data is exposed, user credentials remain protected.
6. Using Environment Variables for Sensitive Data
Sensitive information such as secret keys should not be hardcoded in the application. Instead, they should be stored in environment variables.
require('dotenv').config();

const SECRET_KEY = process.env.SECRET_KEY;
This prevents sensitive data from being exposed in source code or version control systems.
7. Logging and Monitoring API Activity
Monitoring helps detect unusual behavior and identify issues early. Logging tools can track requests and errors for better visibility.
const morgan = require('morgan');

app.use(morgan('combined'));
Regular monitoring and auditing of dependencies using tools like npm audit also help maintain a secure environment.
Best Practices for Node.js REST API Development
.png)
Building a REST API in Node.js involves more than setting up routes and sending responses. As the application expands, a great deal of attention must be paid to preserving structure, consistency, and security to ensure that the API remains reliable and easy to scale down the line.
Well-defined best practices help in reducing the technical debt and prevent problems that are usually encountered when the codebase expands.
By following these practices, developers can build APIs that are easier to maintain, debug, and extend while supporting real-world production use cases.
Use Environment Variables for Configuration
Configuration values like API keys, database connection strings, and secret tokens should never get hardcoded into the application. Storing these values directly in the code is likely to reveal sensitive data, especially in the code that gets shared or uploaded to version control systems.
Using environment variables allows developers to separate configuration from application logic. This makes it easier to manage different environments such as development, testing, and production without modifying the core codebase.
In a Node.js REST API, environment variables are commonly used to store values such as JWT secret keys, database URLs, and API base URLs. This ensures that sensitive configuration remains secure while allowing the API to run consistently across different environments.
Maintain a Clear Project Structure
As the API grows, organizing files into a clear structure becomes essential. Keeping routes, controllers, models, and middleware separated helps maintain a logical flow within the codebase.
A structured project layout makes it easier to understand how different parts of the application interact. Developers can quickly locate specific logic, whether it is related to routing, business rules, or data handling.
This structure is also used in Node.js APIs, allowing for greater scalability in adding new features, such as authentication or validation or new resources. Instead of modifying existing code, new functionality can be added in isolated modules.
Handle Errors Consistently
Error handling should follow a consistent format across all endpoints. Instead of returning unstructured or raw error messages, APIs should provide clear responses with appropriate HTTP status codes.
This is especially important when APIs are consumed by frontend applications, where efficient handling of dynamic data and errors is critical.
In practice, this means defining a standard error response format, such as including a message and status code in every response.
This keeps API behavior predictable and simplifies debugging during development and testing.
Validate All Incoming Data
Every API request that includes user input should be validated before processing. Without validation, invalid or unexpected data can enter the system and lead to errors or security issues.
Validation ensures that the data being inputted is in the format expected for example, an email structure should be checked or a minimum password length ensured. This helps in maintaining the data integrity throughout the application.
In a Node.js REST API, validation is mostly applied at the route level before the execution of business logic. This helps to guarantee that only clean and expected data gets to the core logic of the application.
Keep Dependencies Updated
Node.js applications rely heavily on external packages, which are regularly updated to fix bugs and address security vulnerabilities. Using outdated dependencies can expose the application to known issues.
Regularly updating dependencies ensures that the API remains stable and secure. It also allows developers to benefit from performance improvements and new features introduced in updated versions.
Outdated packages can directly impact security layers such as authentication or validation. Regular checks using tools like npm audit help identify and resolve these risks before they affect the application.
Avoid Overloading Endpoints
Each API endpoint should serve a single, well-defined purpose. Combining multiple operations into a single endpoint can make the API difficult to understand and maintain.
Focused endpoints help improve clarity. When each endpoint is responsible for a particular task, it is easier to debug problems and to extend the functionality without disturbing other aspects of the system.
In REST APIs, this approach aligns with resource-based design, where each endpoint represents a clear action on a resource. This improves consistency and makes the API easier for other developers to use and integrate.
Common Mistakes to Avoid in Node.js REST API Development
While building a Node.js REST API, certain implementation mistakes can affect performance, security, and long-term maintainability. These issues often appear as the API grows or handles more real-world usage.
Understanding these mistakes early helps developers avoid rework and ensures that the API remains stable as new features are added. It also improves code quality and reduces debugging effort.
The following are some of the most common mistakes developers make when building REST APIs in Node.js and how they impact the system.
Not Validating Input Data in API Requests
Failing to validate incoming request data is one of the most common issues in API development. When input is not checked, invalid or unexpected data can enter the system and cause errors during processing.
In a Node.js REST API, input validation ensures that request data follows the expected format before it reaches business logic. This includes validating fields such as email, password, and required parameters.
Without proper validation, APIs become unpredictable and harder to debug. It also increases the risk of security vulnerabilities, especially when handling user-generated data.
Exposing Sensitive Data in API Responses
Sensitive data should never be exposed through API responses or stored directly in the code. This includes secret keys, passwords, tokens, and internal system details.
In Node.js APIs, exposing detailed error messages or returning full database objects can unintentionally reveal internal logic or sensitive fields. This creates security risks, especially when APIs are publicly accessible.
To prevent this, responses should be structured carefully and only include necessary data. Sensitive values should always be stored securely using environment variables and never returned in responses.
Poor Error Handling in Node.js APIs
Inconsistent or unclear error handling makes it difficult for clients to understand what went wrong. Returning raw errors or different formats across endpoints creates confusion and complicates debugging.
A well-designed Node.js REST API should return structured error responses with proper status codes and clear messages. This ensures that frontend applications and other services can handle errors correctly.
Centralizing error handling logic also improves maintainability. It allows developers to manage errors consistently without repeating code across multiple routes.
Not Implementing Rate Limiting
APIs without rate limiting are vulnerable to excessive requests, which can impact performance and availability. High traffic or misuse can overload the server and affect response times.
In Node.js REST APIs, rate limiting helps control how many requests a client can make within a specific time window. This protects the API from abuse and ensures fair usage across users.
Without this control, APIs may face downtime or degraded performance under load. Implementing rate limiting helps maintain stability, especially in production environments.
Keeping All API Logic in One File
Storing all API logic in a single file may work for small projects, but it becomes difficult to manage as the application grows. Large files are harder to read, debug, and extend.
In a Node.js REST API, separating logic into routes, controllers, models, and middleware improves organization. This structure makes it easier to scale the application and add new features.
A modular approach also reduces the chances of introducing errors when updating code. It keeps responsibilities clearly defined and improves overall code maintainability.
Conclusion
A Node.js REST API allows applications to communicate through structured endpoints and standardized HTTP methods. By using Express, developers can build APIs that handle requests efficiently and return consistent responses.
Starting with a basic server setup and gradually adding CRUD operations provides a clear foundation for building APIs. Adding authentication ensures that only verified users can access protected resources, while implementing security measures helps protect the system from common vulnerabilities.
As APIs become a core part of modern applications, following structured development practices and maintaining clean code becomes essential. A well-designed REST API in Node.js can support a wide range of applications, from simple services to complex systems that handle large volumes of data.
 WhatsApp
 Call Us
 Mail Us