


Key React Native Hooks and How They Are Used


What are React Native Hooks?
Applications developed using React Native are component-based. React Native lets developers build applications for both Android and iOS using JavaScript and React's programming model.
A React Native application uses a component-based interface structure. All screens or user interfaces, be they lists, buttons, or forms, are specified as components that render a section of the interface and respond to user input.
Since these components form the interface and respond to user input, they must handle dynamic data and application behavior.
A component might be required to update the UI when data changes, to handle logic during screen load, or to respond to user input.
React Native addresses this need through hooks.
A hook in React Native is a feature that allows a functional component to maintain internal state and control logic throughout the component lifecycle.
Hooks enable developers to manage state and component logic within a component, rather than distributing behavior across multiple lifecycle methods or relying on class-based components.
As functional components have become the default mechanism for creating interfaces in contemporary
React Native applications, hooks have become the basis for managing component state, executing side effects, and structuring application logic within components.
How Hooks Work Inside React Native Components?
The user interface of a React Native application is composed of components, and most components today are functional components. A functional component is merely a JavaScript method that renders the UI of a specific component in the application.
React performs this task during component rendering to determine what to display on the screen. Each time the part rerenders due to either new data or user interaction, the function is re-run, and React updates the interface.
Hooks are used inside this execution.
React evaluates the hooks defined within a functional component during render and links them to the component lifecycle. This enables the component to maintain state, respond to changes, and execute rendering logic.
A component can also control its internal state and event responses via hooks. For example, useState enables a component to maintain state that changes over time, whereas useEffect runs code once the component renders or updates.
Hooks maintain a close relationship between state management, component behavior, and the UI they contain by embedding this logic within the component, which is why many modern applications rely on structured React design patterns to organize component logic effectively.
This approach reduces developers' reasoning about component updates and data flow within a React Native application.
With a background in the mechanisms of hooks within the functional component framework, one can more easily understand why they are the key to modern React Native development. The second step is to examine the most popular React Native hooks used by developers when building apps.
List of React Native Hooks and Their Types
React provides hooks that let developers manage state, control how components update, and handle logic.
Each hook does something specific. Some store state; some run logic after a component renders; others share data throughout the component tree or ensure values persist between renders.
These hooks are essential for building React Native apps. They show us how components manage data, react to changes, and run their logic when they render
State Management Hooks
These hooks help React Native components store and update values that change how the interface appears. They're central to managing a component's state, ensuring the UI updates as that state shifts.
1. useState
useState helps functional components create and manage their own internal state. In React Native apps, state is just data that changes while a component is active, directly affecting what users see.
When you use useStateReact retains that state value between renders. So, every time your component re-runs, maybe because of user interaction or other updates – React keeps the state; it doesn't just reset.
This way, components can remember states such as user input, counters, toggle settings, or data pulled from elsewhere.
The hook gives you two things: the current state value and a function to update it. Call that update function, and React will schedule the component to re-render. During this re-render, the component runs with the new state, and the interface updates to show the change.
Since most interactive elements rely on changing data, useState is how you manage state in React Native components.
Example:
import React, { useState } from "react";
import { View, Text, Button } from "react-native";

export default function Counter() {
  const [count, setCount] = useState(0);

  return (
    <View>
      <Text>Count: {count}</Text>
      <Button title="Increase" onPress={() => setCount(count + 1)} />
    </View>
  );
}
In this example, useState creates a state variable called count. Each time the button is pressed, the setCount function updates the value, which triggers React to re-render the component and display the new count.
2. useReducer
useReducer is another way to manage state in React Native components, especially when logic becomes complex.
useState Works well for simple values, but some components handle many related state updates or require specific transitions. That's when useReducer offers a more structured approach.
Instead of updating the state directly, useReducer it relies on a reducer function to determine how the state should change. This function takes the current state, an action, and an object describing the most recent event, and returns the new state.
Centralizing state transitions within a reducer helps components manage complex updates more predictably. It also makes the state logic much easier to maintain.
The hook gives you the current state and a dispatch function. You use dispatch to send actions to the reducer, which then calculates and returns the new state.
This pattern often comes in handy when components manage multiple state values or when state changes depend on different types of actions.
Example:
import React, { useReducer } from "react";
import { View, Text, Button } from "react-native";

function reducer(state, action) {
  switch (action.type) {
    case "increment":
      return { count: state.count + 1 };
    case "decrement":
      return { count: state.count - 1 };
    default:
      return state;
  }
}

export default function Counter() {
  const [state, dispatch] = useReducer(reducer, { count: 0 });

  return (
    <View>
      <Text>Count: {state.count}</Text>
      <Button title="Increase" onPress={() => dispatch({ type: "increment" })} />
      <Button title="Decrease" onPress={() => dispatch({ type: "decrement" })} />
    </View>
  );
}
In this example, useReducer manages the counter state through defined actions. When a button is pressed, the dispatch function sends an action to the reducer, which determines how the state should update.
3. useEffect
The useEffect hook lets your React Native component run code after it renders.
Rendering determines what appears on screen, but many other operations must occur outside the rendering process. We call these "side effects." Think of things like fetching data, setting up event listeners, starting timers, or keeping component state in sync with outside systems.
When a component renders, React updates the UI first. Then it runs the effect you've defined inside useEffect.
This makes sure any side-effect logic runs after the interface has updated. The hook also accepts a dependency array, which tells React when to rerun the effect.
If any of those dependencies change during a re-render, React will rerun the effect with the new values.
Another important aspect of useEffect is that you can return a cleanup function from it. React runs this cleanup code either before the effect runs again or when the component is completely removed from the screen.
Cleanup functions are super useful for stopping timers, removing event listeners, or canceling subscriptions to avoid any weird behavior.
Example:
import React, { useEffect, useState } from "react";
import { View, Text } from "react-native";

export default function DataExample() {
  const [data, setData] = useState(null);

  useEffect(() => {
    fetch("https://jsonplaceholder.typicode.com/posts/1")
      .then((response) => response.json())
      .then((result) => setData(result));
  }, []);

  return (
    <View>
      <Text>{data ? data.title : "Loading..."}</Text>
    </View>
  );
}
In this example, useEffect runs after the component renders and retrieves data from an external API. The empty dependency array ensures that the effect runs only once when the component is first mounted.
4. useContext
The useContext hook lets components get to shared data from a React context without having to pass props through many layers.
React Native apps often need details, like authentication status, theme settings, or configuration, available throughout the interface. Trying to pass this data manually through every component in between can quickly make your component structure tough to manage.
That's where useContext helps. It lets components read values straight from a context provider placed higher up in the component tree. If the context value changes, React automatically re-renders any components using it, so they'll see the latest data.
This approach centralizes shared state and cuts down on repetitive prop passing, a pattern often called 'prop drilling. As apps get bigger, using context with useContext becomes a common way to handle global or widely shared information in React Native projects.
Example:
import React, { createContext, useContext } from "react";
import { View, Text } from "react-native";

const ThemeContext = createContext("light");

function DisplayTheme() {
  const theme = useContext(ThemeContext);
  return (
    <View>
      <Text>Current Theme: {theme}</Text>
    </View>
  );
}

export default function App() {
  return (
    <ThemeContext.Provider value="dark">
      <DisplayTheme />
    </ThemeContext.Provider>
  );
}
In this example, the DisplayTheme component reads the theme value directly from ThemeContext using useContext. When the value provided by the context changes, the component automatically receives the updated value.
5. useRef
The useRef hook lets a component hold onto a value across renders without triggering a re-render when that value changes.
Most state changes in React Native components cause a re-render; the UI needs to update, after all. But some values need to stick around between renders without actually changing what you see on screen. useRef gives us a way to store those.
When you use useRef, React gives you a mutable object with a .current property. This property can hold any value and stays stable for the component's entire life. Because updating .current doesn't trigger a re-render, useRef comes in handy for storing things like timers, previous state values, or references to UI elements.
You'll also often see useRef in React Native for accessing native components, things like text inputs or scroll views. Attach a ref to a component, and developers can directly interact with that element when they need to, say, programmatically focusing an input field.
Example:
import React, { useRef } from "react";
import { View, TextInput, Button } from "react-native";

export default function InputExample() {
  const inputRef = useRef(null);

  const focusInput = () => {
    inputRef.current.focus();
  };

  return (
    <View>
      <TextInput
        ref={inputRef}
        placeholder="Enter text"
        style={{ borderWidth: 1, marginBottom: 10 }}
      />
      <Button title="Focus Input" onPress={focusInput} />
    </View>
  );
}
In this example, useRef stores a reference to the TextInput component. When the button is pressed, the focusInput function accesses the .current property and programmatically focuses the input field.
Performance Hooks
As React Native apps get bigger, components often re-render when their state or props change. Every update means React has to recreate functions and recalculate values inside them.
Most times, this isn't an issue. But for components doing heavy calculations, or passing functions down to many children, all that repeated work can hurt performance.
Performance hooks offer a way to manage this. They let developers cache computed values or function references between renders. That way, React can just reuse old results instead of recalculating everything on every update.
1. useCallback
The useCallback hook memoizes a function. This keeps React from creating a new function instance each time the component renders.
In React Native components, we often pass functions as props to child components. Think event handlers for buttons or callbacks in lists.
When a component re-renders, React usually creates new function references. This can make child components re-render too, even if their own data hasn't changed.
useCallback avoids this. It returns a memoized version of the function, and React only recreates it if a value in its dependency array changes.
Keeping that function reference stable between renders stops child components that depend on it from updating unnecessarily.
import React, { useState, useCallback } from "react";
import { View, Button, Text } from "react-native";

export default function CallbackExample() {
  const [count, setCount] = useState(0);

  const handlePress = useCallback(() => {
    console.log("Button pressed");
  }, []);

  return (
    <View>
      <Text>Count: {count}</Text>
      <Button title="Increase Count" onPress={() => setCount(count + 1)} />
      <Button title="Log Message" onPress={handlePress} />
    </View>
  );
}
In this example, the handlePress function is memoized using useCallback. React will reuse the same function reference during subsequent renders unless one of the dependencies changes.
2. useMemo
The useMemo hook helps React remember a computation's result, preventing the same work from repeating on every render.
In React Native components, tasks like filtering lists, sorting data, or complex math can get expensive if they run with each update.
useMemo lets React store that computed value and reuse it in later renders.
The calculation only runs again if one of its dependency array items changes. If those dependencies stay the same, React just gives you the previously stored value.
You'll find it especially useful when a component's operations depend on specific inputs but don't need to re-run on every render.
Example:
import React, { useMemo, useState } from "react";
import { View, Text, Button } from "react-native";

export default function MemoExample() {
  const [count, setCount] = useState(0);
  const [number, setNumber] = useState(5);

  const squaredValue = useMemo(() => {
    console.log("Calculating...");
    return number * number;
  }, [number]);

  return (
    <View>
      <Text>Number: {number}</Text>
      <Text>Squared: {squaredValue}</Text>
      <Button title="Increase Count" onPress={() => setCount(count + 1)} />
      <Button title="Change Number" onPress={() => setNumber(number + 1)} />
    </View>
  );
}
In this example, the squared value is recalculated only when number there are changes. When other state updates occur, such as increasing count React reuses the previously computed value instead of running the calculation again.
Advanced Hooks
Some React hooks are used in almost every component, such as useState or useEffect. Others appear less frequently but become important when a component needs more precise control over rendering behavior or interaction with other components.
These hooks are typically encountered when working with layout-dependent updates, component references, or reusable component patterns.
In such cases, developers may need to run logic before the UI is painted, expose specific methods through a component reference, or provide debugging information when building custom hooks.
1. useLayoutEffect
useLayoutEffect works a lot like useEffect, but its timing in the render process is different.
useEffect runs after the component renders and the UI is painted. useLayoutEffect, however, runs right after React updates the component, but before that updated UI is actually visible.
This timing lets developers do layout-dependent operations or visual tweaks before users ever see the result.
For instance, a component might need to measure element sizes, adjust positions, or update layout values that must be applied before the screen shows up.
Since useLayoutEffect runs synchronously during rendering, heavy logic inside it can delay the visual update.
That's why it's typically reserved for layout work that absolutely has to happen before the UI displays. Most other side effects are fine with useEffect.
Example:
import React, { useLayoutEffect, useRef } from "react";
import { View, TextInput } from "react-native";

export default function LayoutExample() {
  const inputRef = useRef(null);

  useLayoutEffect(() => {
    inputRef.current.focus();
  }, []);

  return (
    <View>
      <TextInput ref={inputRef} placeholder="Focused on mount" />
    </View>
  );
}
In this example, useLayoutEffect focuses the input field immediately after the component updates and before the screen is rendered.
2. useImperativeHandle
The useImperativeHandle hook gives a component control over what values or methods another component can access when using a ref to interact with it.
Normally, when a parent attaches a ref to a child component, the parent gets direct access to the child's underlying instance or element. However, developers sometimes want to expose only specific methods, not the entire component reference.
useImperativeHandle usually works with forwardRef. It lets a component define a custom object the parent can access through the ref.
This setup ensures only the functionality the parent truly needs is exposed, keeping the child component's internal workings private.
You'll often find this pattern in reusable components that need to provide specific actions, such as focusing an input field, resetting a form, or starting an animation.
Example:
import React, { useRef, useImperativeHandle, forwardRef } from "react";
import { View, TextInput, Button } from "react-native";

const CustomInput = forwardRef((props, ref) => {
  const inputRef = useRef();

  useImperativeHandle(ref, () => ({
    focusInput: () => {
      inputRef.current.focus();
    }
  }));

  return <TextInput ref={inputRef} placeholder="Type here" />;
});

export default function ParentComponent() {
  const customInputRef = useRef();

  return (
    <View>
      <CustomInput ref={customInputRef} />
      <Button
        title="Focus Input"
        onPress={() => customInputRef.current.focusInput()}
      />
    </View>
  );
}
In this example, the CustomInput component exposes a focusInput method through the ref. The parent component can call this method without directly accessing the internal TextInput instance.
3. useTransition
The useTransition hook lets React mark some state updates as non-urgent. This helps keep the UI responsive even during intensive rendering.
In some components, updating state can kick off significant UI changes think filtering long lists, rendering complex layouts, or loading large datasets. If these updates run immediately, the interface might feel sluggish or unresponsive.
useTransition addresses this by marking specific updates as transitions. When an update is wrapped in a transition, React can delay or pause it if more urgent interactions occur, like a user typing in an input field or clicking a button.
This ensures important user interactions remain smooth while less critical updates get processed in the background.
The hook returns two items: a function to initiate the transition and a boolean indicating if it's currently pending. Developers can use this pending state to display loading indicators or other feedback while the transition runs.
Example:
import React, { useState, useTransition } from "react";
import { View, TextInput, Text } from "react-native";

export default function TransitionExample() {
  const [query, setQuery] = useState("");
  const [list, setList] = useState([]);
  const [isPending, startTransition] = useTransition();

  const handleChange = (text) => {
    setQuery(text);

    startTransition(() => {
      const filtered = Array.from({ length: 5000 }, (_, i) => `Item ${i}`)
        .filter(item => item.includes(text));
      setList(filtered);
    });
  };

  return (
    <View>
      <TextInput
        placeholder="Search items"
        value={query}
        onChangeText={handleChange}
      />
      {isPending && <Text>Updating list...</Text>}
      {list.slice(0, 5).map(item => (
        <Text key={item}>{item}</Text>
      ))}
    </View>
  );
}
In this example, the list filtering operation runs inside startTransition. This allows React to prioritize user input while processing the heavier list update in the background.
4. useDebugValue
The useDebugValue hook lets you see custom debugging details for your own hooks directly in React Developer Tools.
Building reusable hooks can make it hard to track what values they're outputting. useDebugValue solves this; it lets you add descriptive labels or values visible in DevTools.
It doesn't affect how a component renders or behaves in production. Its sole purpose is to improve your debugging experience while developing.
So, when your custom hook uses useDebugValue, React DevTools displays these added details, allowing you to easily inspect that hook's state or output.
You'll typically use useDebugValue inside custom hooks, not regular components. Adding these meaningful debug values simply makes it easier to understand what a hook is doing when you're examining component trees in your development tools.
Example:
import { useState, useDebugValue } from "react";

function useOnlineStatus() {
  const [isOnline, setIsOnline] = useState(true);

  useDebugValue(isOnline ? "Online" : "Offline");

  return isOnline;
}
In this example, the useOnlineStatus custom hook uses useDebugValue to show a readable label in React DevTools, making it easier to inspect the hook’s current state during debugging.
Custom Hooks in React Native
If you've worked on many React Native projects, you'll quickly notice similar hook-based logic popping up in different components.
You'll often find yourself writing the same logic repeatedly for things like API requests, authentication checks, or shared UI management.
When that happens, keeping the logic within individual components makes the code tougher to maintain and reuse.
Instead of repeating that logic in every component, you can pull it out into a custom hook. A custom hook is just a regular JavaScript function that bundles related hook logic into one reusable unit.
Components can then call it like any other hook and get the behavior it provides.
It organizes your app's logic better. Instead of embedding complex behavior right in components, you can shift that logic to custom hooks, making it available wherever that function is needed.
Just like built-in hooks, custom hooks need to follow the Rules of Hooks and start their names with use. This naming convention helps React properly track how hooks are used during rendering and apply its internal mechanisms consistently.
Example
The following example demonstrates how a custom hook can group reusable logic into a single function that multiple components can use.
import { useState } from "react";

function useToggle(initialValue = false) {
  const [isOn, setIsOn] = useState(initialValue);

  const toggle = () => setIsOn(prev => !prev);

  return { isOn, toggle };
}
In this example, the useToggle hook manages a simple toggle state. Instead of writing the same state logic in multiple components, the behavior is encapsulated inside the custom hook and returned as reusable values.
Best Practices and Common Pitfalls When Using Hooks
React hooks are easier to use in managing state and behavior in components, although they need developers to adhere to some patterns that allow them to be reliable.
A lot of problems that developers face with hooks are not related to the hooks; the problem is how they are organized within components, which is an important part of the advantages of using React for complex interfaces.
By observing several practices, it becomes possible to ensure that hooks remain consistent and easier to maintain as applications scale within CI/CD pipelines for React Native.
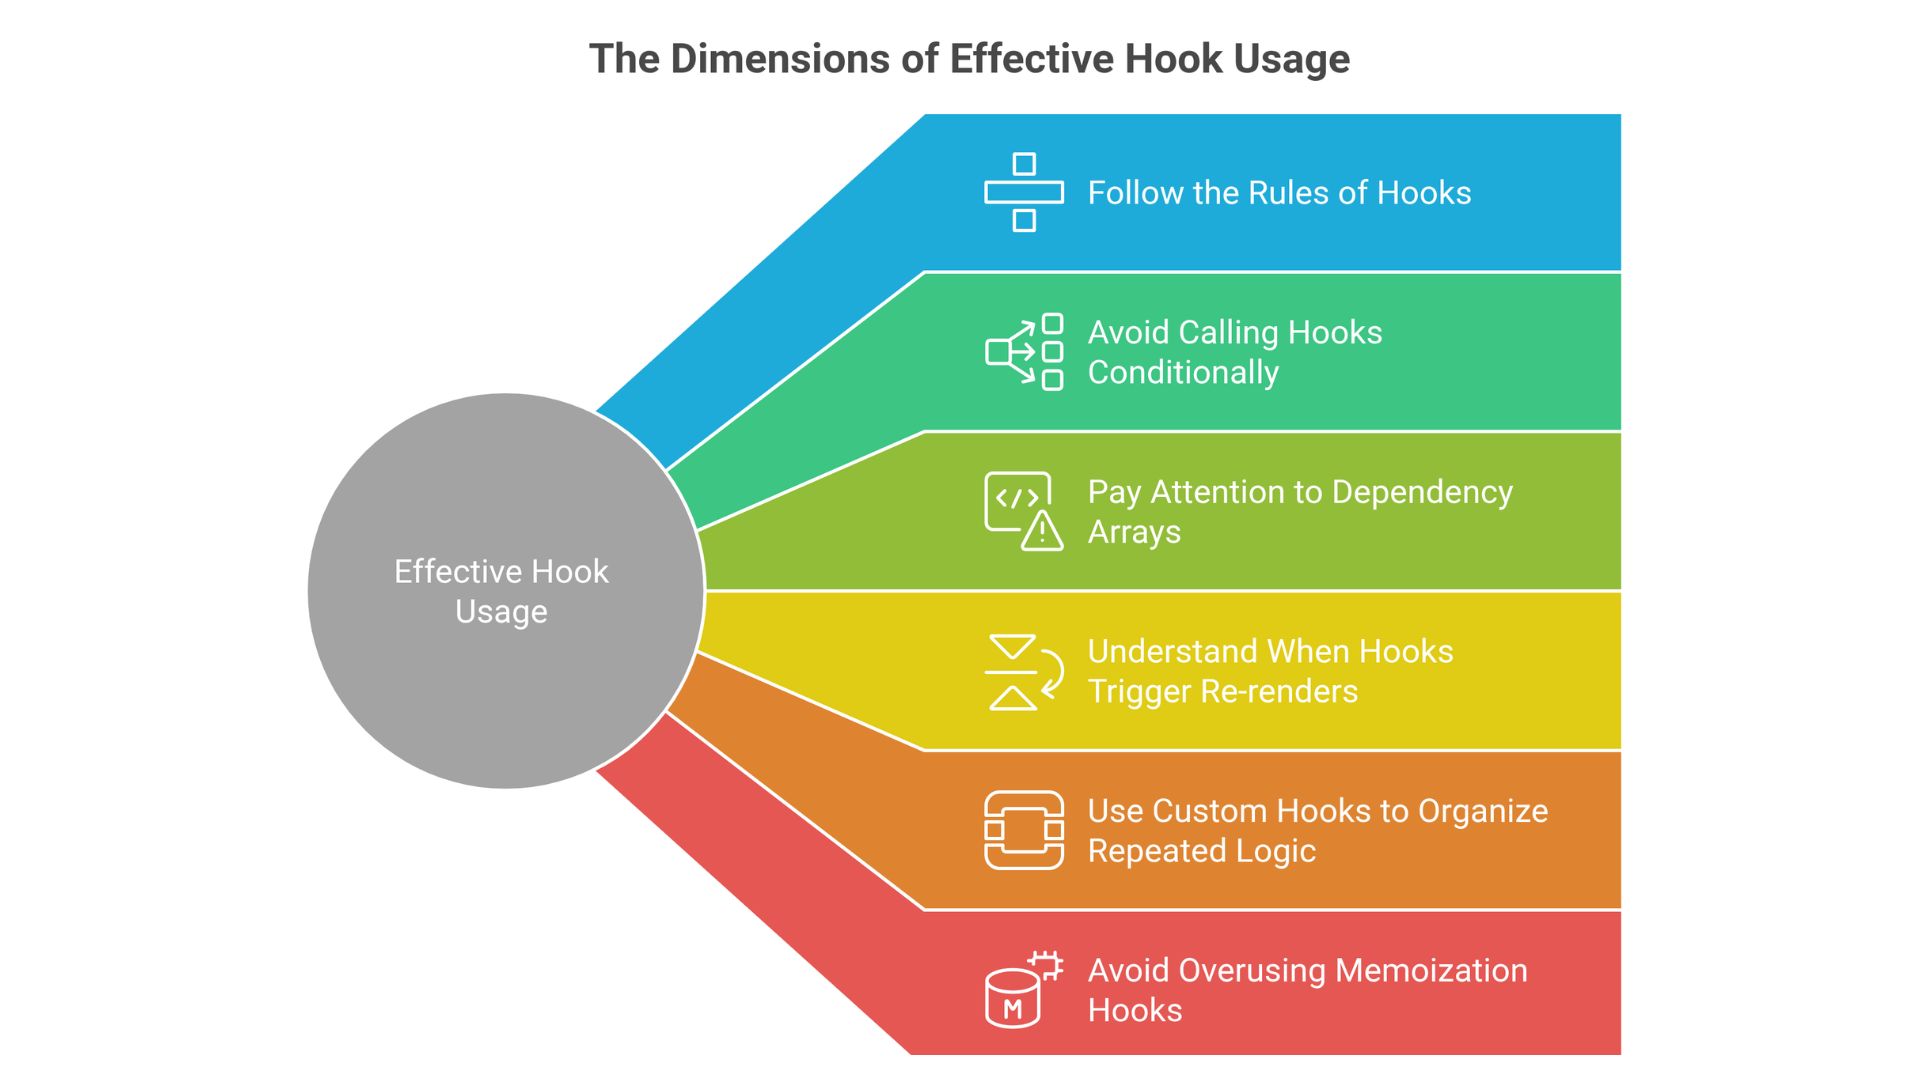
Follow the Rules of Hooks
Hooks are supposed to be accessed at the highest level of a component or within some other hook.
They are not to be placed within loops, conditions, or nested functions. React is based on the order that hooks execute each render, and swapping this order may cause React to lose its internal state tracking.
Avoid Calling Hooks Conditionally
Hooks need to have the same order of execution per render. When they are put into conditions or branching logic, it may alter the sequence in which hooks are run, potentially causing perverse behavior.
Rather than conditionally calling hooks, place the hook declaration on the top-level and deal with conditions within the hook logic.
Pay Attention to Dependency Arrays
UseEffect, usememo, and usecallback hooks utilize dependency arrays to decide when their logic can run again. Dependencies can be left out and lead to the hook using old values, whereas unnecessary dependencies can trigger extra re-renders.
The study of dependency arrays can be useful to keep the behavior predictable.
Understand When Hooks Trigger Re-renders
Other hooks, like useReducer and useState, cause a component to re-render when there is a change in their values. This behavior is significant to understand in order to organize component logic.
State updates that are not necessary can lead to repeated renders, whereas close attention to state changes can ensure efficiency of the components.
Use Custom Hooks to Organize Repeated Logic
In situations where the identical hook patterns are used across several components, it becomes easier to extract that logic into reusable abstractions that support scalable architectures like microservices with Node.js and React.
This is to maintain components that are concerned with making UI and common behavior reusable and simpler to maintain throughout the application.
Avoid Overusing Memoization Hooks
Hooks such as useMemo and useCallback are also aimed at performance optimization, which is not always required. They can add complexity to performance that is not necessary since they can be used everywhere.
These hooks come in most handy in terms of avoiding costly recalculations or minimising unnecessary re-renders in larger parts.
Use Cases for React Native Hooks
Hooks are commonly combined to complete simple developmental tasks like data fetching, user input handling, and state sharing across screens in most React Native apps.
Rather, developers use several hooks together to control data, user interactions, and shared logic in the application.
The scenarios below point to the common occurrence of hooks in a real React Native development.
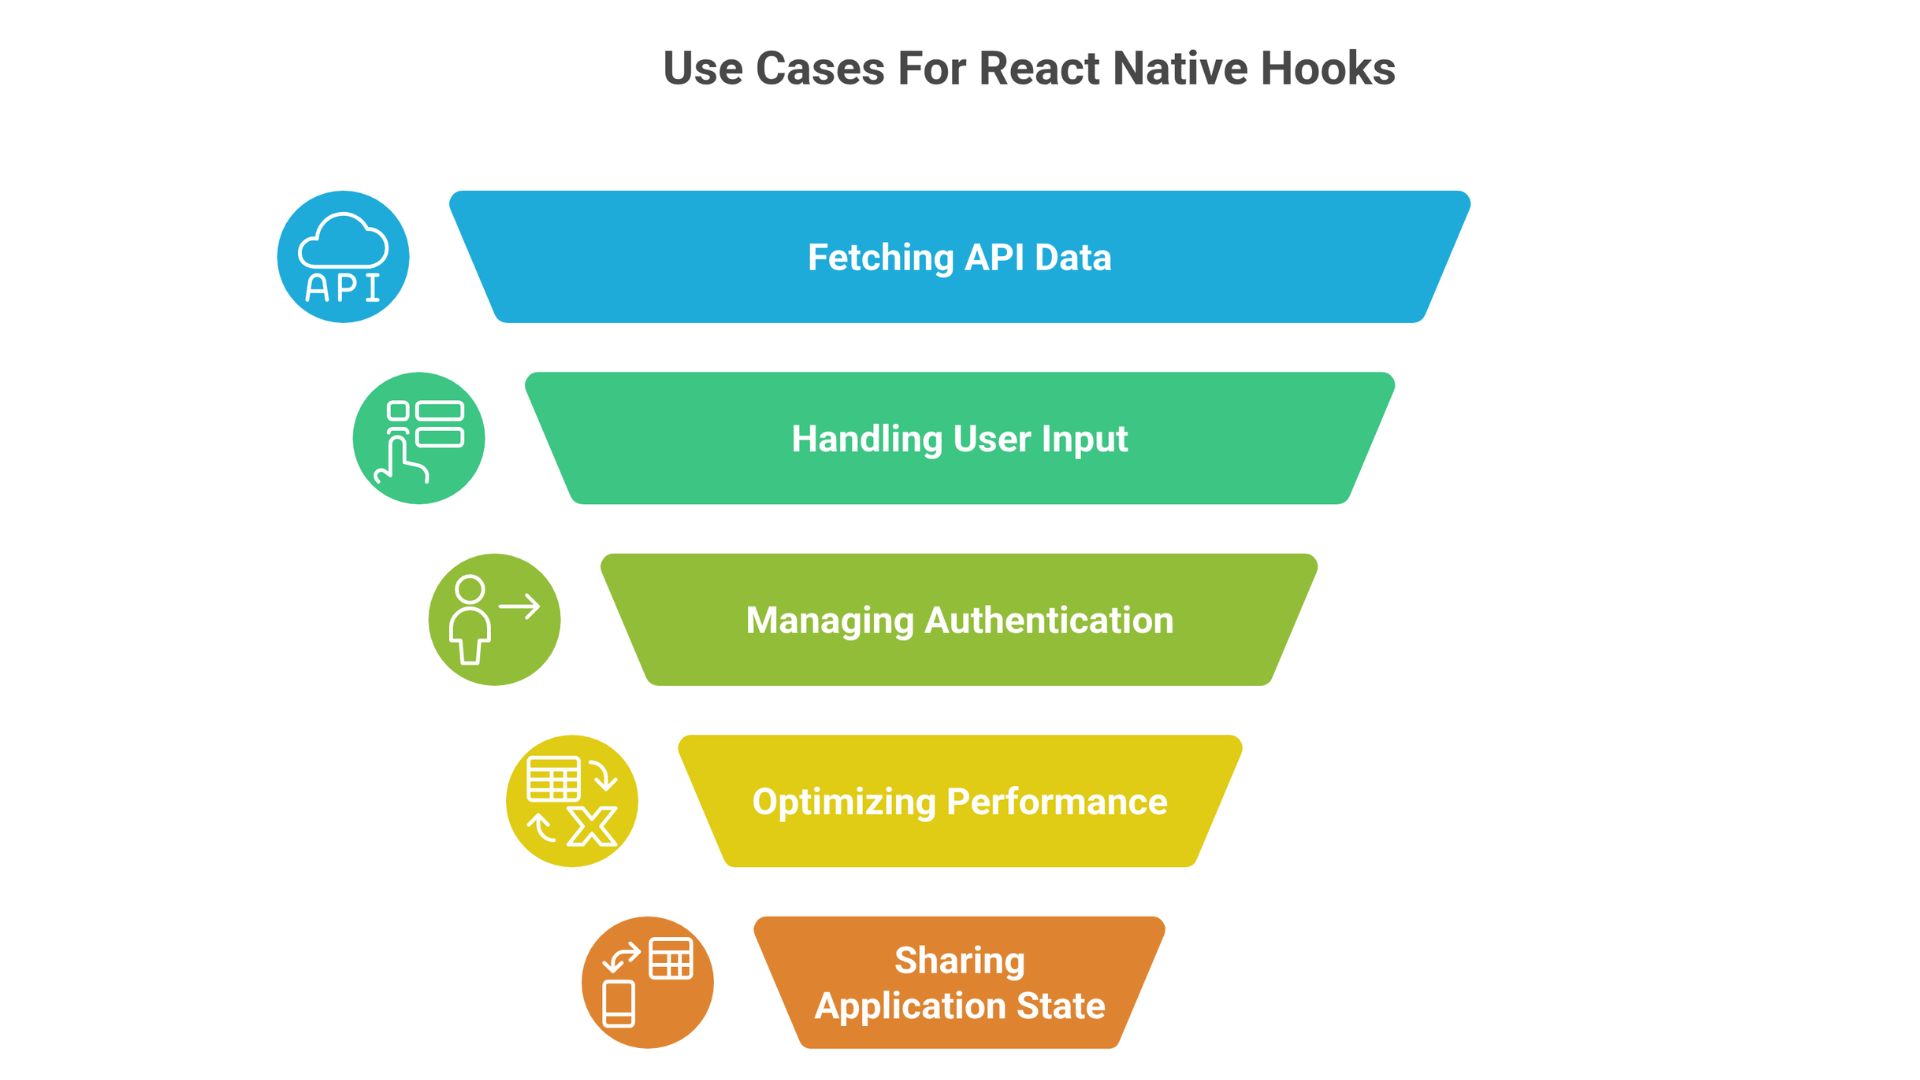
Fetching and Managing API Data
The data obtained by mobile applications is often read by remote services, such as the list of products, user profiles, or content feeds.
Hooks enable the components to accept such requests and refresh the interface when data is made available.
Developers, in most instances, combine hooks to adjust the loading state when a screen is shown and store the retrieved information before rendering it or saving it in some of the top React Native local databases used in mobile apps.
Handling Form Inputs and User Interaction
Forms are used in mobile applications, be it in authentication, account creation, or feedback.
Hooks facilitate easier monitoring of input values, reaction to changes, and control of component updates in the event that the user interacts with the elements of a form.
The methodology maintains form logic within the component instead of basing it on elaborate class-based patterns.
Managing Authentication and User Sessions
Numerous applications must monitor the presence of a user and restrict access to various sections of the interface.
This state is managed with the help of hooks, which store authentication data and update the UI in case of changing the status of the login.
In bigger applications, such logic is frequently coupled with shared state patterns to allow several screens to share user data.
Optimizing Performance in Complex Interfaces
Other screens display big lists, execute filtering, or pass functions to other child screens. The memoization hooks are made to make sure that such operations are not run every time a render is done.
The developers are able to maintain responsive interfaces even when the components become complex by controlling the recalculation of values or functions.
Sharing Application State Across Components
Many applications need some information to be available across multiple components, e.g, a theme setting or user preferences, or global configuration.
Hooks simplify the way of handling this shared state, and allow components to be loosely attached. This method is used to ensure that there is a consistent behavior during the application without too much prop flowing.
 WhatsApp
 Call Us
 Mail Us