


Detailed Guide On React Tables - Features, Implementation, Types & Challenges


Displaying structured data is a common requirement in modern React applications, whether it’s managing product inventories, visualizing user activity, or building admin panels. While basic HTML tables serve simple needs, they quickly fall short when you require features like sorting, filtering, responsiveness, or handling large datasets efficiently, especially when paired with the right React IDEs and code editors that support smooth component development.
Implementing these functionalities in React can be complex, especially when performance and flexibility are priorities. This is where React table libraries step in, offering powerful tools to build customizable, extensible, and user-friendly data grids with minimal effort.
In this guide, you’ll learn how to implement powerful tables in React using libraries like TanStack Table, explore different table types, understand key features, and solve common challenges developers face while working with data-heavy UIs.
React tables are essential when working with structured data in web applications. Whether you're managing product lists, user records, or performance metrics, tables allow developers to display large volumes of data clearly and interactively.
Modern React libraries go beyond basic layouts by supporting features like sorting, filtering, inline editing, and row virtualization, helping improve both performance and user experience. Choosing between headless libraries and pre-built grids depends on how much flexibility and control your project demands, similar to the trade-offs developers face when choosing between React and Angular for front-end projects.
A well-structured React table can significantly reduce development time, enhance usability, and keep your codebase modular and maintainable. For developers working on dynamic interfaces, mastering table components is a key step toward building responsive, data-driven UIs.
What are React Tables?
A React table is a UI component that structures data into a grid-like format, rows and columns, allowing for sorting, filtering, editing, and more. Unlike HTML tables, React tables are dynamic, interactive, and customizable through JavaScript logic.
Cases where React Tables are used:
- Admin dashboards
- Data analytics portals
- CRMs and internal tools
- E-commerce backends
- Financial applications
Features of Modern React Table Libraries
React tables have evolved from static displays to feature-rich data grids. Below are core capabilities that most modern libraries aim to offer:
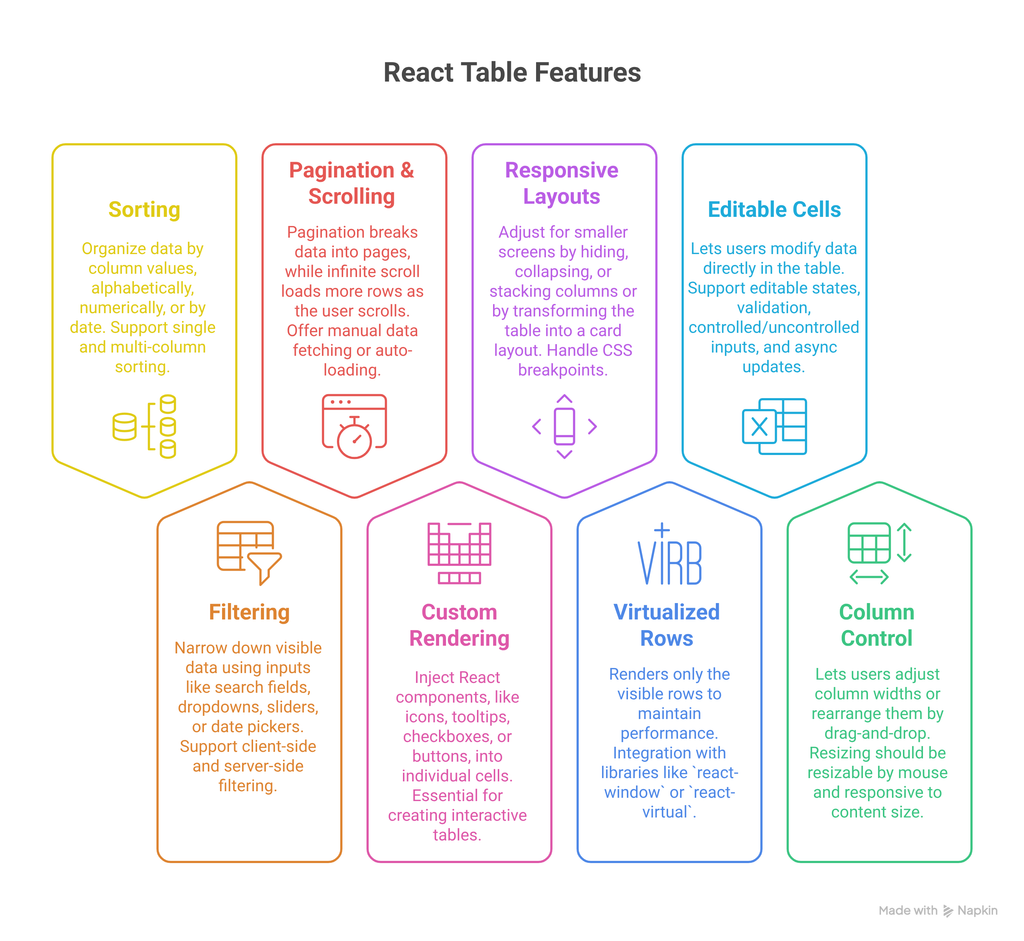
1. Sorting
Sorting allows users to organize data by column values, alphabetically, numerically, or by date. A good table library should support both single-column and multi-column sorting, with custom sort logic for complex data types like dates or currencies.
2. Filtering
Filtering enables users to narrow down visible data using inputs like search fields, dropdowns, sliders, or date pickers. Look for support for both client-side and server-side filtering, especially when dealing with large or dynamic datasets.
3. Pagination & Infinite Scrolling
Pagination breaks data into pages to improve performance and UX, while infinite scroll loads more rows as the user scrolls. Libraries should offer both, with options for manual data fetching or auto-loading via callbacks, depending on how you've implemented infinite scroll in React.
4. Custom cell rendering
Custom renderers allow developers to inject React components, like icons, tooltips, checkboxes, or buttons, into individual cells. This is essential for creating interactive tables with features like inline actions, badges, or dynamic formatting.
5. Responsive layouts
Responsive tables adjust for smaller screens by hiding, collapsing, or stacking columns or by transforming the table into a card layout. A solid table setup should handle CSS breakpoints and conditional rendering for different viewports, especially when paired with utility-first frameworks like Tailwind CSS in React projects.
If you're working on a project with Next.js, check out our guide to install and set up Tailwind CSS with Next.js for a clear walkthrough on configuring your environment for responsive, utility-based design.
6. Virtualized rows
When working with thousands of rows, virtualization renders only the visible rows to maintain performance. Integration with libraries like react-window or react-virtual It is crucial to avoid slow rendering and DOM overload.
7. Editable cells
Inline editing lets users modify data directly in the table. Libraries should support editable states, validation, controlled/uncontrolled inputs, and async updates to sync changes with APIs or external stores.
8. Column resizing & reordering
This feature lets users adjust column widths or rearrange them by drag-and-drop. Ideally, resizing should be resizable by mouse, responsive to content size, and persist across sessions using local storage or state management.
Popular React Table Libraries
Here’s a quick side-by-side view of some popular table libraries and what they offer:
React Table guide
Implementing a dynamic table in React starts with selecting a flexible and expandable library. For this guide, we'll use TanStack Table (React Table v8), a headless, lightweight, and extensible solution ideal for custom UI needs.
Unlike UI-based libraries, TanStack Table doesn’t impose styles or markup; it focuses purely on table logic, giving you full freedom over how the table looks and behaves.
Step 1: Install the Required Package
Use npm or yarn to install the TanStack Table core package:
npm install @tanstack/react-tableThis will include everything needed to build rows, columns, and core rendering logic.
Step 2: Define Your Columns and Data
You’ll need two essentials:
An array of column definitions
A data array representing each row
const columns = [
  {
    header: 'Name',
    accessorKey: 'name',
  },
  {
    header: 'Email',
    accessorKey: 'email',
  },
];

const data = [
  { name: 'John Doe', email: 'john@example.com' },
  { name: 'Jane Smith', email: 'jane@example.com' },
];
Each column uses accessorKey to map the field name in your dataset. You can also define custom headers and cell renderers later.
Step 3: Set Up the Table Instance
Use the useReactTable hook to create a table instance. This hook binds your data and columns to the internal logic of TanStack Table:
const table = useReactTable({
  data,
  columns,
  getCoreRowModel: getCoreRowModel(),
});
getCoreRowModel() it is a required function that generates the base row structure. Additional models like pagination or sorting, can be added here.
Step 4: Render the Table in JSX
Now render the full table by mapping over the table's header and row models:
<table>
  <thead>
    {table.getHeaderGroups().map(headerGroup => (
      <tr key={headerGroup.id}>
        {headerGroup.headers.map(header => (
          <th key={header.id}>
            {flexRender(header.column.columnDef.header, header.getContext())}
          </th>
        ))}
      </tr>
    ))}
  </thead>
  <tbody>
    {table.getRowModel().rows.map(row => (
      <tr key={row.id}>
        {row.getVisibleCells().map(cell => (
          <td key={cell.id}>
            {flexRender(cell.column.columnDef.cell, cell.getContext())}
          </td>
        ))}
      </tr>
    ))}
  </tbody>
</table>
The flexRender() This function ensures that your header and cell content support plain values or functional React components.
Step 5: Add Features (Sorting, Filtering, Pagination)
To make your table more interactive:
- Add
getSortedRowModel()for sorting - Use
getPaginationRowModel()for pagination - Add state hooks like
sorting,pagination, and custom handlers
Example enhancement for sorting:
const [sorting, setSorting] = useState([]);

const table = useReactTable({
  data,
  columns,
  state: { sorting },
  onSortingChange: setSorting,
  getCoreRowModel: getCoreRowModel(),
  getSortedRowModel: getSortedRowModel(),
});
And update the header to be clickable for sorting:
<th onClick={header.column.getToggleSortingHandler()}>
  {flexRender(header.column.columnDef.header, header.getContext())}
</th>
Types of React Tables
Not all tables serve the same purpose in a React application. Depending on your project’s data size, interactivity level, and user needs, different types of tables offer different advantages. This section outlines the main types of React tables, from static layouts to virtualized grids, and when to use each for optimal performance and usability.
1. Static tables
Used for displaying small, fixed datasets where no user interaction is needed, ideal for simple UI layouts, content-driven pages, or read-only reports.
2. API-Driven tables
These tables fetch and update data from RESTful or GraphQL APIs. They dynamically respond to user inputs like filters, search, and pagination, making them perfect for SaaS dashboards and real-time interfaces.
3. Editable tables
Allow users to modify cell or row values directly within the table. Common in admin panels, configuration tools, and financial dashboards, where inline editing and validation are essential.
4. Virtualized tables
Designed to handle large datasets by rendering only the visible rows at a time. Libraries like react-window or react-virtual help reduce performance bottlenecks, making them ideal for analytics-heavy or data-intensive apps.
5. Tree tables/Expandable rows
Suitable for hierarchical or nested data structures like file systems, category trees, or threaded conversations. These tables often use animation libraries to enhance the user experience when expanding or collapsing rows.
Building a Customer Support Ticket Viewer with React Table
Challenge
A customer service SaaS platform needed an interactive table to manage thousands of support tickets. Key requirements included dynamic sorting, column filtering, pagination, and expandable rows to show conversation summaries, all while maintaining performance on mid-tier devices.
Solution
The development team opted for TanStack Table (React Table) due to its headless and extensible design. They implemented:
- Column-level filtering for ticket status, priority, and agent
- Sorting by creation date and SLA breach status
- Expandable rows to display full ticket threads
- Pagination with manual server-side data fetching
- Custom renderers for badges and avatars
Code Snippet: Setting Up Column Filters and Sorting
import {
  useReactTable,
  getCoreRowModel,
  getFilteredRowModel,
  getSortedRowModel,
  flexRender,
} from '@tanstack/react-table';
import { useState } from 'react';

function TicketTable({ data, columns }) {
  const [sorting, setSorting] = useState([]);
  const [columnFilters, setColumnFilters] = useState([]);

  const table = useReactTable({
    data,
    columns,
    state: { sorting, columnFilters },
    onSortingChange: setSorting,
    onColumnFiltersChange: setColumnFilters,
    getCoreRowModel: getCoreRowModel(),
    getSortedRowModel: getSortedRowModel(),
    getFilteredRowModel: getFilteredRowModel(),
  });

  return (
    <table>
      <thead>
        {table.getHeaderGroups().map(headerGroup => (
          <tr key={headerGroup.id}>
            {headerGroup.headers.map(header => (
              <th key={header.id}>
                {flexRender(header.column.columnDef.header, header.getContext())}
                {header.column.getCanFilter() && (
                  <input
                    type="text"
                    onChange={e => header.column.setFilterValue(e.target.value)}
                    placeholder={`Filter ${header.column.id}`}
                  />
                )}
              </th>
            ))}
          </tr>
        ))}
      </thead>
      <tbody>
        {table.getRowModel().rows.map(row => (
          <tr key={row.id}>
            {row.getVisibleCells().map(cell => (
              <td key={cell.id}>
                {flexRender(cell.column.columnDef.cell, cell.getContext())}
              </td>
            ))}
          </tr>
        ))}
      </tbody>
    </table>
  );
}
Result
The team was able to reduce table load time by 35%, even on lower-end laptops. With React Table's headless approach, they matched the company’s design system precisely, without relying on external UI kits. Agents experienced faster load times and better ticket visibility, improving overall resolution time by nearly 20%.
Common Challenges with React Tables (And Solutions)
Performance with large datasets
Problem: Rendering thousands of rows causes jank.
Solution: Implement virtualization (react-virtual, react-window).
Custom cell logic
Problem: Rendering icons, dropdowns, or charts inside cells can get messy.
Solution: Use memoized components and flexRender().
Responsive design
Problem: Wide tables break on small screens.
Solution: Use column collapsing, mobile view switches, or convert rows to cards on mobile.
Accessibility (A11y)
Problem: Most custom table UIs break keyboard navigation.
Solution: Use ARIA roles, tab indices, and proper focus management.
Sorting & filtering edge cases
Problem: Complex filters (e.g., date ranges, currency) can conflict with UI logic.
Solution: Use server-side filtering or custom filter logic hooks.
Best Practices for Building Production-Ready React Tables
1. Use Headless Table Libraries
- Gives full control over layout and behavior.
- Use TanStack Table for flexibility.
2. Memoize Data and Columns
const columns = useMemo(() => [...], [])
const data = useMemo(() => [...], [])
3. Debounce Filtering and Search
- Prevent unnecessary re-renders and API calls.
4. Use Skeleton Loaders or Empty States
- Improve perceived performance and UX.
5. Separate Table Logic from UI
- Keep business logic in hooks (
useTableLogic) and render separately.
6. Audit Performance
- Use Chrome DevTools or React Profiler for render bottlenecks.
Conclusion
Building tables in React isn’t just about displaying rows and columns; it’s about choosing the right balance of performance, flexibility, and functionality based on your app’s needs. Whether you opt for a headless library like TanStack Table, a UI-integrated grid like MUI DataGrid, or even a custom-built solution, your choice should reflect your project’s scale and user expectations. For teams planning external collaboration or looking to speed up delivery, understanding how to outsource React development efficiently can also play a key role.
Instead of reinventing the wheel, use well-maintained libraries unless your use case demands a lightweight or highly customized table. With the right setup, React tables can handle everything from simple listings to complex data workflows. If you're new to combining design systems with React, check out our step-by-step guide to Bootstrap ReactJS for beginners to build consistent and responsive UI components alongside your data tables.
 WhatsApp
 Call Us
 Mail Us