


How to Build a Mobile App Using Kotlin: A Complete Guide for 2026


Android runs on an estimated 3.9 billion devices globally and holds over 72% of the mobile OS market share. If you are building for mobile, you are building for Android. And if you are building for Android in 2026, you are building with Kotlin.
Kotlin is Google’s preferred language for Android development and has become the standard for modern Android apps. It supports faster development, cleaner code, and easier long-term maintenance than older Java-based workflows. From startup MVPs to large-scale consumer platforms, Kotlin is now widely used across Android projects of every size.
This guide explains how to build a mobile app using Kotlin through a practical, step-by-step approach. It covers project setup, Android Studio, UI development with Jetpack Compose, database and API integration, testing, Play Store deployment, development costs, and the common mistakes that slow projects down.
What You Need Before Building an Android App with Kotlin

Before opening Android Studio and creating your first project, it helps to have a few essentials in place. Successful Android apps usually depend less on the language itself and more on clear planning, the right development setup, and early technical decisions that prevent rework later.
Whether you are building a small utility app or a larger commercial product, these foundations make the development process faster and more stable.
Development Tools
Android Studio remains the standard environment for Kotlin Android development because it brings coding, debugging, device emulation, and build management into one workflow. That matters once a project grows beyond a few screens, where fragmented tooling tends to slow iteration and troubleshooting.
Hardware also affects productivity more than many teams expect. Slow builds, lagging emulators, and memory bottlenecks can waste hours each week. For active development, SSD storage and sufficient RAM usually make a noticeable difference.
Project Scope
A clear mobile app development budget often helps teams keep version one focused on the features users actually need. Focused releases usually perform better than feature-heavy ones that take too long to launch.
Before starting, define the core outcome of version one. If the app’s purpose is clear, product decisions become easier, timelines stay realistic, and development effort stays concentrated on what users will actually use first.
Core Features
Some features are simple to add later. Others shape the project from the beginning. User authentication, offline storage, payments, subscriptions, chat, maps, analytics, and third-party integrations often affect architecture, security, testing, and ongoing maintenance.
Identifying these requirements early reduces rework and helps choose the right stack from day one.
Existing Java Codebases
For businesses with older Android apps, Kotlin does not require a complete restart. It works alongside Java in the same project, which allows teams to modernize gradually instead of funding a risky full rewrite.
That flexibility is one reason Kotlin became widely adopted across both new apps and legacy Android systems.
Once these areas are clear, moving into project setup becomes faster and far more predictable.
How to Build an Android App Using Kotlin: Step-by-Step

Building an Android app with Kotlin usually follows the same core path: set up the project, create the interface, manage data, connect external services, test thoroughly, and prepare the release build. The tools may vary by project size, but the overall workflow remains similar for most modern Android apps.
This guide uses that structure so you can move from idea to launch in a practical sequence.
Step 1: Set Up Android Studio
Android Studio is the official IDE for Android development and the main tool you will use throughout this guide. Among modern mobile app IDEs, it remains the standard choice for Android projects.
Built on IntelliJ IDEA, it includes a code editor, UI preview, device emulator, debugger, and build system already configured for Android projects.
Download the latest stable version from the official Android Developers website for Windows, macOS, or Linux. You do not need a Mac to build Android apps, which is only necessary when developing for iOS.
During installation, let the setup wizard install the Android SDK, platform tools, and at least one emulator image. First-time setup usually takes 15 to 30 minutes, depending on system performance and internet speed.
For smoother development, use at least 8GB RAM, though 16GB is noticeably more comfortable when running emulators and Gradle builds. A 64-bit operating system and sufficient free storage are also recommended.
Once installation is complete, open the SDK Manager and confirm the latest supported Android platform version is installed. Keeping SDK components updated helps avoid compatibility issues later when testing devices or preparing Play Store releases.
Step 2: Create Your Kotlin Project
Creating a project in Android Studio takes only a few minutes, but the choices you make here, especially package name, minimum SDK, and language, can stay with your app long after launch.
From the Welcome screen, click New Project. Under Phone and Tablet, select Empty Activity, which creates a starter project using Jetpack Compose by default in current versions.
Enter your app name, choose a package name in reverse-domain format, such as com.yourname.appname, Select Kotlin as the language, and set the minimum SDK to a practical baseline such as API 26 for broad device support.
Click Finish. Android Studio will build the project, download Gradle dependencies, and open the workspace.
Run the app with the green play button. If the setup is complete, the default screen will launch on your emulator, and your first Kotlin Android app is now running.
Step 3: Build the UI with Jetpack Compose
Jetpack Compose is now the standard way to build Android interfaces. Instead of managing separate XML layout files and Kotlin logic for each screen, Compose lets you create the UI directly in Kotlin using composable functions.
This approach usually speeds up development, reduces boilerplate, and makes screens easier to maintain as projects grow. It also works naturally with modern Android architecture and reactive state updates.
Example: A Simple Task List Screen
The example below uses a basic to-do app screen with a top bar, floating action button, and scrollable task list.
@Composable
fun TaskListScreen(tasks: List<Task>, onAddTask: () -> Unit) {
    Scaffold(
        topBar = { TopAppBar(title = { Text("My Tasks") }) },
        floatingActionButton = {
            FloatingActionButton(onClick = onAddTask) {
                Icon(Icons.Default.Add, contentDescription = "Add task")
            }
        }
    ) { padding ->
        LazyColumn(contentPadding = padding) {
            items(tasks) { task -> TaskItem(task) }
        }
    }
}
Core Concepts in Jetpack Compose
Composable Functions
Any function marked with @Composable can describe part of the interface. These functions are reusable and can be previewed directly in Android Studio.
Modifiers
Modifiers control layout, spacing, size, background styling, and click behavior. They are commonly chained together for cleaner UI control.
State Management
Tools such as remember and mutableStateOf help manage UI state in Jetpack Compose, allowing the interface to automatically update when observed data changes.
Material 3 Components
Compose includes production-ready components such as buttons, text fields, cards, app bars, dialogs, and lists that follow modern Android design patterns.
Once the interface is in place, the next step is connecting screens and navigation.
Step 4: Add Navigation Between Screens
Almost every real app has multiple screens. The Navigation component manages screen transitions, back-stack behaviour, and data passing between destinations in a structured way that helps avoid common routing issues.
Add the dependency implementation("androidx.navigation:navigation-compose:2.8.5"), then define a NavHost, which acts as the container for your screen flow:
@Composable
fun AppNavigation() {
    val navController = rememberNavController()

    NavHost(
        navController = navController,
        startDestination = "taskList"
    ) {
        composable("taskList") {
            TaskListScreen(
                onAddTask = {
                    navController.navigate("addTask")
                }
            )
        }

        composable("addTask") {
            AddTaskScreen(
                onBack = {
                    navController.popBackStack()
                }
            )
        }
    }
}
Use navController.navigate("addTask") to move forward and navController.popBackStack() to return to the previous screen. Data can also be passed through routes for detail or edit views.
Step 5: Store Data with Room Database
Most apps need to save data between sessions. Whether it is tasks, preferences, cached content, or user-generated input, relying only on temporary memory is not enough.
Room is Google’s recommended local database library for Android. It works as a wrapper over SQLite and integrates cleanly with Kotlin coroutines and Flow, allowing the UI to stay in sync with database changes without manual refresh logic.
Core Components of Room
Entity
Defines the structure of your stored data. In this example, a Task contains an id, title, and completion status.
DAO (Data Access Object)
Contains the queries and operations used to insert, update, delete, and fetch records. When combined with Flow, changes can automatically update the interface.
Database
Acts as the main access point to your stored data. It is commonly implemented as a singleton so only one database instance runs across the app.
@Entity(tableName = "tasks")
data class Task(
    @PrimaryKey(autoGenerate = true) val id: Int = 0,
    val title: String,
    val isCompleted: Boolean = false
)
Once Room is connected, the app can retain data locally and continue working across sessions.
Step 6: Connect APIs with Retrofit
If your app needs to fetch content from a server, submit data, or authenticate users, Retrofit handles it. It is the standard Android networking library and integrates cleanly with Kotlin coroutines, meaning network calls never block your UI thread.
API Integration in the To-Do App
Define your API interface, create the Retrofit instance with OkHttp underneath it, then call the API from your ViewModel inside a coroutine:
fun syncTasks() {
    viewModelScope.launch {
        _isLoading.value = true
        try {
            val remoteTasks = api.getTasks()
            taskDao.insertAll(remoteTasks)
        } catch (e: Exception) { /* handle error */ }
        finally { _isLoading.value = false }
    }
}
viewModelScope.launch runs on a background thread and automatically cancels if the ViewModel is cleared no memory leaks, no manual thread management, and no NetworkOnMainThreadException crashes
Step 7: Test the App Before Release
Testing is the difference between shipping something and shipping something that actually works. Even a basic test suite catches regression bugs before users find them, and dramatically reduces the cost of fixing issues after launch. An untested app that crashes for 10% of users costs far more in reviews and uninstalls than the time it would have taken to write the tests.
Three Types of Testing
Unit tests — run entirely on your machine and test individual functions in isolation. These should make up the bulk of your test suite. For our To-Do app, this means testing that markTaskComplete(taskId) correctly flips the isCompleted flag, and that tasks sort in the right order. Fast to write, fast to run.
Integration tests — verify that components work correctly together. For example, does your DAO actually insert a Task into Room and return it correctly from getAllTasks() These tests catch the gaps between components that unit tests miss individually.
UI tests with Compose Testing — simulate actual user interactions to verify that screens render and respond correctly. You can test that tapping the floating action button opens the AddTask screen, or that completing a task crosses it out in the list.
Beyond code-level testing, always test on multiple screen sizes (small phone at 360dp, standard phone at 400dp+, and tablet), in dark mode, in landscape orientation, and with a throttled or disconnected network connection using cloud-based mobile app testing where needed. Apps that work beautifully on the developer's flagship device regularly break on older, slower hardware.
Step 8: Publish to Google Play
Google Play requires a signed release build and a digital certificate proving app ownership. Every update to your app must be signed with the same certificate. This means if you lose the keystore file, you cannot push updates to your existing Play Store listing. You would need to publish as an entirely new app and ask all existing users to reinstall.
Generating Your Signed AAB
Go to Build → Generate Signed Bundle / APK. Select Android App Bundle (AAB) — Google Play now requires this format instead of APK. AAB lets Google generate optimised, smaller APKs tailored to each user's specific device, reducing download sizes for everyone.
When creating your keystore file, choose a permanent storage path, set strong passwords, and set validity to 25 years. Back up this file immediately to at least two separate locations, cloud storage, a password manager, and an external drive. The keystore file is the single most critical file in your entire project.
Setting Up Your Google Play Developer Account
Go to play.google.com/console and sign in with a Google account. Pay the one-time $25 registration fee, which covers unlimited app publications for life. Complete identity verification and agree to the developer distribution agreement. Account approval typically takes 24 hours.
What to Include in Your Store Listing
Before uploading, confirm: targetSdk is set to 35 (Android 15, required by Google Play for all new submissions from mid-2025 onward), all debug logging is removed, isDebuggable is false in the release build, and you have tested the signed AAB on at least one physical device.
In Play Console, go to Store Listing:
App title: up to 30 characters - include your main keyword where it reads naturally
Short description: up to 80 characters - your hook
Full description: up to 4,000 characters, indexed for Play Store search
Screenshots: minimum 2, maximum 8, required for phone
App icon: 512 × 512px PNG with no transparency
Feature graphic: 1024 × 500px
Complete the Content Rating questionnaire (answer accurately — misrepresentation leads to removal), the Data Safety form, and Pricing and Distribution settings. Upload your signed AAB under Releases → Production → Create new release.
Tools and Tech Stack for Kotlin App Development
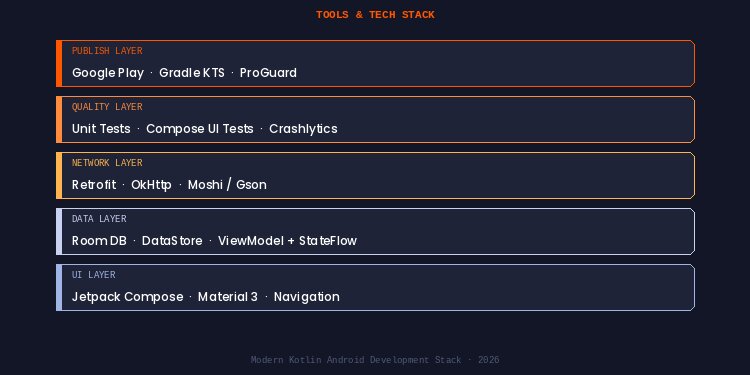
Kotlin is the language, but building a production-ready Android app usually involves a broader stack around it. Most projects combine UI tools, architecture components, networking libraries, storage systems, and build tools that work together.
The table below covers the tools most commonly used in modern Kotlin Android development and where they fit.
Core App Development Stack
For many new Android apps, this set of tools is enough to handle interface development, navigation, and lifecycle-aware state management. Smaller products often launch successfully before needing heavier architecture layers.
Data and Backend Integration
Once an app needs persistent storage, user accounts, live content, or sync across devices, these tools become far more important. They usually have a bigger impact on product capability than adding more UI features.
Productivity and Scaling Tools
These tools matter most when the codebase grows. They reduce repetitive code, improve maintainability, and make larger teams faster, especially when multiple developers work on the same app.
Not every Android app needs the full stack on day one. Many first-version products launch with Android Studio, Kotlin, Jetpack Compose, Retrofit, Room, ViewModel, and Coroutines. Additional tools are usually introduced when scale, team size, or feature complexity starts increasing.
Kotlin vs Java for Android
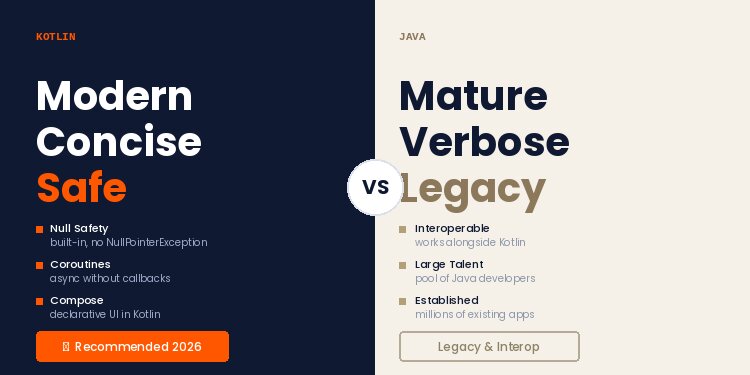
Kotlin and Java are both used in Android development, but they are no longer equal choices for most new projects. Kotlin has become the preferred language for modern Android apps, while Java remains common in legacy systems and teams with long-established Java workflows.
For businesses starting a new app, the decision usually comes down to development speed, maintainability, hiring needs, and how much existing Java code is already in place.
Kotlin vs Java Comparison
For most new Android apps, Kotlin offers a faster and cleaner development path. It reduces repetitive code, fits modern Android tooling more naturally, and generally lowers long-term maintenance overhead.
If you are building a new Android app in 2026, Kotlin is usually the stronger long-term choice. If you are maintaining an older Android product, Java may remain part of the stack for years, and Kotlin’s interoperability makes mixed-language projects practical.
How Much Does It Cost to Build an Android App Using Kotlin
The cost of building an Android app with Kotlin can range from a few thousand dollars to well over six figures, depending on what you are building and who is building it.
A simple utility app costs far less than a marketplace, subscription platform, or real-time service app. The biggest pricing factors are feature complexity, backend requirements, design quality, integrations, developer location, and project timeline.
Build It Yourself vs Hiring a Team
There are two common ways to build a Kotlin Android app: develop it internally or hire outside help. The right choice usually depends on budget, technical skill, speed requirements, and how much control you want over the process.
Comparing established mobile app development companies side by side makes it easier to find a partner with the right Kotlin and Android experience for your budget and timeline.
Typical Development Rates by Region
Regional hourly rates are often the starting point for companies comparing delivery models, especially when evaluating offshore mobile app development options.
Lower rates can improve budgets, but pricing alone rarely determines project success.
Hourly rates matter, but total project cost usually depends more on delivery quality, communication speed, and clearly defined scope than hourly pricing alone.
Estimated Cost by App Complexity
The biggest pricing jump usually comes from Marketplace-style products such as a shopping app, which usually sit at the higher end of this range because of catalog management, payments, and search, while a real-time platform like a food delivery app adds further cost through live order tracking and driver logistics.
For most app projects, cost is driven less by Kotlin itself and more by scope control, feature complexity, and execution quality. A well-scoped MVP built by the right team often outperforms a cheaper project that launches late, needs rebuilding, or misses core user needs.
Common Kotlin App Development Mistakes to Avoid
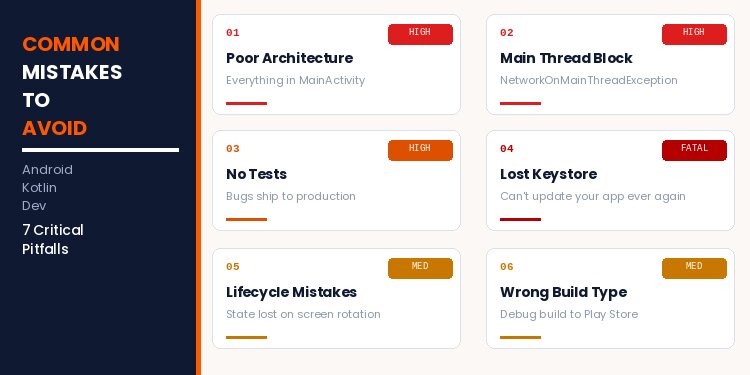
Most of these mistakes are not obvious until you have already made them. Reading through this list before you start building will save you hours of confused debugging and refactoring later.
Poor Architecture
Writing everything inside MainActivity.kt feels fast at first. By your fifth screen, you will have functions that are hundreds of lines long, state scattered across multiple places, and no clear path to testing anything. The fix is not heroic; learn MVVM before building your second feature. ViewModel separates your UI logic from your data layer, and once you have it, rotating the device, adding a new screen, and writing tests all become dramatically simpler.
Lifecycle Mistakes
When a user rotates their phone, Android destroys and recreates the Activity. Any data stored inside the Activity disappears. This is one of the most common beginner crash causes: the user rotates the screen, the app loses everything, and they see either a blank screen or a crash. Store state inside a ViewModel (which survives rotation) instead of the Activity itself, and this problem disappears entirely.
Main Thread Blocking
The main thread drives your UI. Any time-consuming operation, network requests, database reads, and file operations must run off it. In Kotlin, this means launching inside a coroutine with viewModelScope.launch. If you call a network operation on the main thread, Android throws NetworkOnMainThreadException , and your app crashes immediately. If you call a slow database query, Android freezes the UI until it completes, making the app feel unresponsive. Coroutines handle both cases with a single line change.
Hardcoded Values
It feels harmless to write Text("Add Task") or color = Color(0xFF1A73E8) directly in your composable. The problem surfaces when you have 40 screens, need to change a color, or want to support multiple languages. Every text string belongs in res/values/strings.xml. Every color belongs in your theme. This is not bureaucracy; it is the difference between a ten-minute change and a four-hour search-and-replace.
Wrong Release Build
Debug builds are larger, slower, include metadata that should never reach users, and are rejected by the Play Store's automated review. Always generate a signed release build through Build → Generate Signed Bundle / APK. The release build goes through ProGuard, strips debug symbols, and is what users actually install.
Losing the keystore file
This mistake has no recovery path. If you lose the keystore file used to sign your app, you cannot push updates to your existing Play Store listing. You would need to publish as a new app from scratch, losing all your ratings, reviews, and download history. Back it up immediately after creating it, use cloud storage, a secure password manager, and an external drive. Treat it like a bank account password.
Weak Testing
Apps with no test coverage look fine until users find the bugs. More importantly, every new feature you add has a chance of breaking something that was working before. Even basic unit tests for your ViewModel logic and DAO queries catch these regressions immediately, before users do. Starting with even 20% test coverage on critical paths is significantly better than zero.
Most Android setbacks come from rushed engineering habits, not Kotlin itself. Teams that invest early in architecture, release discipline, and testing usually deliver faster over time than teams trying to move fast through shortcuts.
 WhatsApp
 Call Us
 Mail Us