


Guide to building an Inventory Management System in Python


What is an inventory management system?
An inventory management system is a crucial tool for businesses, providing a systematic approach to overseeing the entire lifecycle of goods.
By constantly monitoring inventory levels, the system enables companies to make informed decisions regarding when to restock, preventing excess inventory and stock shortages.
It encompasses order processing, tracking sales, and managing deliveries, facilitating a seamless flow of information across various departments.
The overarching objective is to strike a delicate balance, ensuring that a company always has the right amount of stock to meet customer demand without incurring unnecessary holding costs or experiencing disruptions due to stockouts.
Code B developers have been very effective at providing similar enterprise application development for a very long time.
This blog will walk you through the process of building a simple inventory management system using Python and Flask , a common stack used by many software development companies for web-based business tools.

Prerequisites for developing an inventory management system (IMS).
- To efficiently write our code, we'll utilize Visual Studio Code, commonly known as VS Code, as our code editor. If you don't have VS Code installed, you can download it from their official website. Note that it is not necessary to use VS Code; you can use any code editor of your choice.
- Some understanding of Python, HTML, and CSS.
- Since our project is based on Python, it's imperative to have Python installed on your system. You can install the latest stable version of Python by visiting the official website. I am using Python 3.10.12.
- After we have successfully installed Python, we will now install pip. Now, what is a pip? pip is the package installer for Python. You can install pip using the official documentation.
Note that you might need to set path variables in your system's environment variables if you are using Windows. To set the path variable, you can refer to this answer on Stack Overflow.
We will also need some additional Python packages, which we will install on the go.
We have listed a group of Python packages for data science application-building projects.
All prerequisites are done. Let's dive into the Python world.
- We will use Python as the backend programming language and Flask as the web framework , a combination frequently adopted by offshore development companies for inventory and ERP tools due to its flexibility and open-source nature.
- Flask is a simple and flexible web framework for Python.
- It helps developers easily build web applications without unnecessary complexity.
- Flask's lightweight design makes it a popular choice for creating management systems apps, allowing for efficient and straightforward development with minimal code.
- You can always look for an ideal framework from a wide range of frameworks in Python libraries most suitable for your web development project.
STEP 1:
First of all, we will create a folder for our project. You can do this by simply creating a folder by right-clicking> new folder, or the other way is to execute the following command in the terminal.
mkdir python-imsSTEP 2 :
After you have successfully created a folder open it in VS Code by executing the following command in the terminal.
code python-imsSTEP 3:
Let's create a virtual environment for our project.
A virtual environment, or venv, is a built-in Python module that helps create and manage isolated Python environments.
It allows developers to encapsulate project dependencies, ensuring that each project operates independently without interfering with the global environment.
This command will create a virtual environment for us.
python -m venv venvLet's break down the above command
- Python: This is called the Python interpreter.
- -m venv: The -m flag tells Python to run a module as a script. In this case, the module is Venv, which is responsible for creating virtual environments.
- venv: This is the name of the directory where the virtual environment will be created. You can name this directory anything you likeke (e.g., myenv or env).
- In our case, we have named it venv.
STEP 4:
Now we will activate the virtual environment that we just created by using the following command in the terminal.
You will be able to see that a new environment is started in the terminal with the name venv in the braces.
If you want to exit out of the venv, just type the following command in the terminal.
deactivateSTEP 5:
Let's download the dependencies that we will use for our inventory management system. As we discussed prior, we will use the Flask framework for our project and MongoDB for the database. We will download those using pip now.
pip install Flask pymongoWe have now downloaded the required dependencies, and we are all set now.
STEP 6:
Create an app.py file in the root directory of the project, which will have all the code. Head over to the official Flask documentation and copy the template code for our app.py file. The template code looks like this.
from flask import Flask

app = Flask(__name__)

@app.route("/")
def hello_world():
    return "<p>Hello, World!</p>"
Importing our packages into our app.py file
We will start by importing the dependencies into our main file.
app.py
from flask import Flask, render_template, request, redirect, url_for
from pymongo import MongoClient
from bson import ObjectId
One by one, let's understand what we have imported:
- Flask, as we know, we will be using it for our web application.
- render_template is used to render HTML templates. It is commonly used to generate HTML pages dynamically.
- The request contains the incoming request data from the client. It is used to access form data, file uploads, and other information sent in the HTTP request.
- Redirect is used to redirect the user to a different endpoint.
- url_for is used to generate URLs for the given endpoint.
- MongoClient is used to connect to our MongoDB server.
- ObjectId will help us convert string IDs into MongoDB _ids.
Initializing our Flask app and connecting to our MongoDB server.
Let's now connect our app with MongoDB so we can perform database operations on it.
Add the following lines after initializing our app in the app.py file.
app = Flask(__name__)
client = MongoClient("your-mongo-srv")
db = client["inventory"]
collection = db["items"]
One by one, lets break down the code that we just added
1 . Flask Setup:
Here, we are creating an instance of the Flask class and assigning it to the variable app.
app = Flask(__name__)2. MongoDB Connection :
The argument provided to the MongoClient is the connection string for our MongoDB server.
# replace "your-mongo-srv" with your mongo string
client = MongoClient("your-mongo-srv")
3. Database and Collection Selection:
After connecting to our MongoDB server, we are creating a database inventory and collecting items within that database.
db = client["inventory"]
collection = db["items"]
Coding our APIs
Before writing our APIs, let's understand what an API is. An API (application programming interface) is like a magic messenger that lets different computer programs talk to each other.
It's like asking a robot friend to fetch a toy for you—you tell the robot what you want, and it brings it back.
Similarly, an API lets one program ask another program for information or help, making things work together smoothly
For instance, if you ask a weather API, it can tell your game what the weather is like, so your game knows whether it should be sunny or rainy.
Here's a demonstration of how a Twitter API can be utilized to create bots on the platform using Python.
Let's commence the development of our APIs.
Our web app will have many different API routes. Let's start with our home route.
@app.route('/')
def index():
    items = collection.find()
    return render_template('index.html', items=list(items))
The @app.route('/') decorator is used in Flask to define a route for the specified URL ("/" in our case). When a user accesses the root URL of your application, the function index() will be called.
The index() function will find all the items from the collection (in our case, we have defined the value of collection as items), will render the index.html page on the client side, and will pass the items to the HTML template. Generally, home route URLs are always ("/").
We are converting the items to list of documents because if we print the items that we get from database, it will print something like this
<pymongo.cursor. Cursor object at 0x7f263d863910>
What is this weird thing? A cursor is a pointer or iterator that points to a position within a set of data. When you execute a query, the database returns a cursor, and you can use this cursor to iterate over the result set.
Further moving on to the "/add_item" route. As the name suggests, we will be using this route to add items to our inventory.
@app.route('/add_item', methods=['POST'])
def add_item():
    if request.method == 'POST':
        item_name = request.form['item_name']
        quantity = int(request.form['quantity'])
        price = float(request.form['price'])

        item = {
            'item_name': item_name,
            'quantity': quantity,
            'price': price
        }

        collection.insert_one(item)

    return redirect(url_for('index'))
Whenever we hit the "add_items" route, the function add_item() will run.
It will check if the request method is POST, will extract item details from the form data (or you can also call it the request body), and will create a dictionary representing the new item.
This item will be inserted into our MongoDB collection using 'collection.insert_one(item)'.
Finally, we will be redirected to the 'index' route, which is the main page of our website where the updated list of items will be displayed.
Let's move on to the "/update_item" API. This API will be a bit different from the last one, as it will also accept params in the API route. We will first write the API and then discuss it.
@app.route('/update_item/<item_id>', methods=['GET', 'POST'])
def update_item(item_id):
    item = collection.find_one({'_id': ObjectId(item_id)})

    if request.method == 'POST':
        new_quantity = int(request.form['new_quantity'])
        new_price = float(request.form['new_price'])

        collection.update_one(
            {'_id': ObjectId(item_id)},
            {'$set': {'quantity': new_quantity, 'price': new_price}}
        )

        return redirect(url_for('index'))

    return render_template('update_item.html', item=item)
Here you can see we are accepting the <item_id> parameter in the API.
We can also call this route a dynamic route. We will use this ID to fetch the item from our database and perform the update operation on it.
Now you might be wondering why we have two request methods here, "GET" and "POST."
This is because when we click on the update button on the UI side, we need to first get the item from the DB and pre-fill the form.
For this, we will use the GET method. After editing our details and clicking on Update, we will send a POST request to update the document.
You can see that we are separating the two requests using the if statement.
We are converting the item_id to _id (MongoDB unique id) using the ObjectId function that we imported from the bson package to fetch the right document from the database.
After that, we just extract the new content from the request body and replace the existing field values with the new ones using the $set operator from MongoDB.
Now let’s create our final API, which will be the "/delete_item" API. This route is like the update route, i.e., it will also accept the item_id parameter in the API route.
@app.route('/delete_item/<item_id>')
def delete_item(item_id):
    collection.delete_one({'_id': ObjectId(item_id)})
    return redirect(url_for('index'))
This API is quite small compared to the other APIs.
We will accept the id parameter from our route, convert it to a MongoDB ObjectId, delete it from the database using the delete_one function, and finally redirect the user to the home page, which in our case is the index.html page.
After completing our four APIs, our app.py would look like this.
from flask import Flask, render_template, request, redirect, url_for
from pymongo import MongoClient
from bson import ObjectId

app = Flask(__name__)
client = MongoClient("mongodb+srv://local:local@local-cluster.crpsu8t.mongodb.net/")
db = client["inventory"]
collection = db["items"]


@app.route('/')
def index():
    items = collection.find()
    return render_template('index.html', items=list(items))


@app.route('/add_item', methods=['POST'])
def add_item():
    if request.method == 'POST':
        item_name = request.form['item_name']
        quantity = int(request.form['quantity'])
        price = float(request.form['price'])

        item = {
            'item_name': item_name,
            'quantity': quantity,
            'price': price
        }

        collection.insert_one(item)

    return redirect(url_for('index'))


@app.route('/update_item/<item_id>', methods=['GET', 'POST'])
def update_item(item_id):
    item = collection.find_one({'_id': ObjectId(item_id)})

    if request.method == 'POST':
        new_quantity = int(request.form['new_quantity'])
        new_price = float(request.form['new_price'])

        collection.update_one(
            {'_id': ObjectId(item_id)},
            {'$set': {'quantity': new_quantity, 'price': new_price}}
        )

        return redirect(url_for('index'))

    return render_template('update_item.html', item=item)


@app.route('/delete_item/<item_id>')
def delete_item(item_id):
    collection.delete_one({'_id': ObjectId(item_id)})
    return redirect(url_for('index'))


if __name__ == '__main__':
    app.run(debug=True)
We have completed the API side of the code.
Now just a few HTML divs here and there, and we will have our inventory management system ready!
Building Our Frontend
We will create a folder with name templates in the root directory of our project. Create two HTML files inside the templates folder: "index.html" and "update_item.html."
Note that we need to name these files the same names as we used in the app.py file. Open your cmd and paste the following command to create the files:
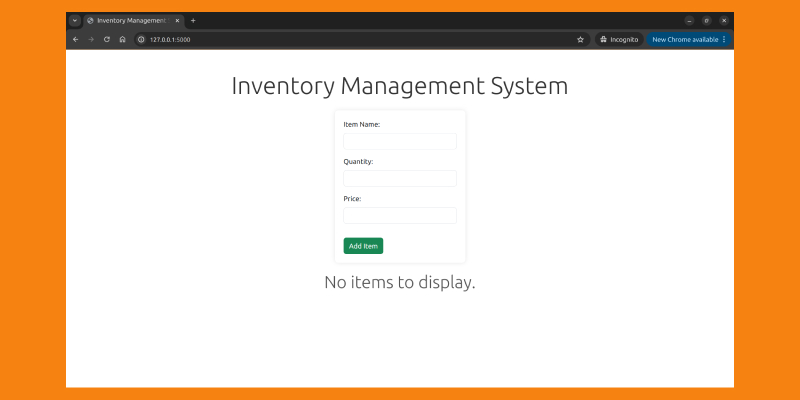
Let's code our home page i.e. index.html.
This page will contain a form through which we can create an item and also the page will list all the items with two options [update, delete] next to them.
We will use Bootstrap along with traditional CSS for our app. Check out how to integrate Bootstrap into your project here.
After coding everything our index.html would look like this
<!DOCTYPE html>
<html lang="en">
<head>
    <meta charset="UTF-8">
    <meta http-equiv="X-UA-Compatible" content="IE=edge">
    <meta name="viewport" content="width=device-width, initial-scale=1.0">
    <title>Inventory Management System</title>
    <!-- Bootstrap CSS -->
    <link rel="stylesheet" href="https://cdn.jsdelivr.net/npm/bootstrap@5.3.0/dist/css/bootstrap.min.css">
    <style>
        h1 {
            color: #333;
        }

        form {
            background-color: #fff;
            padding: 20px;
            border-radius: 8px;
            box-shadow: 0 0 10px rgba(0, 0, 0, 0.1);
            margin-bottom: 20px;
            max-width: 300px;
            margin: auto;
        }

        label {
            margin-bottom: 8px;
        }

        .no-items-message {
            color: #555;
            margin-top: 20px;
            text-align: center;
        }
    </style>
</head>
<body>
    <div class="container mt-5">
        <h1 class="display-4 d-flex justify-content-center w-100">Inventory Management System</h1>

        <form action="{{ url_for('add_item') }}" method="post" class="mt-4">
            <div class="mb-3">
                <label for="item_name" class="form-label">Item Name:</label>
                <input type="text" name="item_name" class="form-control" required>
            </div>

            <div class="mb-3">
                <label for="quantity" class="form-label">Quantity:</label>
                <input type="number" name="quantity" class="form-control" required>
            </div>

            <div class="mb-3">
                <label for="price" class="form-label">Price:</label>
                <input type="number" name="price" step="0.01" class="form-control" required>
            </div>

            <button type="submit" class="btn btn-success mt-3">Add Item</button>
        </form>
        {% if items %}
        <table class="table mt-4">
            <thead>
                <tr>
                    <th scope="col">Item Name</th>
                    <th scope="col">Quantity</th>
                    <th scope="col">Price</th>
                    <th scope="col">Actions</th>
                </tr>
            </thead>
            <tbody>
                {% for item in items %}
                <tr>
                    <td>{{ item.item_name }}</td>
                    <td>{{ item.quantity }}</td>
                    <td>{{ item.price }}</td>
                    <td>
                        <a href="{{ url_for('update_item', item_id=item._id) }}" class="btn btn-warning btn-sm">Update</a>
                        <a href="{{ url_for('delete_item', item_id=item._id) }}" class="btn btn-danger btn-sm">Delete</a>
                    </td>
                </tr>
                {% endfor %}
            </tbody>
        </table>
        {% else %}
        <p class="no-items-message display-6">No items to display.</p>
        {% endif %}
    </div>
    <script src="https://cdn.jsdelivr.net/npm/bootstrap@5.3.0/dist/js/bootstrap.bundle.min.js"></script>
</body>
</html>
Our home page would look like this in the browser
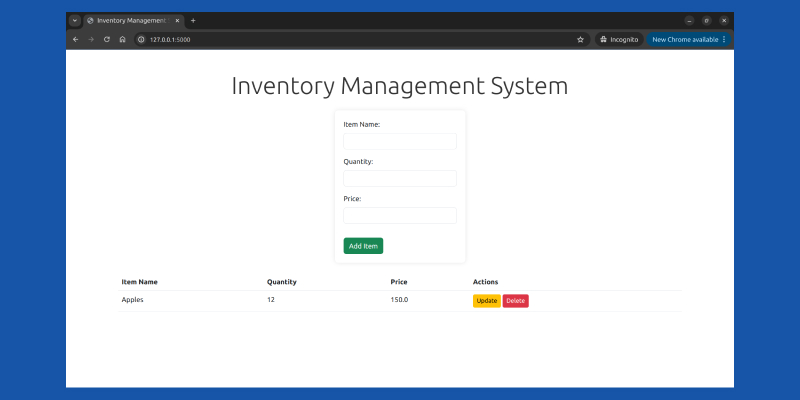
After we add an item to our database, the item will be displayed like this
Let's go ahead and fill in the update_item.html file that we created.
update_item.html
<!DOCTYPE html>
<html lang="en">
<head>
<meta charset="UTF-8">
<meta http-equiv="X-UA-Compatible" content="IE=edge">
<meta name="viewport" content="width=device-width, initial-scale=1.0">
<title>Update Item</title>
<!-- Bootstrap CSS -->
<link rel="stylesheet" href="https://cdn.jsdelivr.net/npm/bootstrap@5.3.0/dist/css/bootstrap.min.css">
<style>
body {
font-family: 'Arial', sans-serif;
background-color: #f4f4f4;
margin: 0;
padding: 0;
display: flex;
align-items: center;
justify-content: center;
height: 100vh;
}
h1 {
color: #333;
}
.custom-container {
text-align: center;
display: flex;
align-items: center;
justify-content: center;
flex-direction: column;
}
form {
background-color: #fff;
padding: 20px;
border-radius: 8px;
box-shadow: 0 0 10px rgba(0, 0, 0, 0.1);
width: 300px;
display: flex;
flex-direction: column;
align-items: center;
}
label {
margin-bottom: 8px;
}
input {
margin-bottom: 16px;
padding: 8px;
border: 1px solid #ccc;
border-radius: 4px;
}
button {
padding: 8px;
background-color: #4caf50;
color: #fff;
border: none;
border-radius: 4px;
cursor: pointer;
}
</style>
</head>
<body>
<div class="container custom-container">
<h1 class="mt-5">Update Item</h1>
<form action="{{ url_for('update_item', item_id=item._id) }}" method="post" class="mt-4">
<div class="mb-3">
<label for="new_quantity" class="form-label">New Quantity:</label>
<input type="number" name="new_quantity" value="{{ item.quantity }}" class="form-control" required>
</div>
<div class="mb-3">
<label for="new_price" class="form-label">New Price:</label>
<input type="number" name="new_price" step="0.01" value="{{ item.price }}" class="form-control" required>
</div>
<button type="submit" class="btn btn-success">Update Item</button>
</form>
</div>
<script src="https://cdn.jsdelivr.net/npm/bootstrap@5.3.0/dist/js/bootstrap.bundle.min.js"></script>
</body>
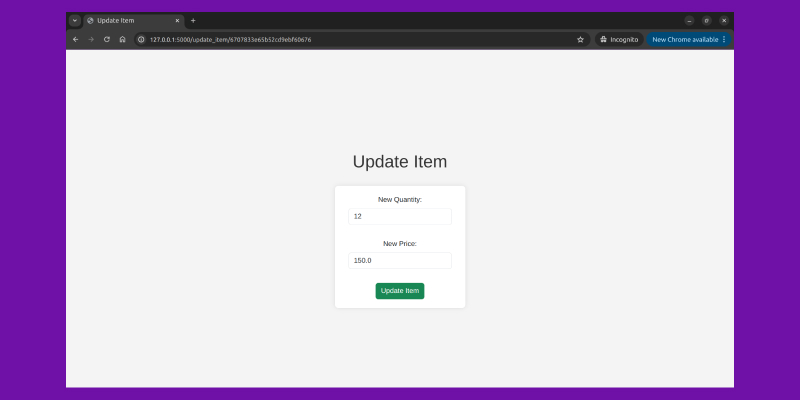
</html>So clicking on the update button of any item would take us to the update page and would prefill the fields with the current values of that item.
The update page would look like this.
Clicking on the delete button would remove the item from the database, and if there are no items in the database, it will display "No items to display."
This way, we have finished the HTML part as well. Now we have an inventory management system that can perform basic operations on data. The goal of this blog was to demonstrate how you can build a basic inventory management system.
If you’re planning to implement this in a production-grade environment or looking to scale quickly, consider exploring a few notable Node.js development companies that build robust inventory apps with real-time capabilities.
 WhatsApp
 Call Us
 Mail Us