


Building a Shopping App from Scratch: Features, Cost, Steps


Building a shopping app from scratch involves defining the app model, identifying core features, choosing the right tech stack, and developing the frontend and backend systems. The process includes market research, MVP development, testing, and launch, followed by continuous updates based on user feedback.
Most shopping apps do not fail due to development challenges. They fail because of poor planning, unclear feature prioritization, and unnecessary complexity. In fact, up to 90% of startups fail, often due to lack of market need and weak product direction, according to recent industry data.
The key is to focus on what actually drives usage and conversions. This means selecting the right app model, building only essential features in the initial stage, and choosing a development approach that aligns with your timeline and budget. Overbuilding early often leads to delays without improving user adoption.
A well-structured approach ensures that development remains efficient while the product stays aligned with user needs. Instead of trying to solve everything at once, successful apps evolve through focused iterations based on real user behavior and feedback.
Choosing the Right Shopping App Model
Before development, you need to decide what kind of shopping app you are building and how it will generate revenue. This decision shapes your feature requirements, backend structure, and overall development effort.
Without this clarity, it’s easy to build unnecessary features or choose an approach that doesn’t align with your business goals.
Use the breakdown below to evaluate which model fits your use case and constraints.
Types of Shopping Apps
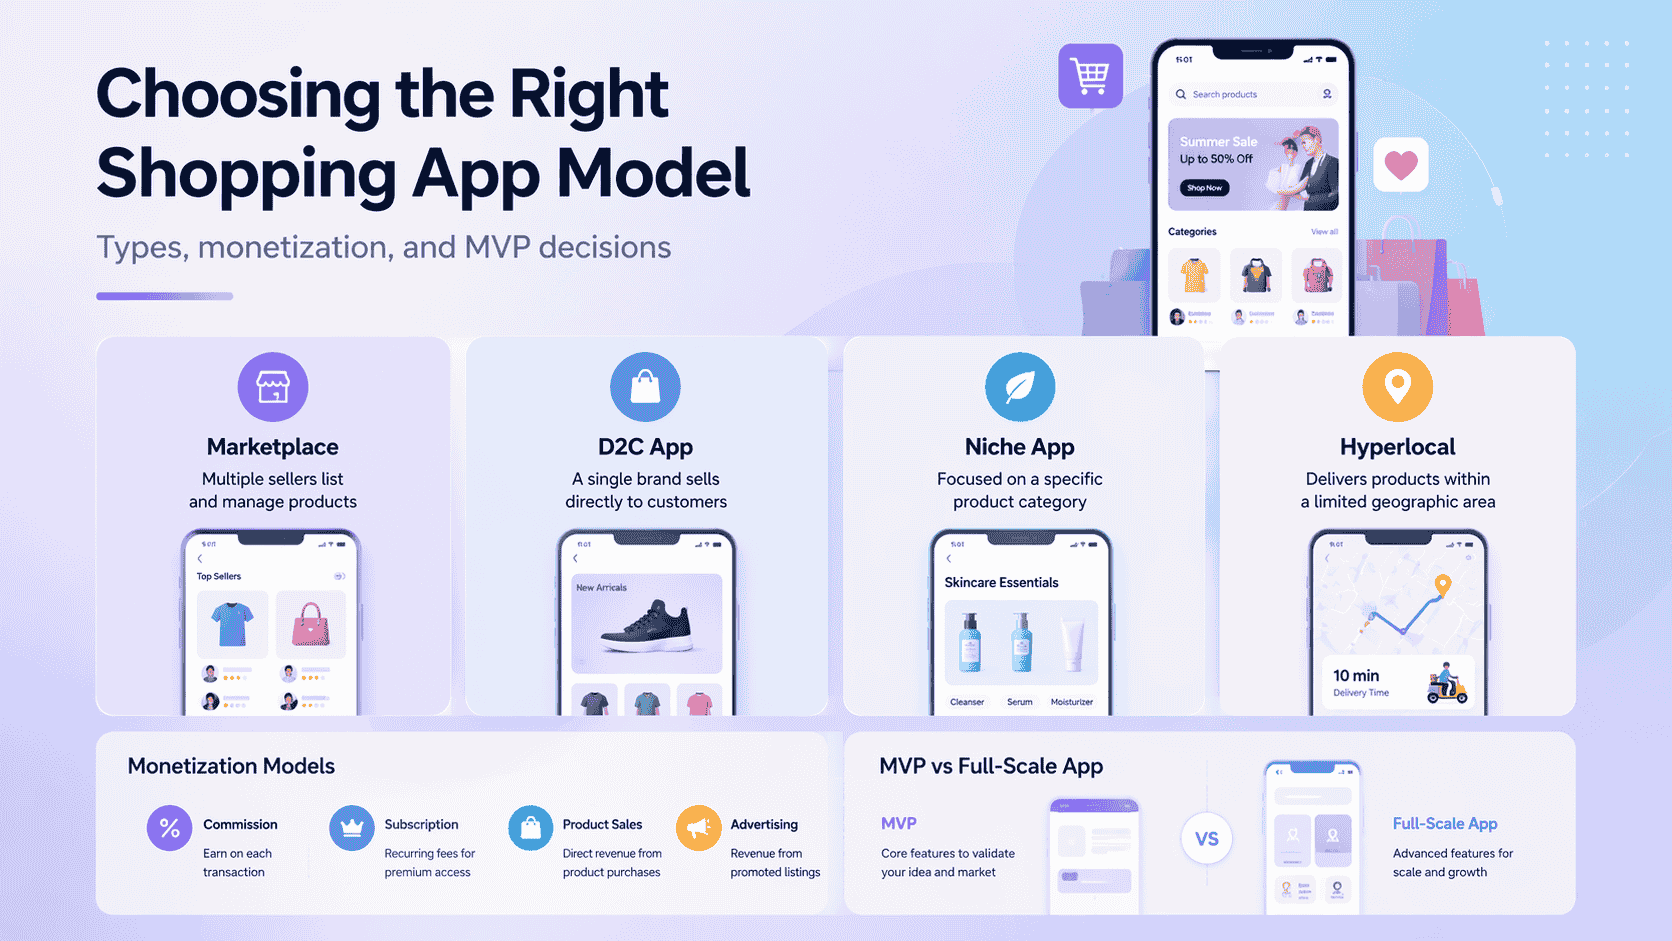
The type of shopping app defines how products are managed, how users interact with the platform, and how complex the system becomes. Each model supports a different business structure and requires a different level of development effort.
A marketplace model introduces additional layers such as vendor onboarding, commission handling, and order distribution across sellers. These requirements increase backend complexity and require more planning from the start.
A D2C app keeps the structure simpler by centralizing product control under one brand. This reduces dependencies and allows faster development and easier maintenance.
Niche apps focus on a specific category, which helps with positioning and targeted user acquisition. For example, building a pharmacy app involves healthcare-specific features such as prescription management and regulatory compliance.
Hyperlocal apps depend heavily on delivery logistics and location tracking, which adds operational complexity beyond the app itself.
Monetization Models
The monetization model determines how revenue flows through your app and what systems need to support it. This is not just a business decision it directly affects how transactions, payments, and user roles are handled.
Commission-based models rely on tracking every transaction and distributing earnings between platform owners and sellers. This requires precise payment handling and reporting systems.
Direct sales simplify the flow since revenue comes directly from product purchases. Subscription models introduce recurring billing and access control, which adds another layer to the backend.
Advertising depends on user volume, as revenue is tied to visibility. Choosing a monetization approach early ensures that the financial structure of the app is aligned with how it operates.
MVP vs Full-Scale App
The decision between launching an MVP or a full-scale app affects both timeline and investment. Building a complete product upfront often leads to longer development cycles without confirming whether all features are necessary.
An MVP focuses on essential functionality such as product listings, search, cart, and payment integration. This allows you to launch faster and gather real user feedback, which can guide future improvements.
A full-scale app is more suitable when requirements are clearly defined and backed by existing data or experience. In most cases, starting with an MVP reduces risk and ensures that development decisions are based on actual user behavior rather than assumptions.
Step-by-Step Process to Build a Shopping App
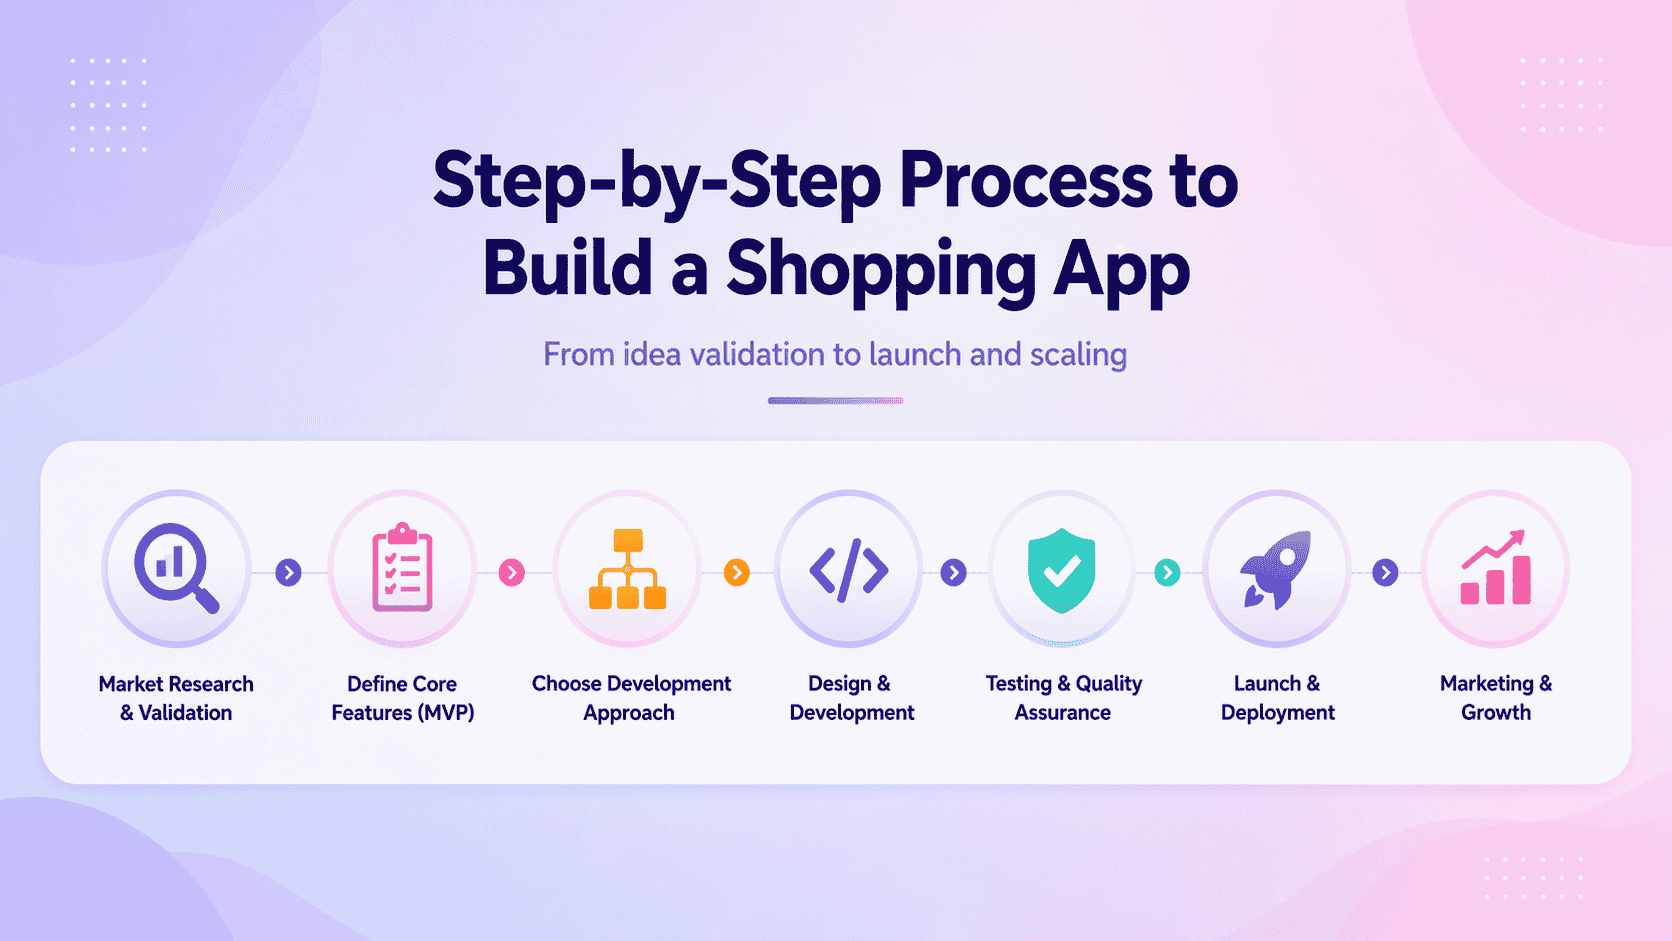
Building a shopping app is a structured process where each step builds on the previous one. Skipping early stages often leads to higher costs and features that don’t align with user needs.
The steps below outline how to move from idea validation to launch in a focused and efficient way.
Step 1: Market Research and Validation
Before starting development, you need to confirm that there is actual demand for your app idea and that you’re solving a real problem. Skipping this step often leads to building features no one uses or entering a crowded market without a clear advantage.
Mobile commerce data highlights why this step matters. According to this, mobile devices account for over 57% of global eCommerce sales, generating more than $2 trillion in revenue annually.
Growth trends further reinforce this shift. As shown in this, mobile commerce is projected to contribute close to 60% of total retail eCommerce sales, indicating continued user preference for app-based purchasing. These numbers line up with broader mobile app development statistics showing app-based commerce outpacing mobile web across nearly every retail category.
This makes one thing clear: demand already exists. The real challenge is identifying where your app fits and how it solves a specific problem better than existing solutions.
Market research should focus on analyzing competitors, studying user feedback, and identifying gaps in the current experience. Instead of copying features, focus on areas where usability can be improved or where a specific audience is underserved.
Validation comes from testing your idea before full development. Simple methods like landing pages, waitlists, or early prototypes can help measure user interest and ensure that your concept has real potential before investing further.
Step 2: Define Core Features (MVP)
Core features of a shopping app include a product catalog, search and filters, cart and checkout, payment integration, and order tracking.
Once your idea is validated, the next step is defining the core features required for your app. At this stage, the goal is to build a product that allows users to complete a purchase without friction, not to include every possible feature.
An MVP should focus on enabling a complete buying journey, from product discovery to order completion. This helps you launch faster and identify what actually matters to users before expanding further.
Core MVP Features and Their Role
Each of these features supports a specific stage in the user journey. Product discovery begins with the catalog and search system, while the cart and checkout flow determine whether users actually complete a purchase.
Payment processing needs to be reliable and simple, as even minor friction here can lead to drop-offs. Order tracking becomes important after the purchase, helping users stay informed and confident about their order through an order management system.
A well-built MVP focuses on getting these fundamentals right. Additional features like recommendations or personalization can be introduced later, once the core experience is stable and user behavior is clearly understood.
Step 3: Determine the App Development Approach
Once your features are defined, the next decision is how you will build the app. This is not just about cost it determines how fast you can launch, how much control you have, and how easily you can scale the product later.
The choice usually comes down to three options, like building an internal team, hiring freelancers, or working with a development agency.
In-house Team
An in-house team is suitable when the app is a core part of your business and requires continuous development. It gives you full control over product decisions, code quality, and long-term direction.
The trade-off is time and cost. Hiring skilled developers, designers, and managers takes effort, and maintaining the team increases ongoing expenses. This approach works best when you are building a long-term product rather than a quick launch.
Freelancers
Freelancers are often used for building early versions of the app or handling specific tasks. They are easier to hire and cost less upfront, which makes them suitable for testing ideas with limited investment.
The challenge lies in coordination and consistency. Managing multiple freelancers can lead to delays, uneven quality, and dependency on individuals who may not always be available when needed.
Development Agency
Mobile app development companies with past shopping-app or marketplace work is a reasonable way to shortlist faster. This is useful when you want structured execution and predictable timelines.
The trade-off is reduced day-to-day control, as the work is handled externally. Clear communication and defined requirements are necessary to ensure the final product aligns with your expectations.
Comparison of Development Approaches
For early-stage apps, freelancers or agencies help reduce time to launch. As the product grows and requires ongoing updates, transitioning to an in-house team becomes more practical.
Step 4: Choose Between Native and Cross-Platform Development
After deciding who will build your app, the next step is choosing how the app will be developed from a technical perspective. This decision affects performance, development time, and how easily your app can run across multiple platforms.
The right approach depends on your priorities. Some methods focus on performance, while others reduce development time by using a shared codebase.
Native App Development
Native development involves building separate apps for each platform, such as Android and iOS, using platform-specific technologies. This allows better performance, smoother interactions, and full access to device features.
The trade-off is higher development effort, as each platform requires its own codebase. This increases both time and cost, making it more suitable for apps where performance is a top priority.
Cross-Platform App Development
Cross-platform uses a single codebase to build apps for multiple platforms. Frameworks like Flutter and React Native are commonly used for this approach. Picking between the two often comes down to team familiarity and how much native-module access the app will eventually need.
This reduces development time and cost while still delivering a strong user experience. It is a practical choice for most shopping apps, especially when launching on both Android and iOS.
Hybrid App Development
Hybrid application development involves building apps using web technologies that run inside a mobile app container. These apps are quicker to develop and easier to maintain since most of the logic is shared across platforms.
However, performance and user experience may not match native or cross-platform apps. This approach is typically used for simpler applications or early-stage products.
App Builders and No-Code Platforms
App builders allow you to create a shopping app using pre-built templates and drag-and-drop tools. This is the fastest way to launch a basic version without writing code.
The limitation is reduced flexibility and customization. These platforms are useful for testing ideas, but not ideal for building feature-rich or long-term products.
Technical Approach Comparison
For most shopping apps, cross-platform development offers a practical balance between cost and performance. Native development becomes relevant when performance requirements are higher, while app builders are mainly useful for early validation.
Step 5: Choose the Right Tech Stack for Your Shopping App
A typical shopping app tech stack includes a frontend framework, backend system, database, and payment integration to support core functionality.
After deciding how your app will be built, the next step is selecting the technologies that will support its functionality. The tech stack determines how your app performs, how data is processed, and how easy it is to maintain and extend over time.
Instead of choosing too many tools, the focus should be on selecting technologies that are reliable, widely supported, and suitable for your specific requirements.
Frontend Development for User Interface
The frontend handles everything the user interacts with, including browsing products, navigating categories, and completing purchases. It needs to be responsive and consistent across different devices to ensure a smooth experience.
Frameworks like Flutter and React Native are commonly used because they allow you to build for multiple platforms using a single codebase. This helps reduce development time while maintaining a consistent interface.
Backend Systems for App Logic and Operations
The backend manages core functionality such as user authentication, product management, order processing, and communication between systems. It ensures that all user actions are processed correctly.
Technologies like Node.js and Python are widely used due to their flexibility and strong ecosystem. Python, in particular, is often preferred when building mobile apps that involve data processing or backend-heavy logic.
Database Selection for Storing App Data
The database stores all critical data, including product details, user information, and transaction records. The way this data is structured affects performance and how quickly information can be retrieved.
MongoDB is suitable for flexible data structures, while PostgreSQL works well for structured and relational data. The choice depends on how your data needs to be organized and queried.
Payment Gateway Integration for Transactions
Setting up a payment gateway is a critical part of enabling users to complete purchases securely and without friction. The integration should support commonly used payment methods such as cards, UPI, and digital wallets to ensure a smooth checkout experience.
Platforms like Stripe and Razorpay provide ready-to-use solutions for handling payments. A properly integrated payment system ensures smooth transactions, reduces failures, and builds user trust over time.
Tech Stack Comparison Across Key Layers
Key Considerations When Choosing a Tech Stack
Choosing the right tech stack is about balancing simplicity and capability. A well-supported and stable setup is easier to maintain and extend, while overly complex choices can slow down development and increase long-term effort.
Start with technologies that align with your current needs and expand only when required. This approach keeps development efficient and reduces unnecessary complexity.
Step 6: UI and UX Design for Ecommerce Apps
An effective shopping app design focuses on simple navigation, fast checkout, clear product information, and mobile-first usability.
Once the technical foundation is defined, the next step is designing how users will interact with your app. UI/UX design directly impacts how easily users can browse products, complete purchases, and return for future transactions.
The focus should be on reducing friction at every stage of the user journey. A well-designed interface improves engagement and increases the chances of conversion.
Simplified Navigation for Faster Browsing
Navigation should help users find products quickly without unnecessary steps. Clear categories, visible search, and intuitive layouts reduce the time it takes for users to explore the app.
Overcomplicated navigation often leads to drop-offs, especially on mobile devices. Keeping the structure simple ensures users can move between sections without confusion.
One-Tap Checkout for Faster Conversions
The checkout process should require minimal effort. Reducing the number of steps between cart and payment helps improve conversion rates.
Features like saved addresses, auto-filled details, and quick payment options allow users to complete purchases without interruptions. Fewer steps directly increase the likelihood of completing a purchase.
Reducing Cart Abandonment
Cart abandonment is often caused by friction during checkout, such as unexpected costs or complicated forms. Simplifying this process helps users complete their purchase without hesitation.
Providing clear pricing, delivery timelines, and a smooth transition from cart to payment creates a more reliable experience and reduces drop-offs.
Mobile-First Design Approach
Shopping apps are primarily used on mobile devices, so the design should prioritize smaller screens. This includes readable text, accessible buttons, and layouts that adapt across devices.
A mobile-first approach ensures usability remains consistent, which directly impacts engagement and repeat usage.
Key UX Principles for Shopping Apps
Small UX improvements often have a direct impact on conversions. Simplifying navigation, reducing checkout steps, and making key actions easier to access can significantly improve how users interact with your app.
Focusing on clarity and ease of use is more effective than adding extra features. In most cases, a clean and intuitive experience leads to better results than a complex interface.
Step 7: UI and UX Design for Ecommerce Apps
Once the technical foundation is defined, the next step is designing how users interact with your app. UI/UX design directly affects how easily users can browse products, complete purchases, and return for future transactions. Even small friction points in the interface can lead to drop-offs.
Navigation should be simple and predictable so users can find products without effort. Clear categories, visible search, and intuitive layouts reduce the time it takes to explore the app. Complicated navigation structures often cause users to leave before reaching the product page.
The checkout experience plays a critical role in conversions. Reducing the number of steps, enabling saved details, and offering quick payment options helps users complete purchases faster. Long or confusing checkout flows are one of the main reasons users abandon their carts.
Design should also prioritize mobile usage, as most shopping activity happens on mobile devices. This includes readable text, properly sized buttons, and layouts that adapt to different screen sizes. A mobile-first approach ensures the app remains usable and efficient across devices.
Key UX Elements and Their Impact
A clean and intuitive interface often performs better than a feature-heavy design. Simplifying navigation and checkout flows has a direct impact on conversions, while unnecessary complexity increases drop-offs.
Step 8: Developing Your Shopping App Architecture and Core Systems
Once the design and tech stack are defined, the next step is developing the core systems that power your shopping app. This stage focuses on how different components work together to handle user actions, manage data, and process transactions.
The objective is to build a structured system where the frontend, backend, and external services communicate efficiently. A well-defined architecture ensures that the app performs reliably as users browse products, add items to their cart, and complete purchases.
Authentication and authorization manage how users access the app and protect sensitive data. Users should be able to securely create accounts, log in, and perform actions based on their permissions.
API integration connects the frontend with backend services, allowing data to flow between systems. This enables key actions such as loading products, updating the cart, and processing orders without delays.
Database management and retrieving information such as product details, user data, and transaction records. Efficient data handling ensures that the app remains responsive and accurate.
Payment system integration allows users to complete transactions securely. This involves connecting with payment gateways and ensuring that transactions are processed without errors.
Third-party services extend functionality by adding features such as notifications, analytics, and delivery tracking. These integrations improve the overall experience without requiring additional development from scratch.
Core System Components and Their Role
A clear architecture helps prevent issues as your app grows. Structuring these systems properly from the start makes it easier to maintain the app and add new features without breaking existing functionality.
Step 9: Testing and Quality Assurance
Testing a shopping app involves validating functionality, performance, and security to ensure a stable user experience.
Once the core systems are developed, the next step is ensuring that the app works as expected under different conditions. Testing helps identify issues early, improve stability, and ensure that users have a consistent experience across devices.
The goal is to validate that every feature functions correctly, the app performs well under load, and user data remains secure. Skipping proper testing often leads to crashes, slow performance, and loss of user trust after launch.
Key Testing Areas Table
Functional testing ensures that each feature behaves as expected. This includes validating user flows such as product browsing, adding items to the cart, and completing transactions without errors.
Performance testing evaluates how the app handles multiple users and large amounts of data. This helps ensure that the app remains responsive even during peak usage.
Security testing focuses on protecting user information and preventing unauthorized access. This includes validating authentication systems and ensuring that sensitive data is handled securely.
Testing should not be treated as a final step but as an ongoing process. Identifying and fixing issues early helps maintain app quality and reduces the risk of failures after launch.
Step 10: Launch and App Store Optimization
Once testing is complete, the next step is launching your app on app stores and ensuring it is discoverable. App Store Optimization (ASO) helps improve visibility, attract users, and increase downloads without relying only on paid marketing.
The goal is to present your app clearly while aligning with how users search for shopping apps. A well-optimized listing increases the chances of organic installs.
Key Elements of App Store Optimization
A clear title and description help users understand what the app offers while improving search rankings. Screenshots and previews provide a visual walkthrough, which plays a major role in convincing users to install the app.
Following app store guidelines is essential to avoid delays or rejection during submission. Early reviews and ratings help establish credibility and improve visibility in search results.
A well-optimized app listing can significantly improve downloads without additional marketing spend. Clear messaging and strong visuals often make the difference between a user installing your app or moving on.
Step 11: Marketing and User Acquisition
Launching the app is only the beginning. To drive installs and conversions, you need a structured marketing strategy that targets users before and after launch.
The focus should be on building awareness, attracting the right audience, and converting them into active users.
Key Marketing Channels
Pre-launch campaigns help generate interest before the app is available, making the launch more effective. Influencer marketing allows you to tap into existing audiences and build trust faster.
Paid advertising provides immediate visibility, while retargeting helps bring back users who showed interest but did not complete a purchase.
Focusing on the right audience is more effective than targeting everyone. A smaller, relevant user base often leads to better engagement and higher conversions.
Step 12: Maintenance and Scaling
After launch, ongoing maintenance is required to keep the app stable and relevant. This includes fixing issues, improving performance, and adding new features based on user feedback.
The goal is to ensure that the app continues to perform well as user activity grows.
Key Areas of Maintenance
Performance monitoring helps identify technical issues before they affect users. Regular updates ensure that the app stays aligned with user expectations and market trends.
As the number of users increases, infrastructure needs to scale accordingly to maintain performance and reliability.
Consistent updates and performance improvements help retain users over time. An app that is regularly maintained is more likely to sustain engagement and growth.
Factors That Affect the Cost of Shopping App Development
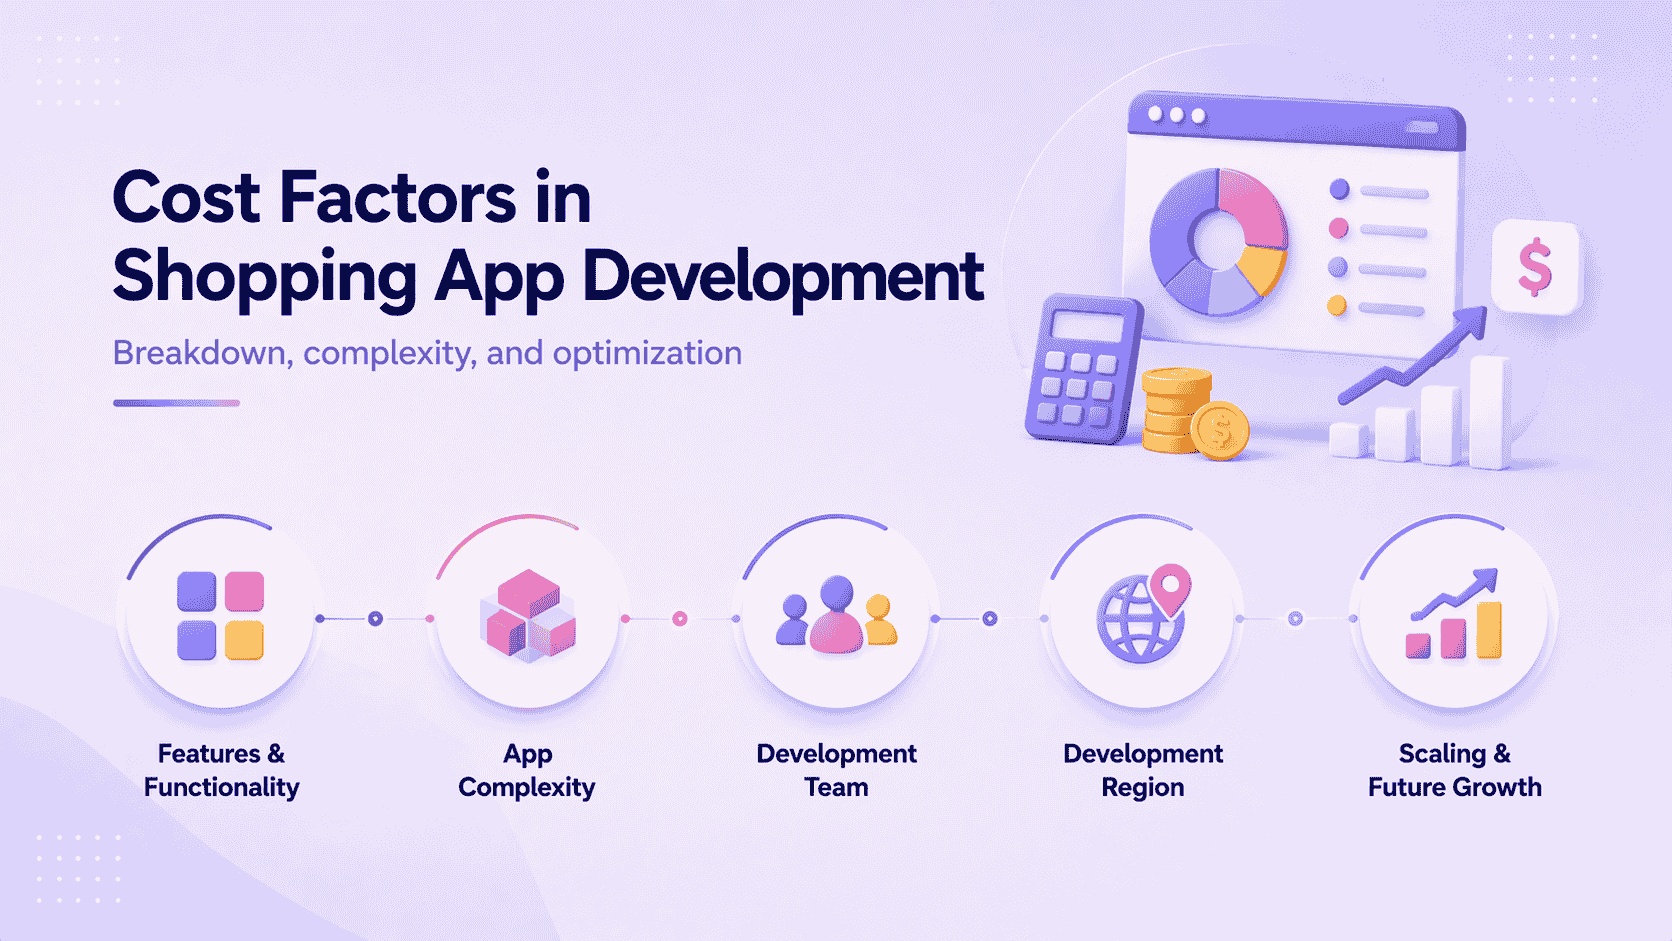
The cost of building a shopping app is not fixed. It depends on multiple variables such as features, app type, development approach, and the region of your development team. These same variables show up across most mobile app development cost estimates, though a shopping app adds catalog, payment, and inventory logic most simpler apps don't need. Instead of focusing on a single number, it’s more useful to understand where your budget will be spent and what drives those costs.
A basic shopping app will cost significantly less than a feature-heavy platform. The key is understanding which decisions increase cost and which ones help control it.
Cost Breakdown by Development Stage
Every stage of development contributes to the total cost. Knowing how the budget is distributed helps in planning and avoiding overspending in later stages.
Development takes the largest share because it involves building all core systems. Maintenance becomes an ongoing cost after launch to keep the app stable and updated.
What Drives the Cost the Most
The biggest cost driver is feature complexity. Adding more features increases development time, testing effort, and system dependencies. A simple app with essential functionality is much faster and cheaper to build than a feature-rich platform.
The type of app also plays a major role. A marketplace requires vendor management, commissions, and dashboards, which adds more layers compared to a basic D2C app.
Development choices also impact cost. Native apps require separate builds, while cross-platform apps reduce effort. Similarly, agencies, freelancers, or in-house teams each come with different cost structures.
Feature Complexity and Cost Impact
Not all features contribute equally to cost. Some are essential, while others significantly increase development effort.
Core features like product catalogs, search, cart, and checkout form the base of the app and are relatively straightforward to build. These are required for any functional shopping app.
Features like user accounts, payments, and order tracking add moderate complexity because they involve integrations and secure data handling. These are necessary but require careful implementation.
Advanced features such as AI recommendations, AR experiences, and analytics increase cost the most. They require additional logic, integrations, and testing, which makes them more suitable for later stages rather than initial builds.
Estimated Cost Based on App Type
The overall cost depends heavily on what type of app you are building.
A basic app focuses on essential functionality, while advanced apps require more systems and integrations, increasing both time and cost.
Cost by Development Region
Development cost varies depending on where your team is located. This difference is driven by hourly rates and the availability of skilled developers.
Choosing the right region depends on your budget and how closely you want to manage the development process.
How to Reduce Shopping App Development Cost
Reducing cost comes down to making better decisions early. Starting with an MVP helps you launch faster and avoid spending on features that users may not need.
Using cross-platform frameworks reduces development effort compared to building separate native apps. This approach allows you to reach multiple platforms with fewer resources. Comparing cross-platform app frameworks side by side is worth doing before committing, since the trade-offs shift depending on how performance-sensitive the app needs to be.
Using third-party services for payments, notifications, and analytics also helps reduce development time. Building everything from scratch increases complexity without adding immediate value.
The cost of a shopping app is shaped more by decisions than by development itself. A focused feature set and a phased approach can significantly reduce costs while still delivering a functional product.
Common Mistakes to Avoid When Building a Shopping App
Even with the right plan, certain mistakes can slow down development, increase costs, or reduce user adoption. Avoiding these early helps ensure that your app performs well and delivers a better user experience.
Many of these issues are not technical but strategic. They come from poor prioritization, lack of planning, or trying to build too much too soon. Identifying these risks early can save both time and budget.
Common Mistakes and Their Impact
Overbuilding the MVP often results in wasted effort, as many features may not be used by users. Starting with a focused set of features allows faster launch and better decision-making based on real feedback.
The checkout experience directly impacts conversions. Even small friction points can lead to drop-offs, which makes it important to keep the process simple and clear.
Ignoring scalability and backend planning can create problems later when user activity increases. Fixing these issues after launch is usually more expensive than planning for them early.
Most failures are caused by poor prioritization rather than lack of features. Keeping the app simple, efficient, and user-focused leads to better long-term results.
Conclusion
Building a shopping app requires more than just development. It involves making the right decisions at every stage, from defining features to choosing the development approach and managing costs. A clear plan helps avoid unnecessary complexity and keeps the project aligned with user needs.
Focusing on core functionality first allows you to launch faster and validate your idea. Instead of trying to build a feature-heavy app from the start, prioritizing usability, checkout flow, and performance delivers better results in the early stages.
As your app grows, continuous improvements based on user behavior and feedback become essential. A structured approach to development, combined with smart feature planning, helps build a shopping app that is efficient, reliable, and ready to scale.
 WhatsApp
 Call Us
 Mail Us